
Bulk messaging in Telegram, WhatsApp, Instagram, and other messengers
Learn how to create and set up bulk messages in Telegram, WhatsApp, Instagram, and other messengers with the KWIGA platform.
Mass broadcasts in KWIGA let you send messages to subscribers of connected bots in Telegram, WhatsApp, Instagram Direct, Facebook Messenger, and Viber.
Use them to announce new products and webinars, send reminders, share useful materials, and let customers know about special offers.
You can choose recipients, personalize messages, add files and buttons, schedule sending, and set up recurring broadcasts.
Creating a broadcast
Go to "Chatbots and messengers" → "Broadcasts" and click "Create" (+).
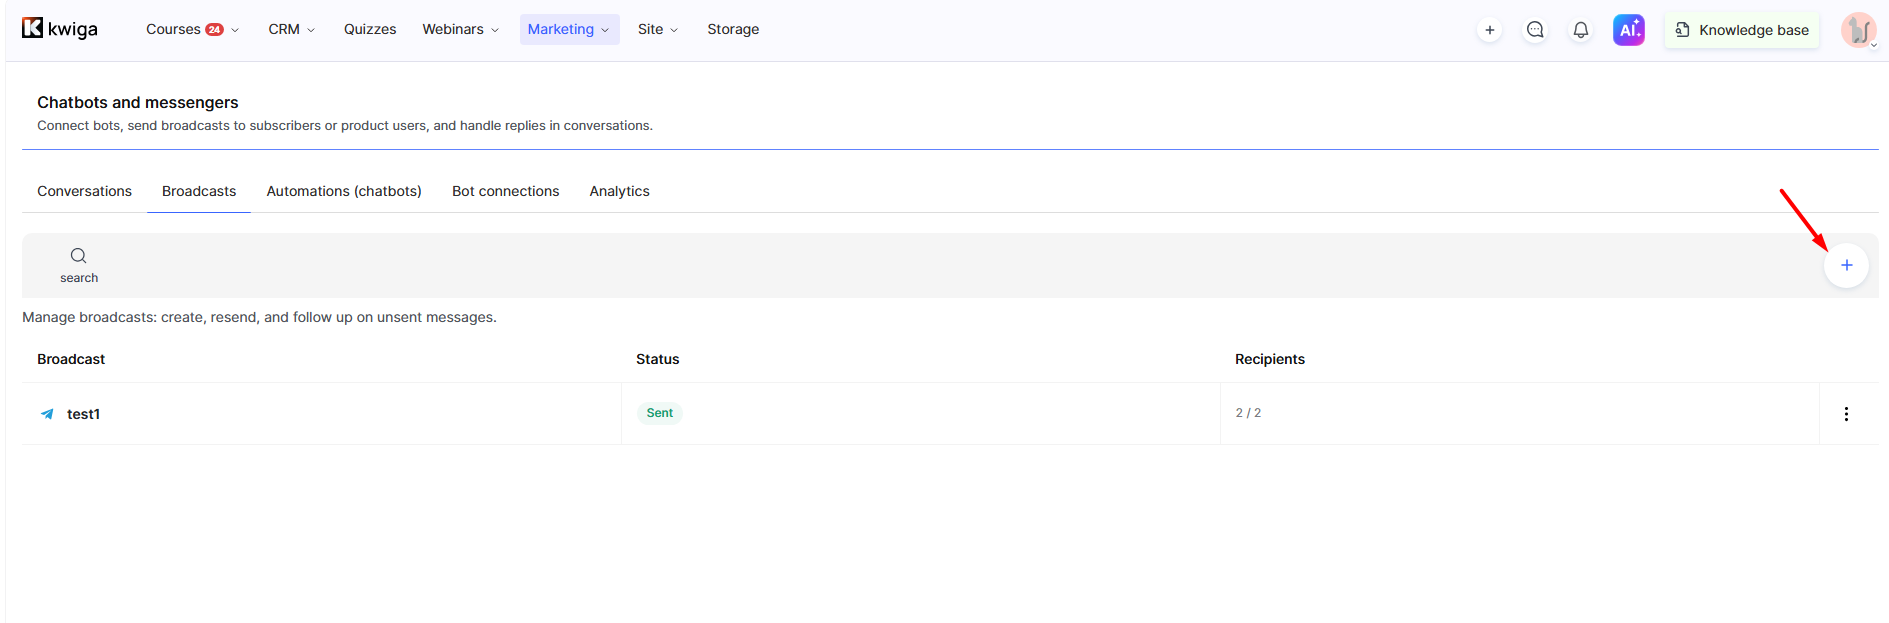
Broadcast setup consists of several blocks.
1. Basic settings
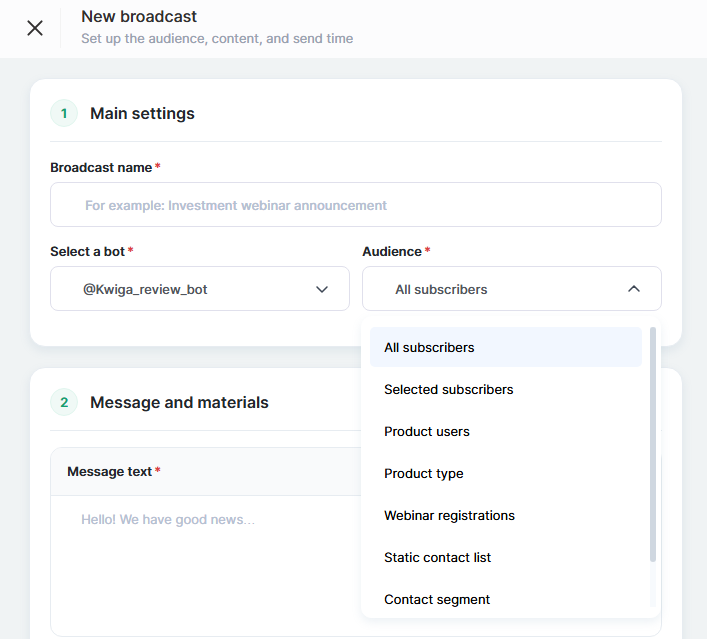
First, enter the basic information about the broadcast.
-
Broadcast name — an internal name that helps you find the broadcast in the list and tell it apart from others. For example, "New course announcement" or "Webinar reminder". Recipients don't see this name.
-
Select a bot — choose which bot and messenger to send the message through. For example, if your subscribers talk to you via a Telegram bot, select it to send the broadcast.
-
Audience — choose the users who will receive the message.
Once you select a bot, you can choose the audience.
Choosing the audience
KWIGA lets you choose recipients by different criteria. This helps you send messages only to users they're relevant for, not to every subscriber.
The following options are available:
-
All subscribers — all users subscribed to the selected bot. Use this for general news, announcements, and promotions.
-
Selected subscribers — lets you pick specific recipients yourself. For example, when you need to notify only a certain group of users about changes.
-
Product users — subscribers linked to users of a specific product. Handy for communicating with buyers or course members: you can tell them about a new lesson, extra materials, or changes to the course.
-
Product type — defines the audience by product type. Useful when you need to message users linked to a certain product category.
-
Webinar registrations — users registered for the selected webinar. Use this for start reminders, sending the join link, or extra materials.
-
Static contact list — recipients from a pre-built contact list. Suitable for working with a specific group of customers you want to reuse.
-
Contact segment — audience based on CRM segmentation conditions. For example, you can send a special offer to customers who have already bought a certain product, or to users who match other criteria.
Tip: before launching, check that the selected audience matches the purpose of the message. For example, a webinar reminder is best sent to registered members, and information about a new product — to all interested subscribers.
2. Message and materials
In this block, you create the message subscribers receive.
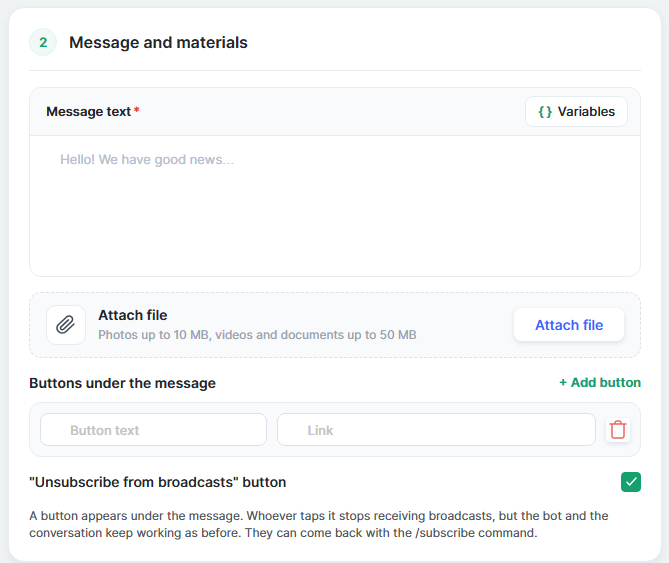
Message text
Enter the broadcast text. It can be an announcement, an invitation, a reminder, information about a new product, or a special offer.
Using the button «Variables" you can add dynamic values to the text. This lets you personalize the message for each recipient, for example, by addressing them by name.
Attach file
You can add extra materials to the message:
-
photos — up to 10 MB;
-
videos and documents — up to 50 MB.
This is handy when you need to send a presentation, instructions, a promo banner, a video, or learning materials right in the messenger.
Buttons below the message
Using the button "Add button" you can add an interactive button with text and a link.
Buttons help guide the recipient to the right action, for example:
-
"View program" — opens the course page;
-
"Register" — opens the registration form;
-
"Learn more" — opens the product description page;
-
"Buy" — opens the payment page.
Use buttons to shorten the path from receiving the message to taking the action.
"Unsubscribe from broadcasts" button
If needed, enable this option to add an unsubscribe button to the message.
A user who clicks it will stop receiving broadcasts, but the bot and their private chat will keep working. They can resubscribe with the command /subscribe.
This lets users manage bulk messages themselves without losing the ability to chat with the bot.
3. Send later
If you want to prepare a broadcast in advance but send it on a specific day and time, turn on the toggle "Send later".
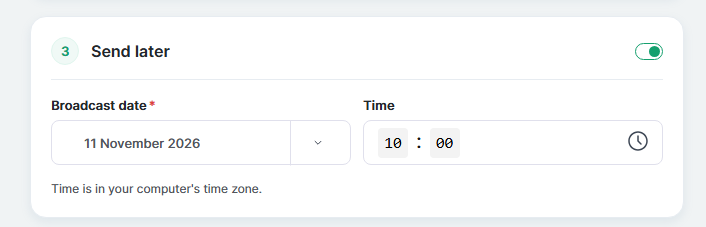
Specify:
-
Broadcast date — the day the message should be sent.
-
Time — the sending time.
The time is based on your computer's time zone.
This feature is handy for planning communication: for example, you can prepare a course launch announcement, a webinar reminder, or a message about the start of a promotion in advance.
4. Repeat
If you need to send the same message regularly, turn on the toggle "Repeat".
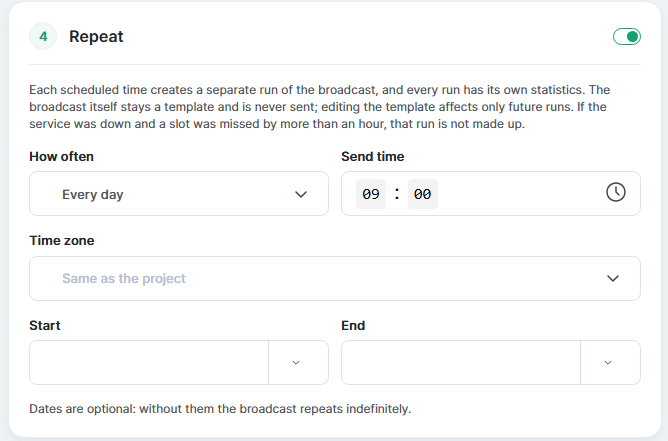
This can be useful for daily reminders, regular news, informational messages, or recurring announcements.
The following settings are available:
-
How often — choose daily repetition or sending on specific days of the week.
-
Send time — set the time of each run.
-
Start — set the date when repetitions start.
-
End — set the date when repetitions end.
Start and end dates are optional. If you don't set them, the broadcast will repeat with no date limits.
Important: a separate broadcast run is created on the set schedule, with its own statistics. The broadcast itself remains a template and isn't sent as a separate message. Template changes only affect future runs.
If the service was down and the scheduled time was missed by more than an hour, that run isn't made up.
5. Additional settings
In this section, you can set additional conditions that help you target recipients more precisely and control message frequency.
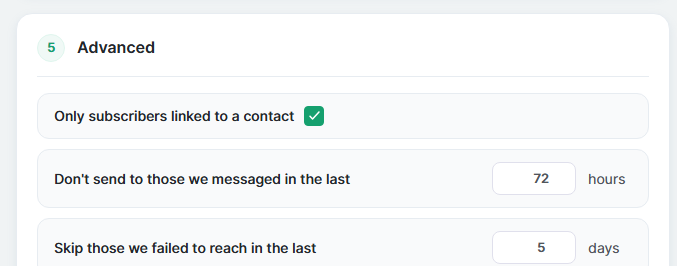
-
Only subscribers linked to a contact — the broadcast will only go to bot subscribers who have a matched and linked contact in KWIGA CRM. Use this option if the message is meant only for identified customers whose data is in your CRM.
-
Don't send to those messaged in the last N hours — excludes users who have already received messages within the specified time. This helps avoid sending too many messages, especially if you communicate with subscribers regularly.
-
Skip those who couldn't be reached in the last N days — excludes users to whom a message couldn't be delivered during the specified period. This way, you won't retry sending to those who recently had delivery issues.
Checking and launching the broadcast
Before creating the broadcast, use the additional checks:
-
Check audience — see how many users match the set conditions. This helps make sure you've chosen the right audience and are reaching the right number of recipients.
-
Send test to myself — check how the message looks in the messenger and whether the text, variables, buttons, and attachments display correctly.
After checking, click "Create broadcast".
If you set up scheduled sending, the broadcast will wait for the scheduled time. If you set up repetition, runs will happen according to the set schedule.
Viewing and managing broadcasts
The "Broadcasts" tab shows a list of created broadcasts. Here you can see their names, statuses, and number of recipients.
You can view detailed information for each broadcast.
Content and recipients
On this tab, you can view:
-
message text and attached materials;
-
total number of recipients;
-
list of subscribers the broadcast is intended for;
-
linked KWIGA contacts, if subscribers are matched with contacts;
-
delivery status for each recipient.
You can use the filter and search to find a specific subscriber or view users with a specific status.
This is useful when you need to check whether a specific client received the message, or to find those it wasn't delivered to.
Metrics and clicks
This tab shows the broadcast delivery statistics:
-
Total — total number of recipients.
-
Sent — number of messages that were sent successfully.
-
Pending — messages still waiting to be sent.
-
Error — number of messages that failed to send.
-
Skipped — number of recipients skipped according to the broadcast conditions.
You can also see the delivery rate and clicks on the buttons below the message, if any were added.
These statistics help you evaluate the broadcast results: check how many messages were sent, whether there were delivery issues, and whether users interacted with the added buttons.
Reusing a broadcast
To create a similar broadcast, use the button "Duplicate".
This lets you use the previous settings and content as the basis for a new message. You don't need to set everything up from scratch — just change the data, audience, or text you need.
In the broadcasts section, you can also resend messages and send those that failed to be delivered on the previous attempt.
Please note: after a mass broadcast is sent, the messages appear in private chats with the corresponding subscribers, marked "Broadcast". This helps you tell mass messages apart from regular private conversations with the user.
Frequently asked questions
What size files can I attach to a campaign?
Photos – up to 10 MB, videos and documents – up to 50 MB.
What happens if the recipient clicks the "Unsubscribe from campaigns" button?
They will stop receiving campaigns, but the bot and your direct chat with them will keep working. They can resubscribe with the /subscribe command. The button appears in the message if you enable this option.
Which time zone is used to send a scheduled campaign?
The time is based on your computer's time zone.
What happens to recurring campaign runs if you change the campaign text?
On the set schedule, a separate run with its own statistics is created, while the campaign itself remains a template. Changes to the template only affect future runs. If the service was down and the scheduled time was missed by more than an hour, that run is not made up.
How do I avoid sending a campaign to people who were recently contacted or whose messages weren't delivered?
There are two conditions in the advanced settings. "Don't send to those messaged in the last N hours" excludes users who have already received messages within the specified time. "Skip those who couldn't be reached in the last N days" excludes users to whom a message failed to be delivered within the specified period.
How do I test a campaign before sending it?
Before you create a campaign, you can run two checks: "Check audience" shows how many users match the conditions, and "Send test to myself" shows how the message looks in the messenger (text, variables, buttons, and materials).
Will the campaign be visible in private chats with subscribers?
Yes. Once sent, messages appear in the private chats with the corresponding subscribers and are labeled "Campaign" to distinguish them from regular private conversations.
Thanks for your feedback!
Thanks! We'll update the article. Need an answer now? Contact support