Articles:
A step-by-step guide to creating and managing participant statuses for effective gamification of the learning process.
In this article:
Gamification is an effective tool for boosting motivation and engagement in your learning process. When students see their progress represented by points and statuses, they naturally strive to improve their performance. This creates additional motivation for regular learning and active participation in the course.
Status Configuration
The platform provides the necessary tools to build an effective gamification system.
To get started, go to Courses → Gamification, Loyalty.

This article provides a detailed walkthrough of setting up participant statuses.
Before creating statuses, you must activate the feature. Go to the Statuses tab and enable the toggle in the Status Settings block. Once activated, you'll gain full access to status creation and management tools.

The platform offers 4 default statuses, which you can use as-is or fully customize to your needs.

To add a new status, click the + Status button.

Each status can be customized individually based on your course’s specifics and student needs.
Creating a Status
-
Visual Design

Add a vibrant icon in .jpg, .png, or .jpeg format. Choose a small image that loads quickly and displays clearly. The image will appear in a 40x40 pixel square. If your image has different proportions, the system will automatically scale it proportionally to cover the entire element without empty areas.
The status name should be clear and motivating. For example, instead of a plain "Level 1," use names like Beginner or Explorer — something that gives students a sense of achievement and progress.
-
Grouping Statuses for Better Organization

If you have multiple courses or different learning tracks, it's helpful to create separate status groups. This allows students to have different statuses in various knowledge areas. For instance, a student may be an Expert in one course and a Newbie in another.
To create a new status group, go to Gamification, Loyalty → Statuses tab → click the Group button.

Add a group name and click Create. Then build your own set of statuses with specific award conditions for that group.
Alternatively, you can leave the status in the general group to reflect the student's overall achievements across the entire project. This approach works well for building a universal motivation system.
-
Status Earning Conditions

The most important part of the setup is defining clear conditions for earning a status. The platform offers two main approaches to configuring these conditions.
Point-based condition. This is the standard and most common method — set the required number of points and specify whether the condition applies to the entire project or to a specific product. A student receives the status once they accumulate the required points.
Event-based condition. You can assign a status based on a participant’s actions on the platform. Select an event type from the list of available conditions — these can be events related to completing courses, marathons, quizzes, or other products. For each condition, you can specify a particular product and additional parameters.
You may select more than one condition — they will be combined with the logical operator “AND”, meaning the status is granted only when all listed conditions are met.
Recommendation: create conditions that are achievable but not too easy. The student should feel that the status is earned through their effort.
Don’t forget to click Save condition and Confirm settings at the end.
Additional Configuration Options
Status Visibility
Sometimes, it's necessary to hide certain statuses from students. This is useful during the platform setup phase or for creating special statuses used for segmentation. Use the eye icon to hide a status. In this case, the status will still function within the system but will not be visible to the student.

Manual Status Management
For maximum flexibility, enable the Allow Manual Changes toggle.

This feature allows you to manually change a student's status via the Gamification tab in their contact profile, regardless of automatic conditions.
It's beneficial for rewarding unique achievements or accounting for individual circumstances.
Notification Settings for Status Awards
Keeping participants informed of their achievements helps maintain motivation. To do this, enable the Notifications feature.

The platform offers two options:
-
Send internal notifications through the platform’s notification module
-
Send email notifications with the option to create a custom message template
Personalized notifications help participants feel recognized for their efforts and encourage continued engagement.
How Statuses Are Displayed to the Student
In the student's Dashboard profile, participants can view their progress and current status.
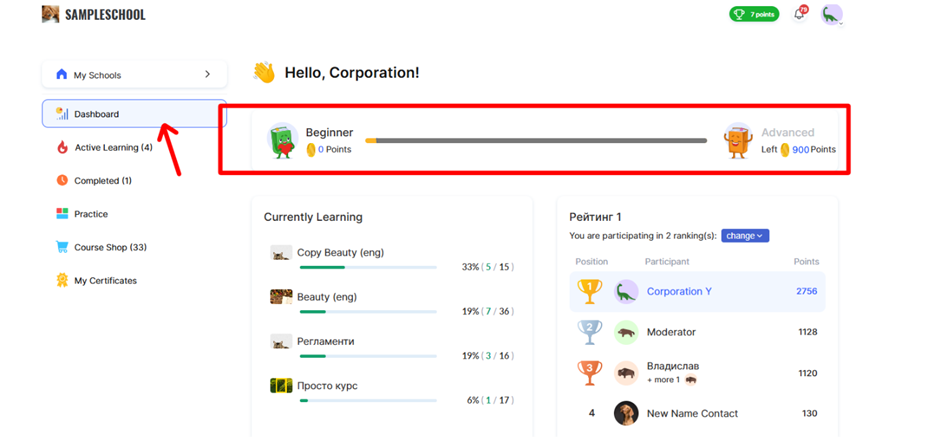
If earning the next status requires collecting a certain number of points, the student sees a progress bar showing the points earned and the total required.
If the next status is granted for meeting specific conditions (not points-based), the progress bar appears grey, and instead of points, a text description of the requirement is shown →. When the student clicks this link, a window opens with a detailed explanation of the conditions needed to obtain the next status.
Properly configured statuses encourage active learning. The status system acknowledges participants’ achievements and motivates them to continue developing.
Remember: Effective gamification is a balance between challenge and attainability. Set realistic conditions for earning statuses so learners feel a sense of progress and satisfaction from their achievements. Regularly review participant activity and adjust settings as needed to achieve optimal results.
Didn't find the answer? Contact the support service via online chat or Telegram