
How to Organize Technical Support for Course Participants
Set up a method for collecting technical requests through a non-graded LMS assignment to ensure effective communication with course participants.
During an online course, participants may encounter not only learning tasks, tests, or homework but also technical issues. These can include questions about the platform’s functionality, course completion conditions, access to materials, or any other aspects beyond the curators’ responsibility.
To ensure effective communication and support, a separate mechanism for collecting such requests can be implemented. One of the most convenient options is using quizzes, which help structure requests and simplify their processing.
How to Create a Field for Technical Questions
To set up an efficient system for collecting technical questions, you first need to create a corresponding assignment in the LMS. This task will function similarly to homework but without grading.
How to Create an Assignment:
1. Go to the Quizzes menu and click + Quiz.
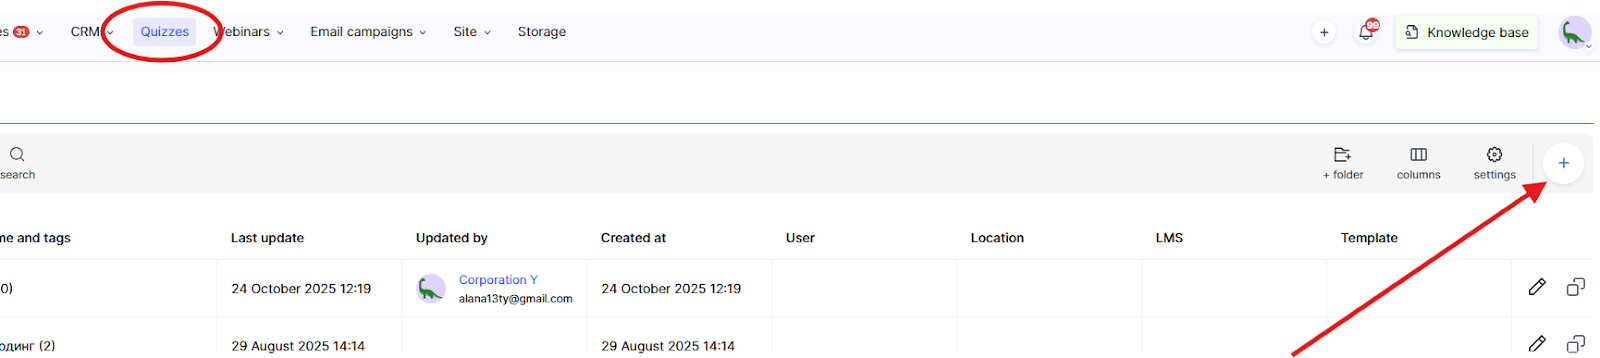
2. Enter the assignment name — for example, Technical Support.
3. Select the LMS Assignment type.
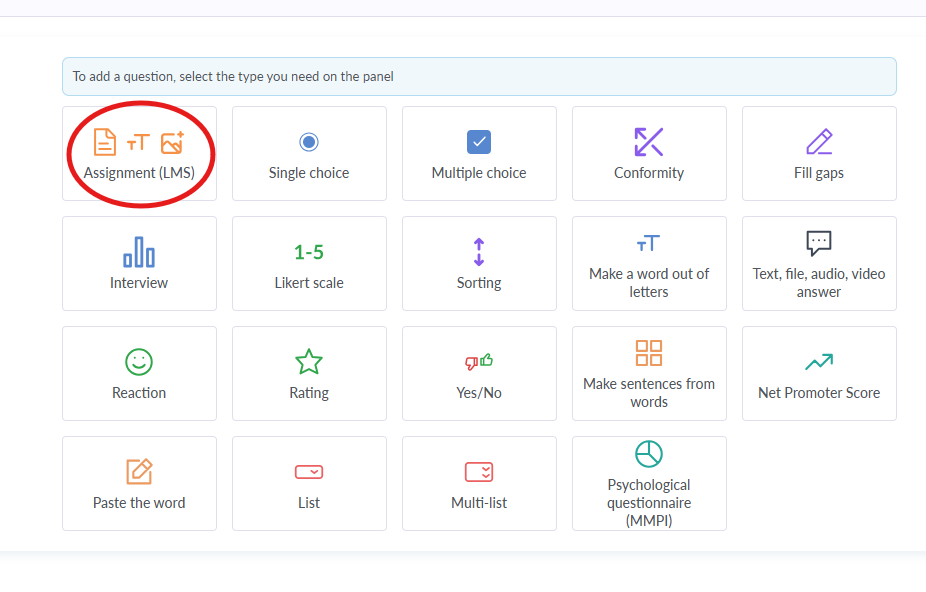
4. Add a question explaining to participants what types of issues they can submit.
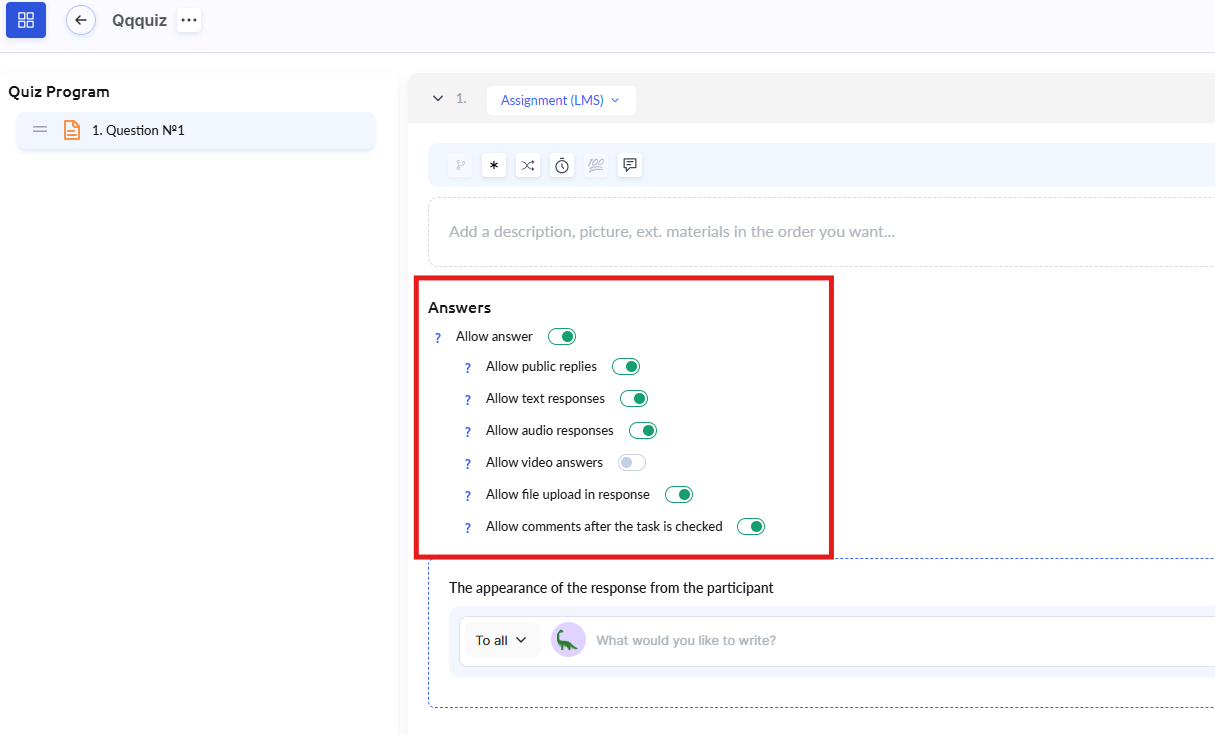
5. Configure the answer types — enable text responses, allow commenting after review, and, if necessary, permit file uploads (for example, screenshots).
6. Save the quiz and go to its settings.
After creating the quiz, you can adjust its parameters according to the needs of technical support, for example: 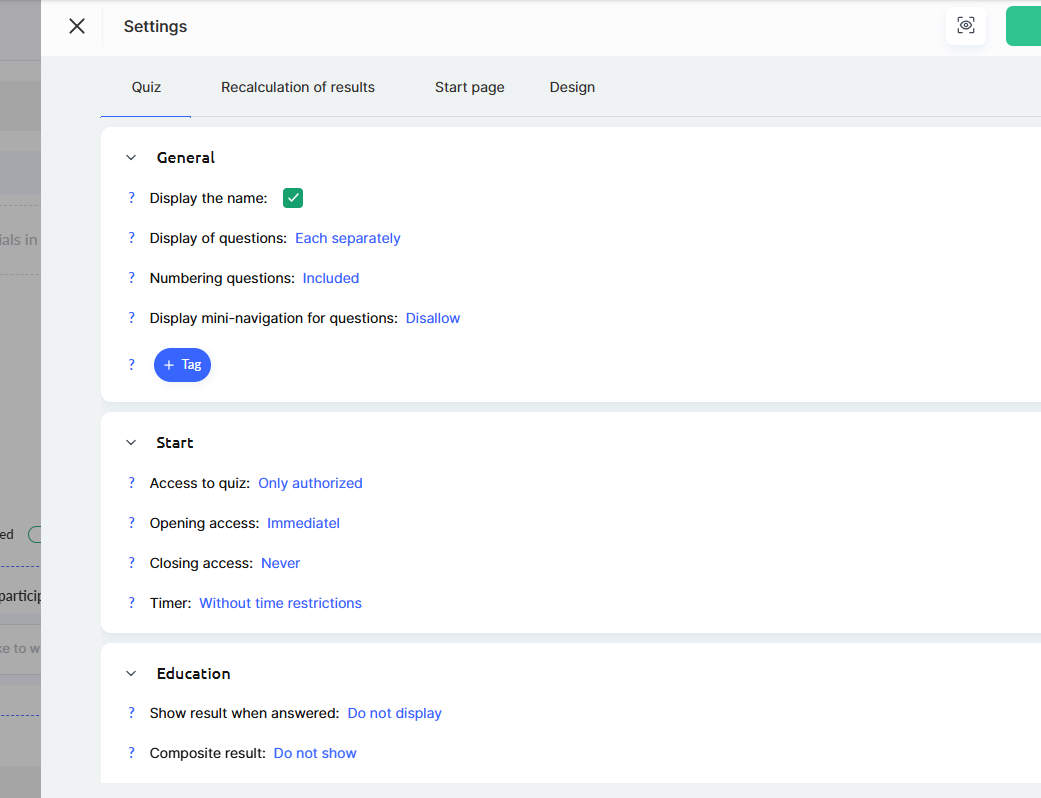
● No grading – participants’ responses will not require scores or automatic evaluation.
● Curator review – all requests will be sent to the manager for review, who will provide the necessary response.
● Display responses after submission – participants will be able to view their requests and received replies within the lesson.
● Commenting option – both the participant and the curator can clarify details in the discussion thread.
How to Add a Field for Technical Questions to a Lesson
To add a field for technical questions, you need to:
-
Open the course and go to the Lessons tab.
-
Open the Lesson Builder.
-
Choose one of the following ways to add it:
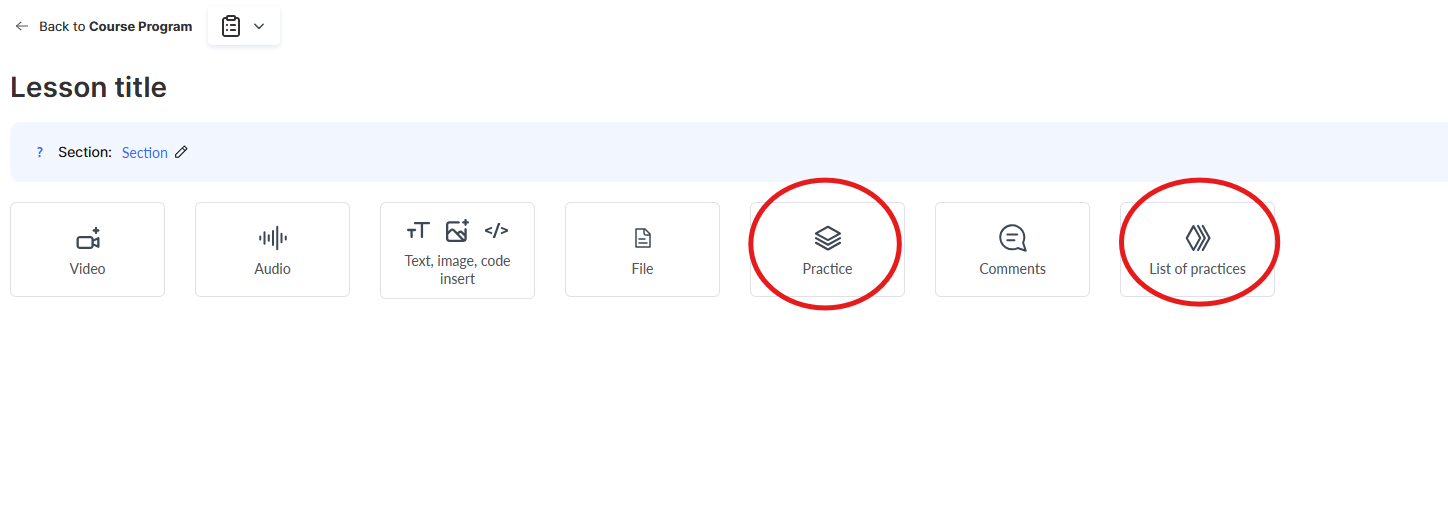
Practice – use this option if the field should be part of the lesson materials and appear directly below the lesson content.
Practice List – use this option if the field should be placed on a separate page that the student can access via a link in the lesson.
Both options support open-ended questions, file uploads, audio and video responses, as well as the ability to enable review and comments. You can find more details on adding assignments to a lesson in a separate article.
Quiz Settings: Excluding from Progress
Since this field serves a supplementary purpose and is not part of the main learning program, it’s important to exclude it from the course progress.
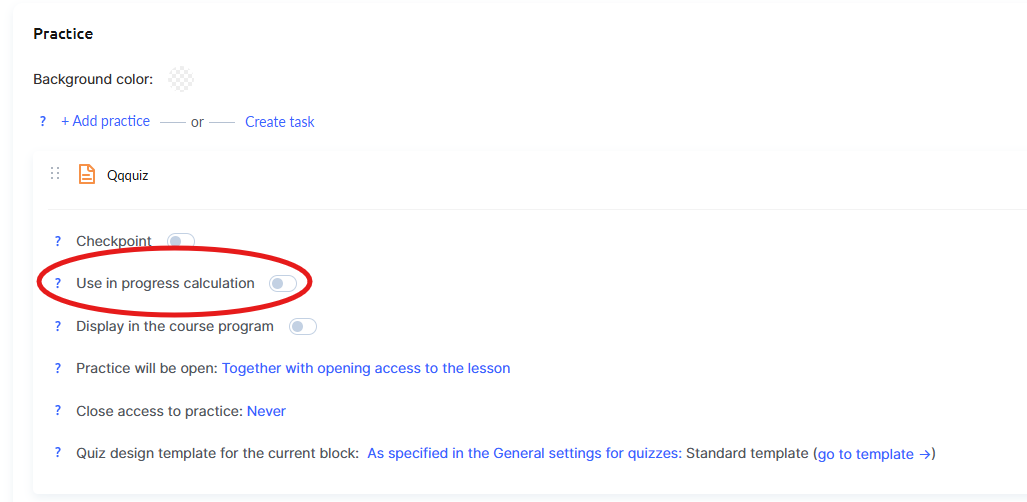
This ensures that it won’t affect participants’ completion statistics or create unnecessary obstacles.
Access and Visibility Settings for the Assignment
If a specific team member is responsible for handling technical questions, you can restrict access to these assignments to certain curators only. The settings are available directly in the course: open its settings and go to the "Team, assistants" tab.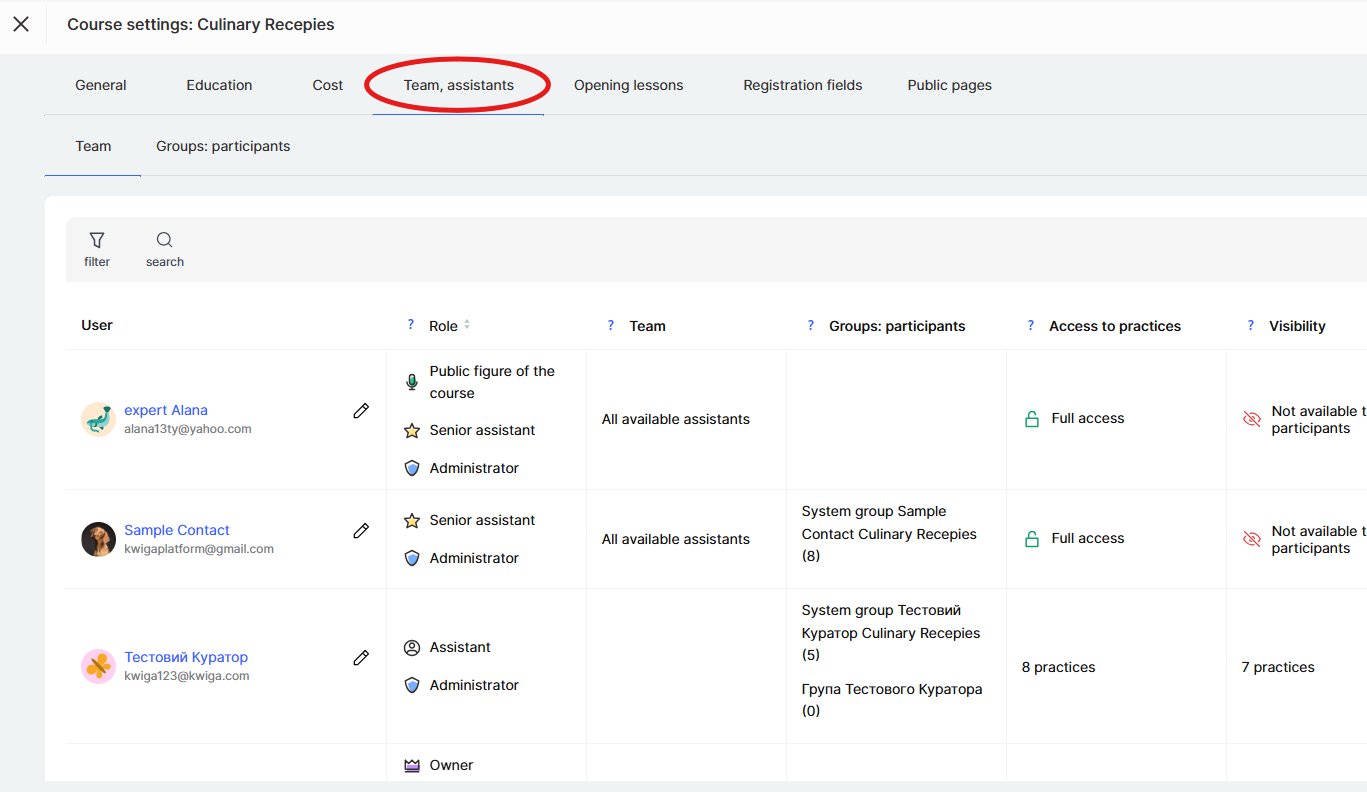
To do this, you can:
- Configure assignment visibility for specific team members.
- Grant access to such practical assignments only to the curators who handle participant requests.
This will help organize a simple support system where each team member sees only the assignments relevant to their area of responsibility.
Recommendation: Regularly analyze the types of requests being submitted — this will help identify the most common issues and improve the overall learning experience.
Technical support through the LMS creates a comfortable learning environment and reduces the workload for instructors. Using quizzes to collect requests helps structure the communication process and ensures quick responses to participant issues.
Online chat on your school pages
Besides LMS assignments, you can connect an online chat so students can message you right from your school website. Kwiga supports six chat services: Tawk.to, LiveChat, Elfsight, Chatwoot, HelpCrunch and SmartSender. You connect them yourself — in the Courses menu → Process settings → Integrations, on the Chats tab. There you also choose who sees the chat (all visitors or only signed-in users) and on which pages.
Step-by-step instructions are in the article Adding an Online Chat for Students to the Kwiga Platform.
Frequently asked questions
Should points be awarded for contacting technical support?
No. In the assignment settings, you can select "No grading" – then members' answers won't require scores or automatic grading.
Can a member attach a screenshot to their request?
Yes, if file uploads are allowed in the assignment. You can enable them alongside text responses when configuring response types.
Where will the member see the response to their request?
If answers are displayed after submission, the member can see their questions and the answers they receive directly in the lesson. If comments are enabled, the member and assistant can clarify details in the discussion thread.
Where should I place the contact form: in the lesson itself or on a separate page?
Both options are available. Select "Assignment" if the field should appear directly below the lesson content, or "Assignment list" if it should appear on a separate page that the member can access via a link in the lesson.
Can I make inquiries visible to only one employee?
Yes. You can limit the visibility of and access to these assignments to specific assistants – those responsible for handling requests. You'll find the relevant options in the course settings under the "Team, assistants" tab.
Can I add a live chat to my school?
Yes. Kwiga supports six chat services: Tawk.to, LiveChat, Elfsight, Chatwoot, HelpCrunch, and SmartSender. You can connect them yourself: go to "Courses" → "Process settings" → "Integrations", then open the "Chats" tab. You can also choose who sees the chat and which pages it appears on.
Thanks for your feedback!
Thanks! We'll update the article. Need an answer now? Contact support