Articles:
- How to delete a course?
- Copyright protection of your content on Kwiga
- Public or trial lesson
- Як змінити статус уроку на чернетку та приховати його від учнів
- Using checkpoints
- How to add an assignment to a lesson?
- How to create an assignment with mandatory verification by the curator?
- How to create a task for different offers?
- How to create a test with scores and automatic approval?
- How to create and conduct a survey among students on the course
- Contents of the lesson, all types of activities in the lesson
- Downloading video files
- How to add time codes to the video
- How to add button to the lesson
- Inserting iframe code
- Додавання дробів, математичних функцій, формул
- How to add text with spoiler to the lesson
- How to create a course on the Kwiga platform
- How to create a marathon?
- Як додати обкладинку на курс?
- Course Program Display Options
- How to add a public face to a course
- How to add a team to a course
- Course preview with different access levels
- Блок над уроками (верхній банер)
- Setting delays, schedule for opening and closing lessons (dripping content)
- Selling through a registration form on a third-party site
- How to create a copy of the course?
On the Kwiga platform, you can easily create an online course, customize its structure, add modules, lessons, and fill them with content. This article will guide you through all the key steps to creating an educational product.
In this article:
- Create a course
- Create a course outline
- Add content to the lessons
- Adding content
- Create Practical Tasks
- Adjustment of Practice in the Lesson
- Set up a lesson
- Adjust the opening delays of lessons (dripping content)
- Access Control Tab
- Set up public course pages
- Add a preview of the course
- Settings for the Lesson/Module Page
- Setting up the course program
- Publishing course
- Issuing Certificate
- Set the Course Price
- Add the first participant
Create a course
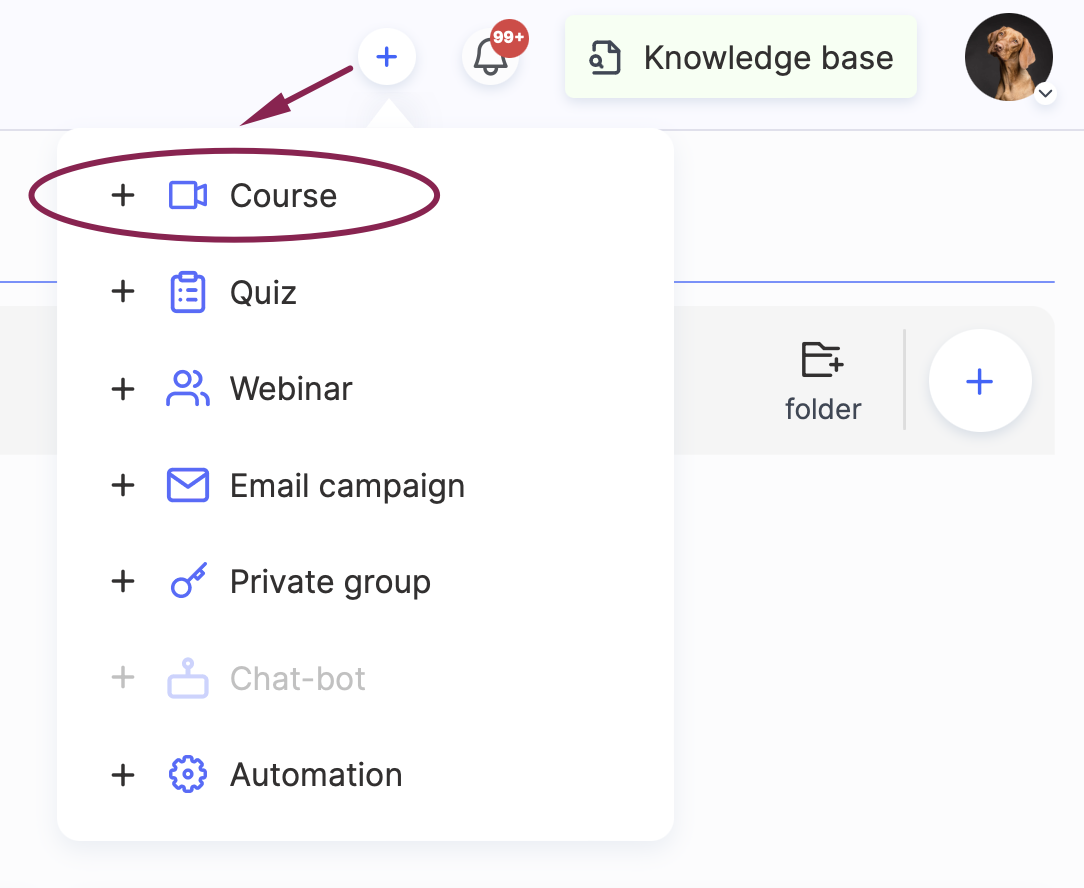
To create a course on the Kwiga platform, you can use one of two methods:
-
On the top panel in the right corner, click the + button and select Course to start creating a new course quickly.
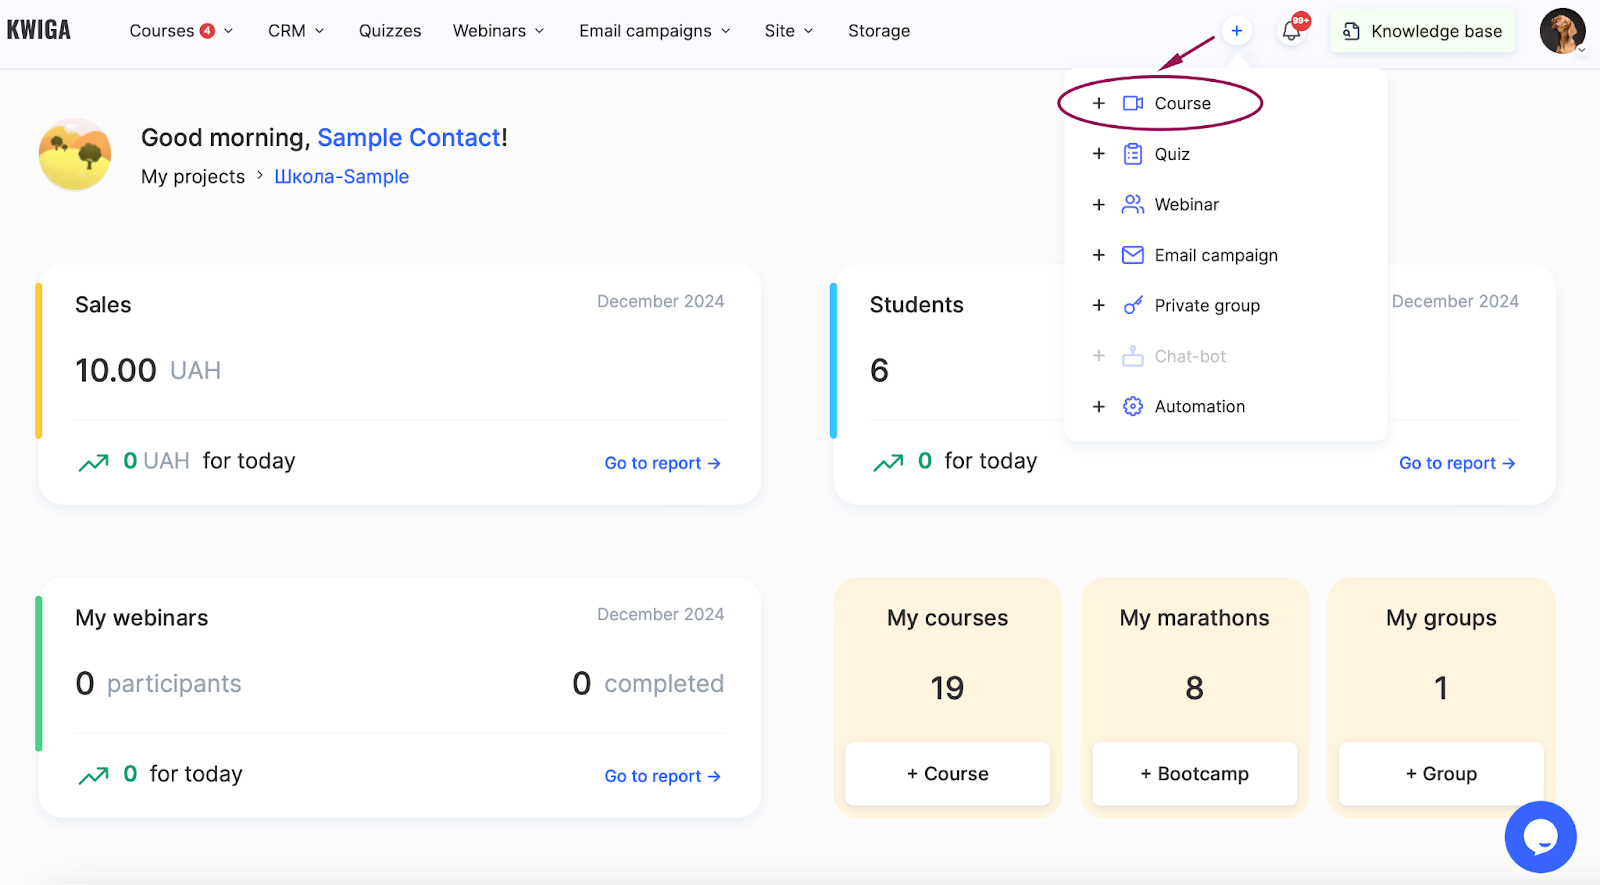
2. In the upper menu on the left, select Courses to open the section where all your created courses are displayed. In this section, click the + button in the upper right corner.
Then, enter the name of your course and click the green Create button. Your course will appear in the list, and you can proceed adding details and content.
Create a course outline
A course outline on the Kwiga platform can have a flexible structure: it can be divided into modules with multiple levels or simply consist of a list of lessons without modules. Lessons can be added to a module or exist outside of one, allowing you to customize the outline to your specific needs.
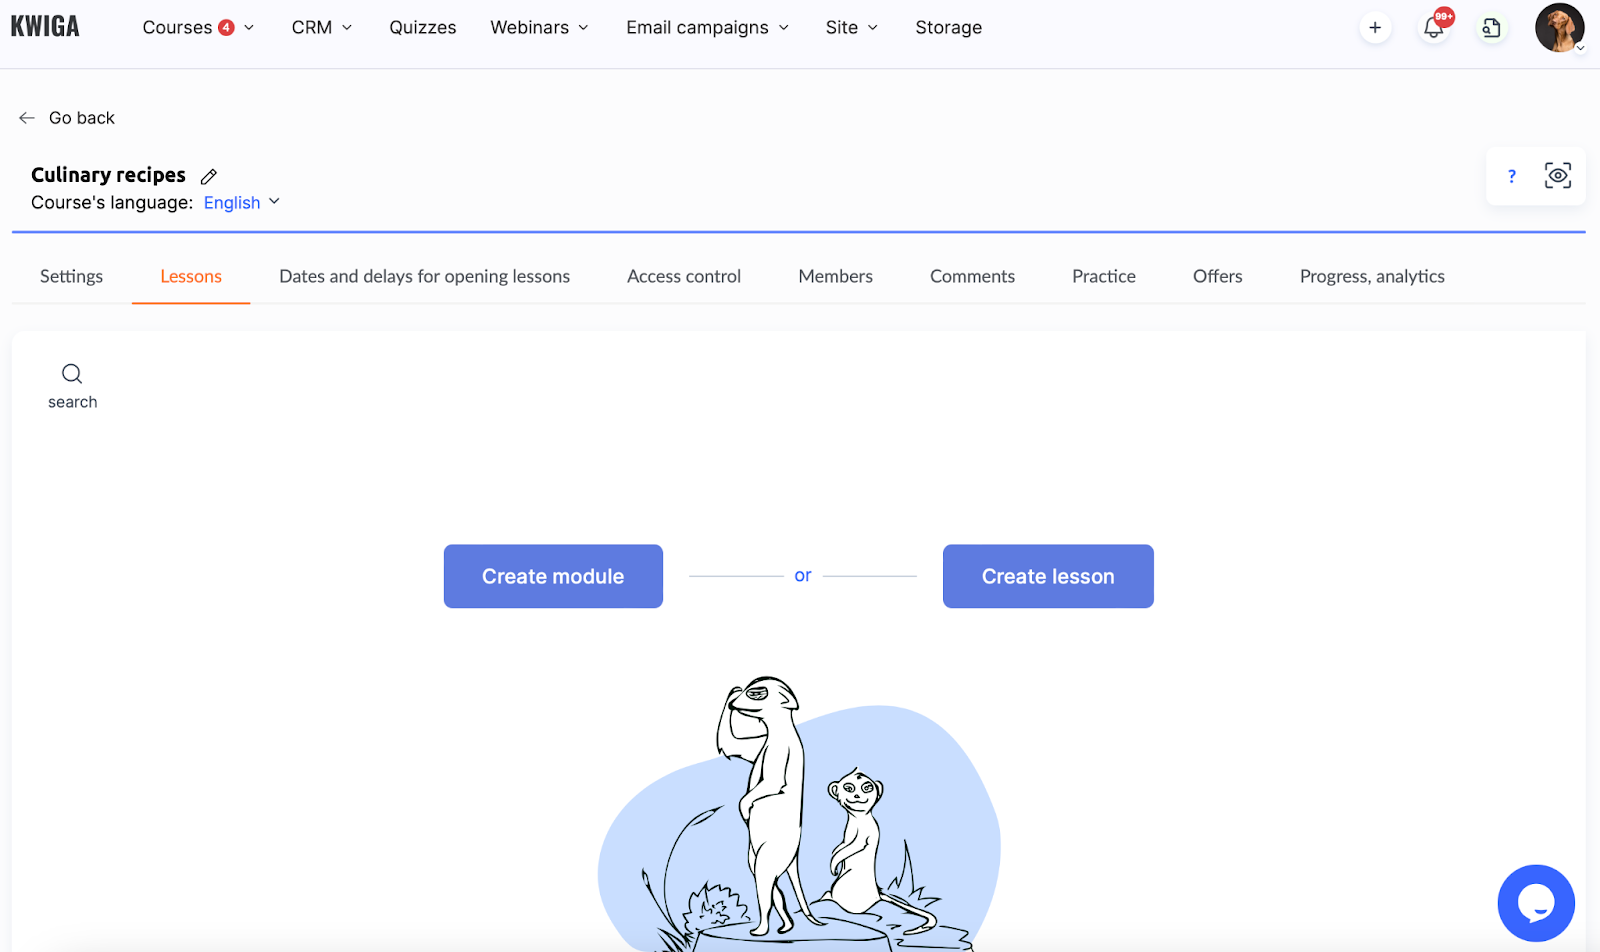
How to create a module:
Click the + Module button.
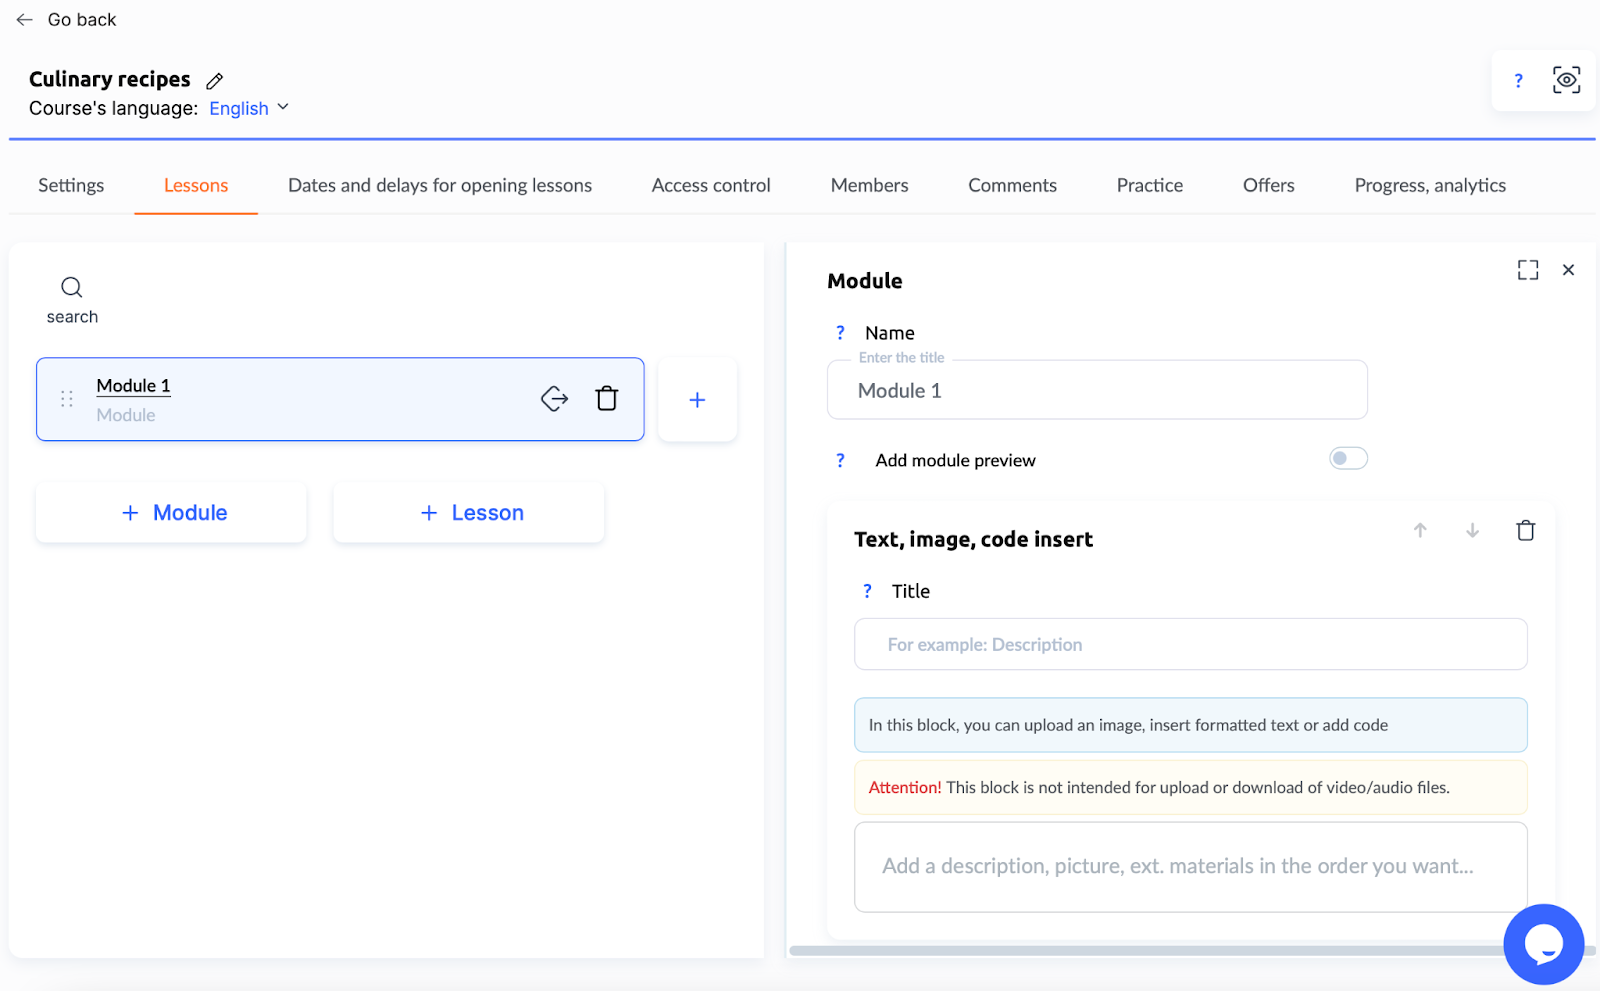
In the right panel, enter the module's name and, if desired, add a preview image. To do this, enable the Add module preview option and upload a 1280x720 image (it will automatically resize to 75x42). To add a description, click the Text, image button.
How to add lessons:
To add lessons to a specific module, click the + button next to the module's name.
If you prefer another structure, lessons can also be created outside of modules by clicking the + Lesson button.

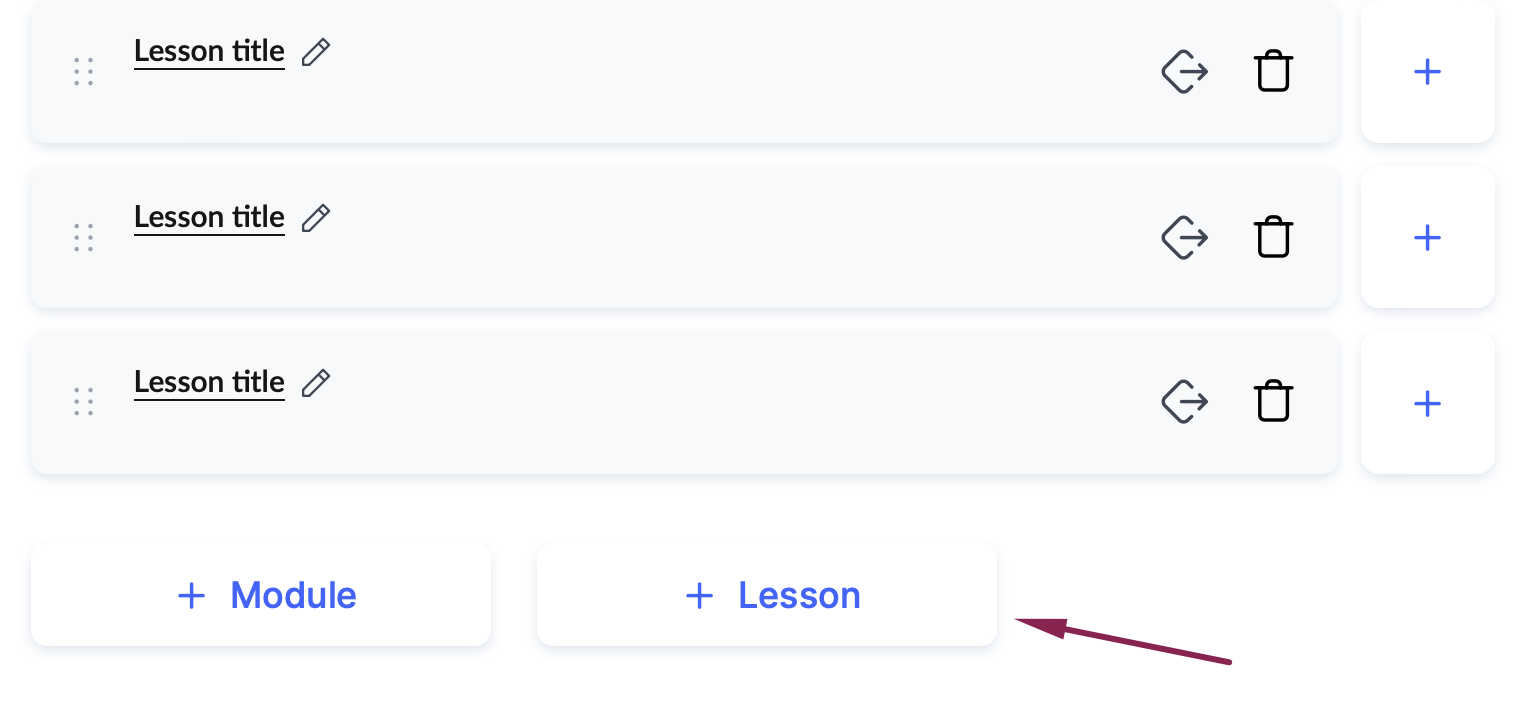
You can rearrange lessons by dragging them in the list or moving them between modules. To edit a lesson, click on its name to open the lesson builder, where you can modify or add content.
Add content to the lessons
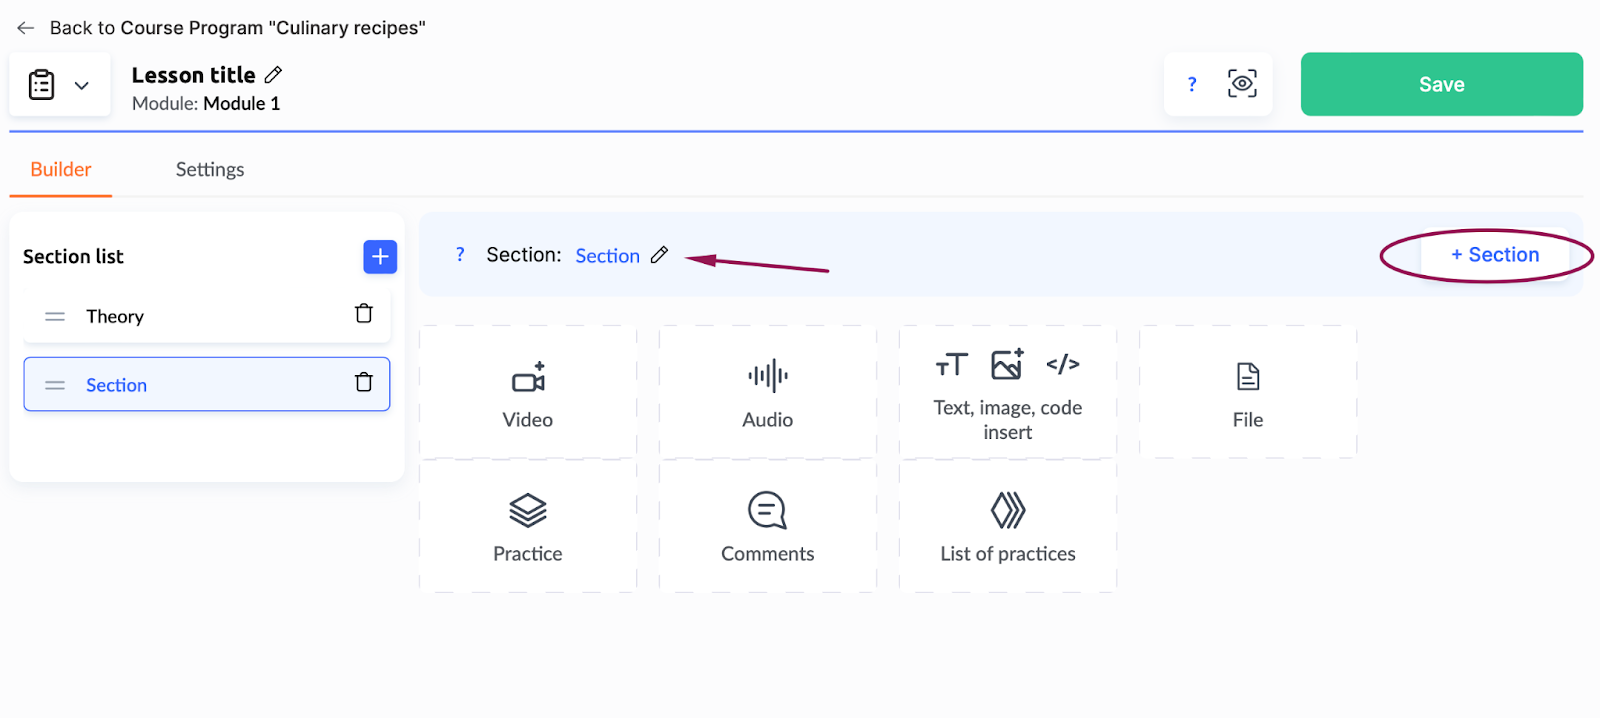
The lesson editor on the Kwiga platform allows you to create lessons with various types of content: videos, audio, text materials, and files. Each lesson can include one or more sections where blocks with content are added, helping to structure the material and make it clearer for students.
Create sections
A lesson can consist of a single section or be divided into multiple sections, which simplifies navigation, especially when there is a large amount of material. Each section can be named for easy organization, and their order can be adjusted by simply dragging them.
For example, the first section might include a video with a presentation file, the second could provide step-by-step instructions in text format, and the third might contain attached PDFs for self-study or practical exercises.
If the lesson consists of only one section, it is not displayed separately on the public page. In such cases, the lesson content is shown immediately upon opening by the participant.
Adding content
To add content to the lesson, use the buttons in the Lesson Builder:
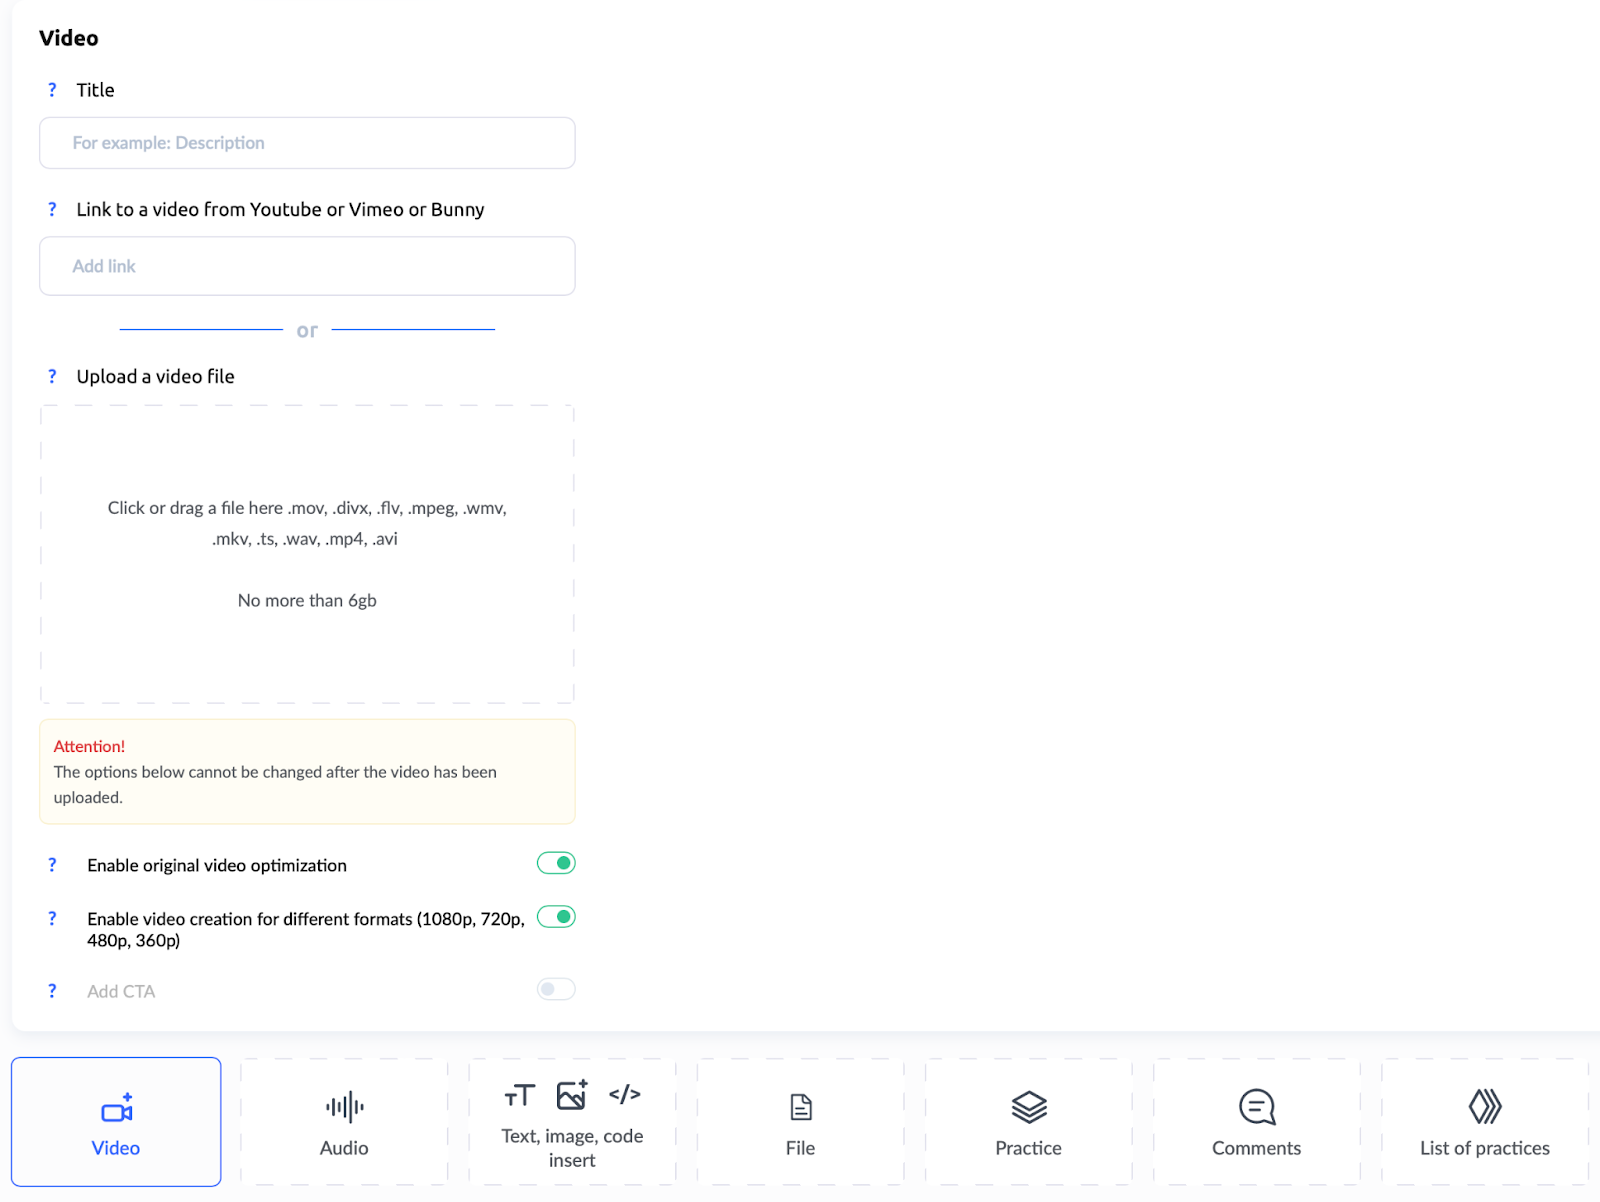
Video:
Click Video to add a video to a lesson. You can add a link to YouTube, Vimeo, or the Bunny CDN, or upload a file to the platform's storage.
https://kwiga.com/ua/help-center/stvorit-produkt/zavantazhennya-video-fajliv
Audio:
Use the button audio to upload lectures, podcasts, or voice messages.
Text and image:
The Text, image button allows you to add explanations, instructions, or illustrations to the lesson.
It is also suitable for integrating external services (Google Forms, Wordwall, etc.) by embedding iframe code.
https://kwiga.com/ua/help-center/stvorit-produkt/vstavka-kodu-iframe
Additionally, you can use the text editor to add interactive buttons. For instance, a button can direct users to an external resource or facilitate navigation to another part of the course.
https://kwiga.com/ua/help-center/stvorit-produkt/yak-dodati-knopku-v-urok-chi-marafon#anchor-1
Files:
Use the File button to attach documents, presentations, or assignments for download. The platform supports the most popular file formats (e.g., PDF, Word) and allows uploads of files up to 1GB in size.
Once uploaded, file access can be configured. For example, you can enable or disable the download option for students. If downloading is disabled, students can view the file directly in the lesson using the preview option.
Comments:
A comment block can be added to the lesson, allowing students to leave text or audio feedback. Comments on the platform are public and visible to all participants with access to product comments.
Note: If you need to add a field for homework submission, it is recommended to use Practice tasks, such as questions with the Assignment (LMS) type, rather than comments.
Create Practical Tasks
Practical tasks on the Kwiga platform make lessons interactive, allowing students to test their knowledge and provide valuable feedback.
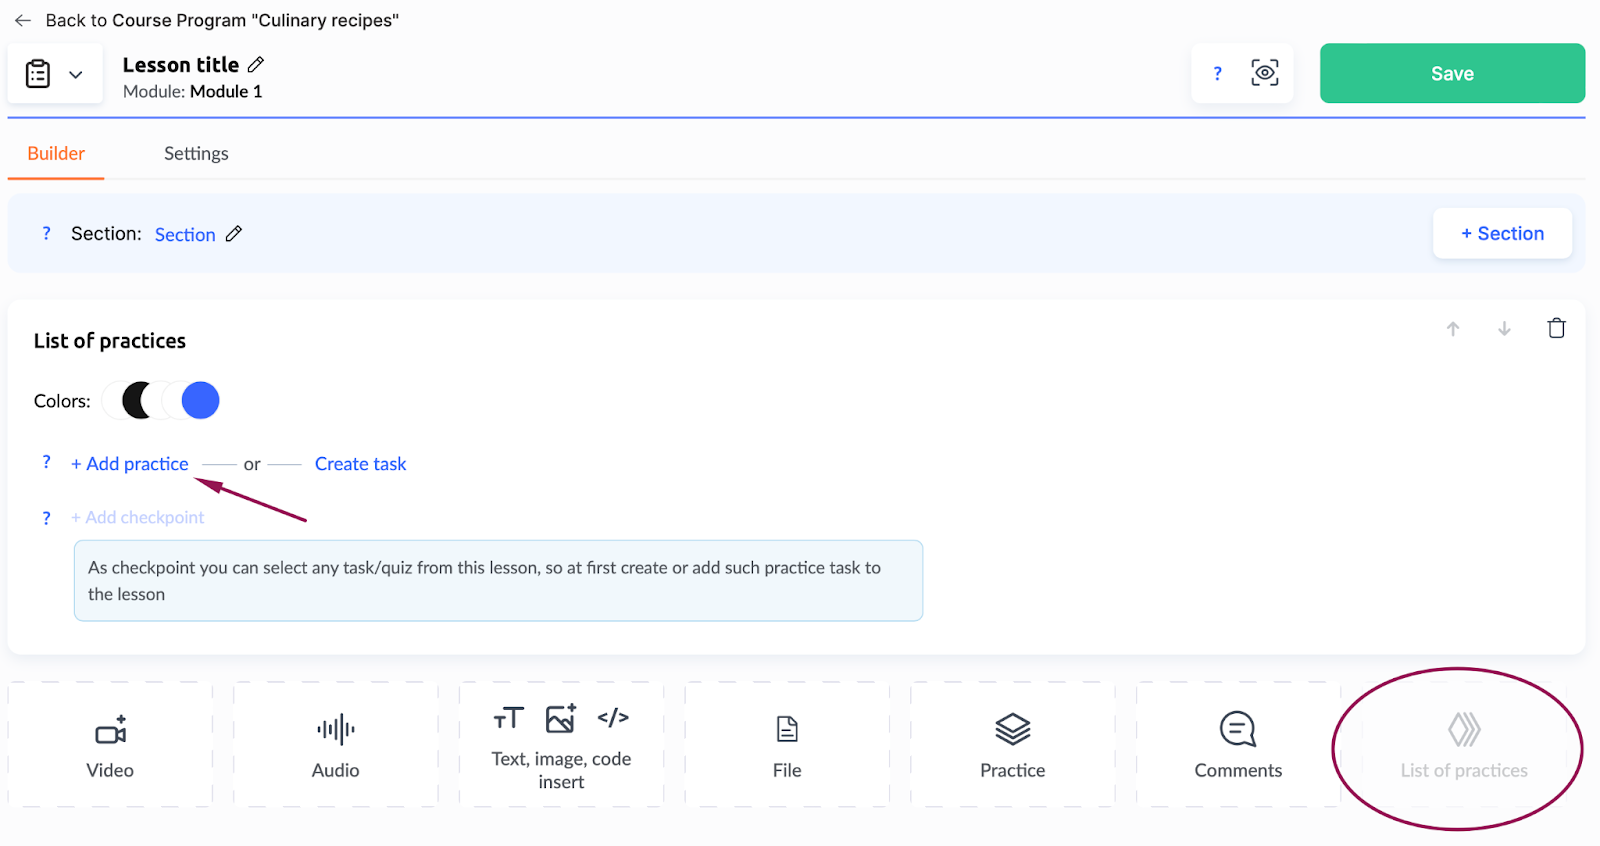
The Practice button lets you integrate tasks directly into the lesson. Questions or tasks are displayed as part of the lesson content, making them ideal for quick knowledge checks or small exercises.
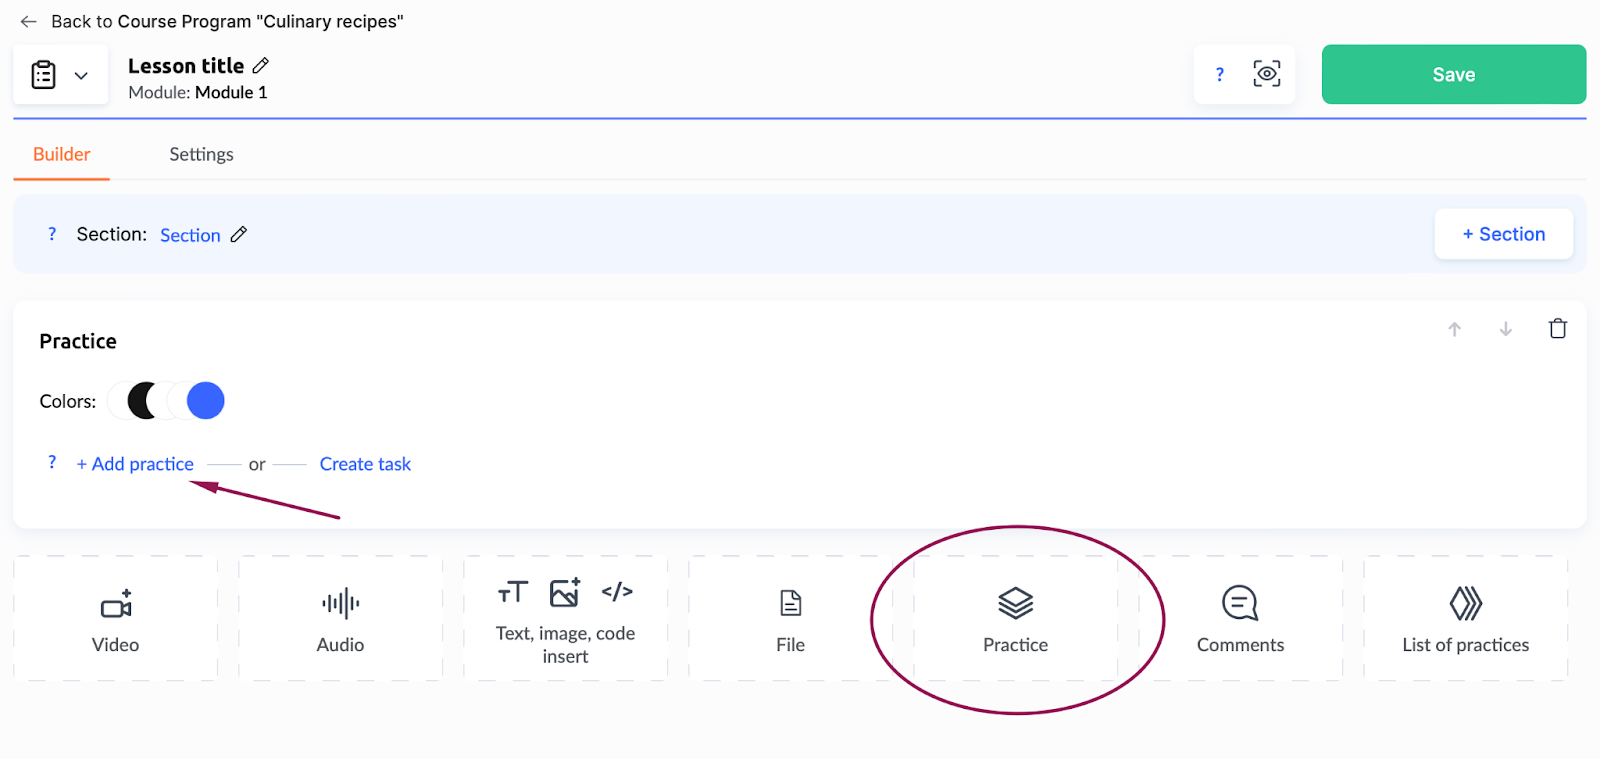
If you prefer tasks to be completed on a separate page, use the List of practices button. The lesson will display only the name of the practice, and clicking on it will take the student to a new page to complete the task.
A variety of question types are available for creating practical tasks:
-
Assignment (LMS): Add text-based or multimedia assignments.
-
Single choice: A question where students select one correct answer.
-
Multiple choice: A task with multiple correct answers.
-
Conformity: Matching tasks to pair related elements.
-
Fill gaps: Insert the missing words or values into the text.
-
Interview: Collect feedback without a right or wrong answer.
-
Likert scale: used for rating on a scale (for example, from 1 to 5).
-
Sorting: Arrange items in the correct order.
-
Make a word out of letters: Form words from provided letters.
-
Make sentences from words: Rearrange words to create correct sentences.
-
Reaction: Allow students to respond using emojis or quick answers.
-
Rating: Enable students to give ratings using stars.
-
Yes/No: Confirm or deny statements.
-
Text, file, audio, video answer: Students can submit answers in text, file, audio, or video formats.
-
Paste the word: Enter specific words or phrases into an answer field.
-
List: Choose an option from a dropdown list.
-
Multi-list: Select multiple correct options from dropdown lists.
-
Net Promoter Score: Evaluate satisfaction using an NPS survey.
These tools provide flexible options to create engaging and interactive learning experiences.
Adjustment of Practice in the Lesson
The Kwiga platform allows you to customize practical tasks to align with the specific requirements of your course. Below are the key options available for configuring practical tasks:
-
Checkpoint (Stop lesson)
This feature sets a control point where students can only access the next lessons after completing the task. It’s an excellent way to ensure knowledge validation and maintain the learning sequence. -
Use in progress calculation
If you enable this option, the completion of the practice will be taken into account when calculating the overall progress of the course participant. -
Availability of practice
By default, the practical task is available immediately after opening the lesson. If you want to set an access delay, activate the option Practice will be open -
Close access to practice
Access to a practical task can be time-limited. By default, there are no restrictions, and students can access the task indefinitely. If necessary, set specific availability time frames to restrict access within a certain period.
You can add multiple practical tasks to a single lesson and customize the settings for each task individually.
These options help create a structured and engaging learning process, enabling greater control over task availability and student progress.
Set up a lesson
The Settings tab allows you to configure the main parameters of the lesson.
The lesson status can be either draft or published.
https://kwiga.com/ua/help-center/stvorit-produkt/yak-zminiti-status-uroku-na-chernetku-ta-prihovati-jogo-vid-uchniv
The draft remains inaccessible to participants, while the published lesson can be viewed by students.
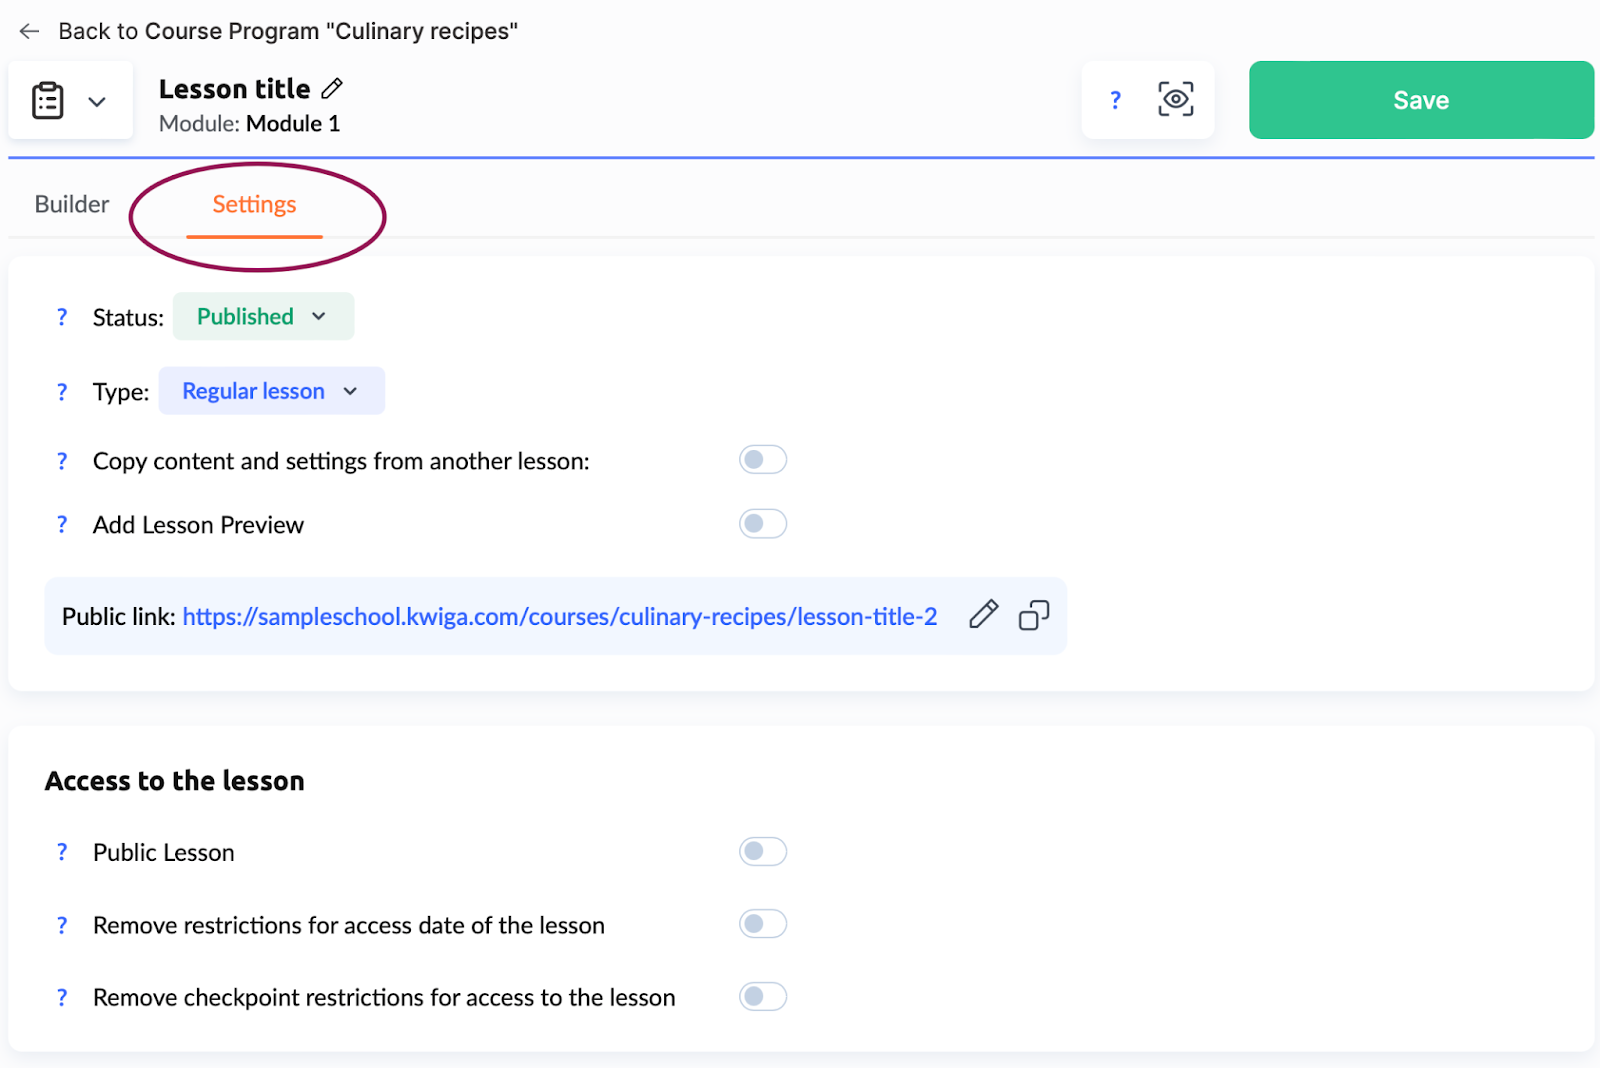
A draft remains inaccessible to participants, while a published lesson can be viewed by students.
For convenience, you can Add lesson preview that will be displayed next to the lesson name in the course syllabus. This helps structure lessons and makes the program more visually appealing.
If needed, enable a Public lesson — such a lesson can be viewed without authorization. A public lesson is open to all users who have a link to the lesson, even without registration on the platform.
https://kwiga.com/ua/help-center/stvorit-produkt/zagalnodostupnij-chi-probnij-urok
If you need to create a copy of a lesson or a similar lesson, you can copy the contents of an existing lesson and then edit its settings and content as needed.
Adjust the opening delays of lessons (dripping content)
Setting up delayed opening of the lessons, also known as dripping content, helps to gradually provide access to materials, organizing a sequential learning process. For example, you can open only the first lessons immediately after payment, and make the next ones available every week or after a certain period.
To adjust the delays, you need to go back to the course settings or exit the individual lesson constructor and go to the tab Dates and delays for opening lessons.
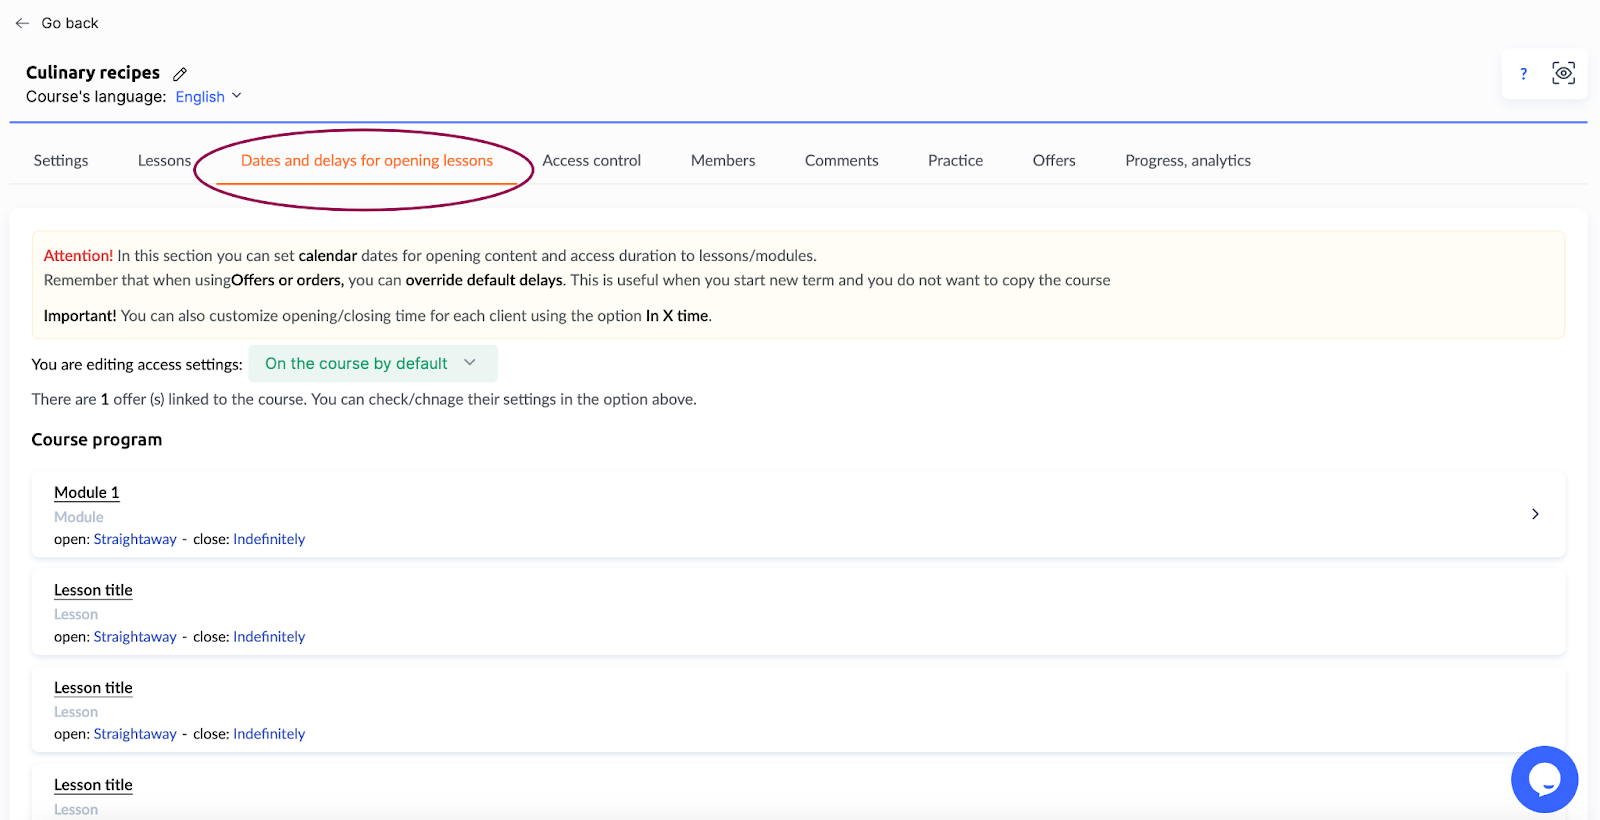
Opening lessons or modules:

At once: the lesson becomes available immediately after gaining access to the course.
In N days: a lesson or module opens a certain number of days after the course starts. For example, if you want to open a new module every week, select this option to avoid setting specific dates for each stream.
A certain date: the lesson becomes available on a specified day.
Closing lessons or modules:
You can also set up blocking of access to individual lessons:
Indefinitely: access remains open without additional restrictions.
In N days/hours/minutes: access to the lesson is closed after a certain time after gaining access to the course or module.
A certain date: the lesson or module becomes unavailable on the specified day.
Note: If access to a course is provided for a specific period (e.g., two months), it is recommended to configure closings through the offer rather than setting delays for each lesson or module. When extending access, the closing dates set by delays do not adjust automatically. In such cases, you will need to manually edit and redefine delays for each participant individually. To avoid extra work, it’s better to configure the access duration through offers.
When a lesson or module becomes available, students receive a notification via email and in the platform’s notification section (bell icon in the upper-right corner).
This feature not only automates gradual access to materials but also helps control the training duration, providing convenience and structure for all participants.
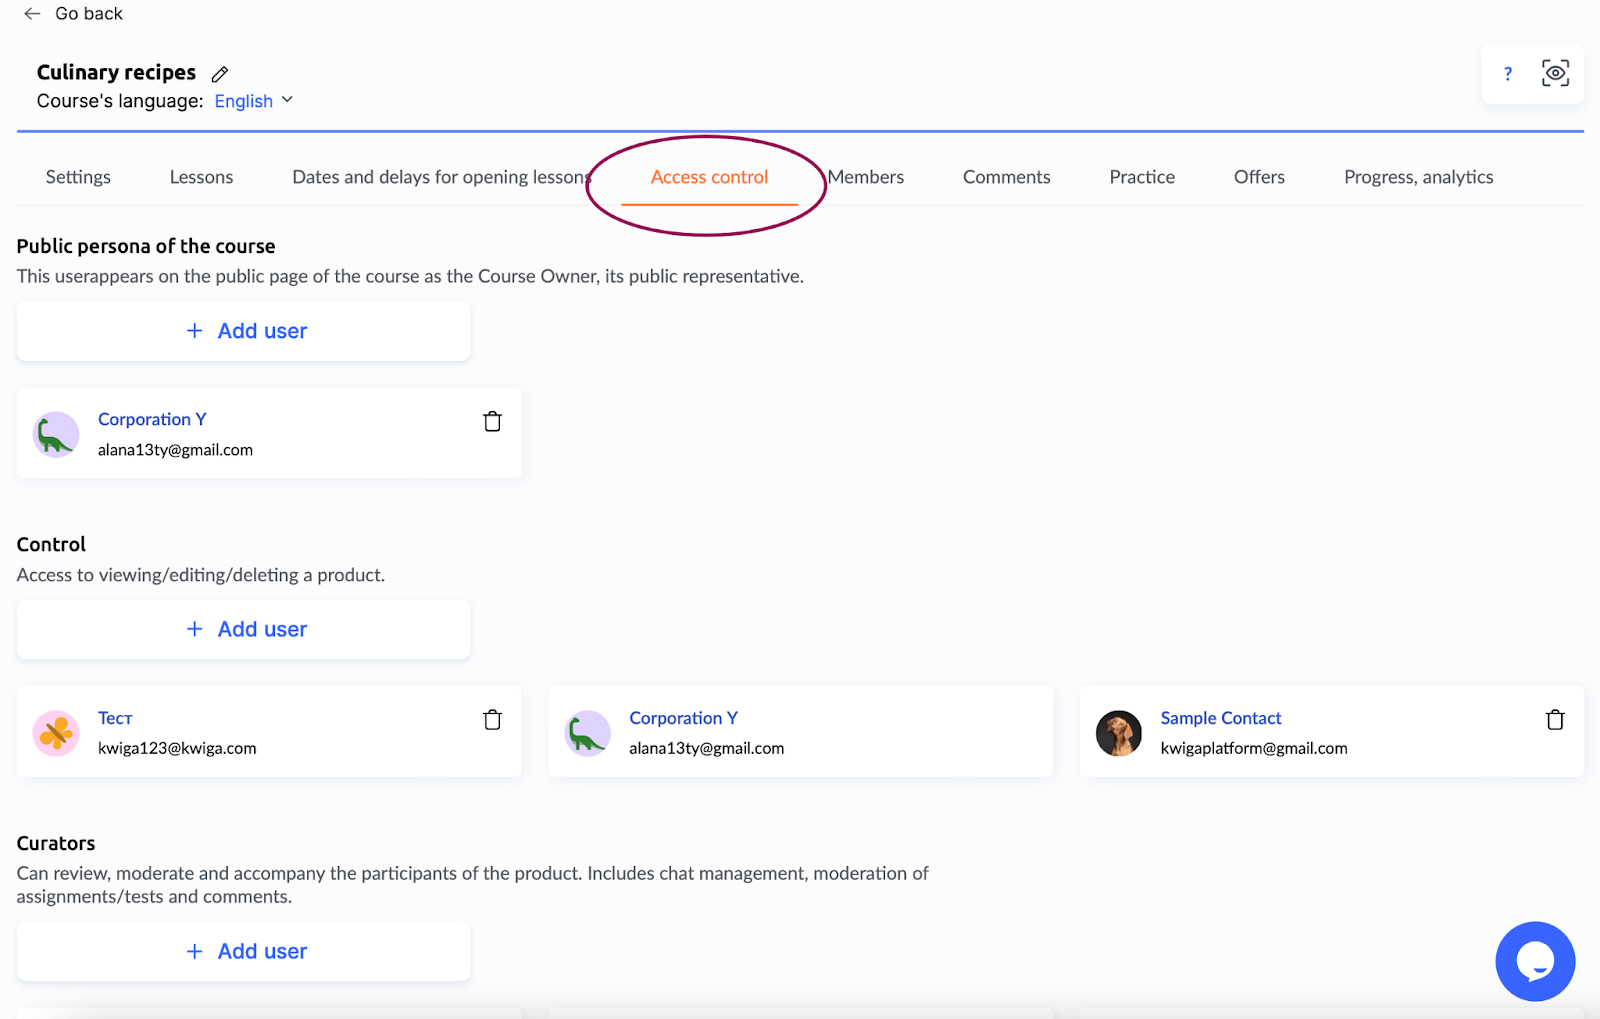
Access Control Tab
The Access Control tab allows you to manage and customize user permissions for your course. You can configure access for team members and assistants to ensure smooth collaboration and effective course moderation.
All team members who have access to this course are displayed here.
How to add a team member?
On this tab, there is an option to configure the Public persona of the course. He/She is a user who is shown by the student on the course page as its owner or representative. By default, this is the owner of the account, but you can add another user or remove a public person by leaving this field blank.
https://kwiga.com/ua/help-center/stvorit-produkt/yak-dodati-publichnu-osobu-na-kurs .
In the same section, you can manage the access of assistants. Assistants are users who help moderate the course: check assignments, work with comments, and accompany participants.
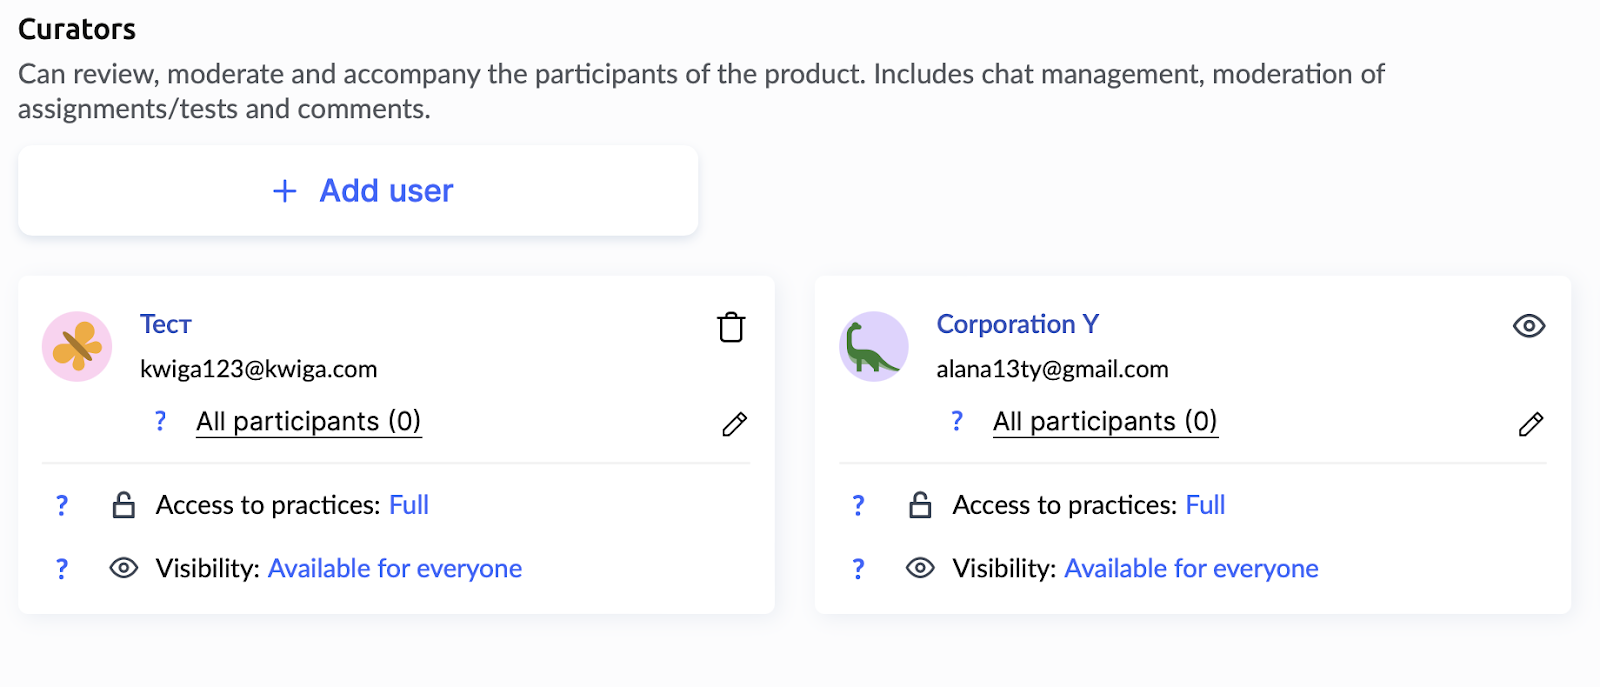
For curators, you can configure:
Access to members — full access or to a specific group of students;
Access to practices — the possibility to hide certain practices from the assistant;
Visibility — hide the assistant from the contact list so that students cannot contact him/her, but the assistant will still see and check their assignments.
These functions will help to organize the work of assistants on the course.
Set up public course pages
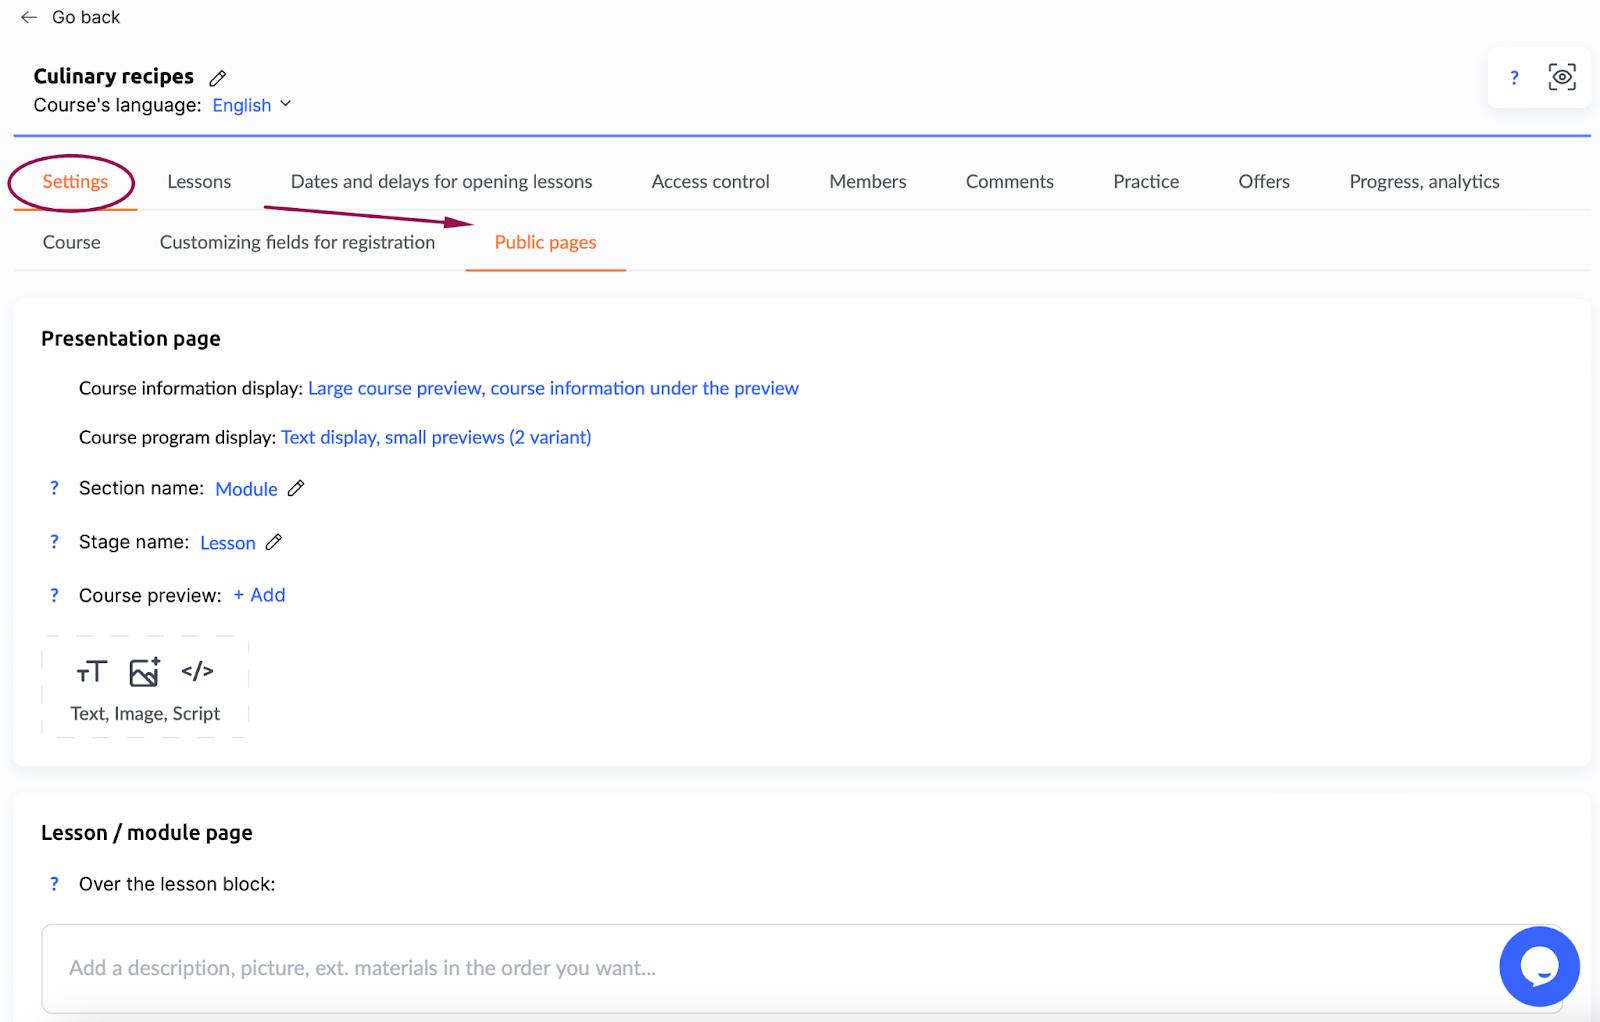
Each course has a unique link and a public page that potential buyers or members can see. It should give basic information about your product. Here you can add a preview image, a description of the course, and display its program.
To customize the page, open the course and go to the tab Settings. Then select the tab Public pages
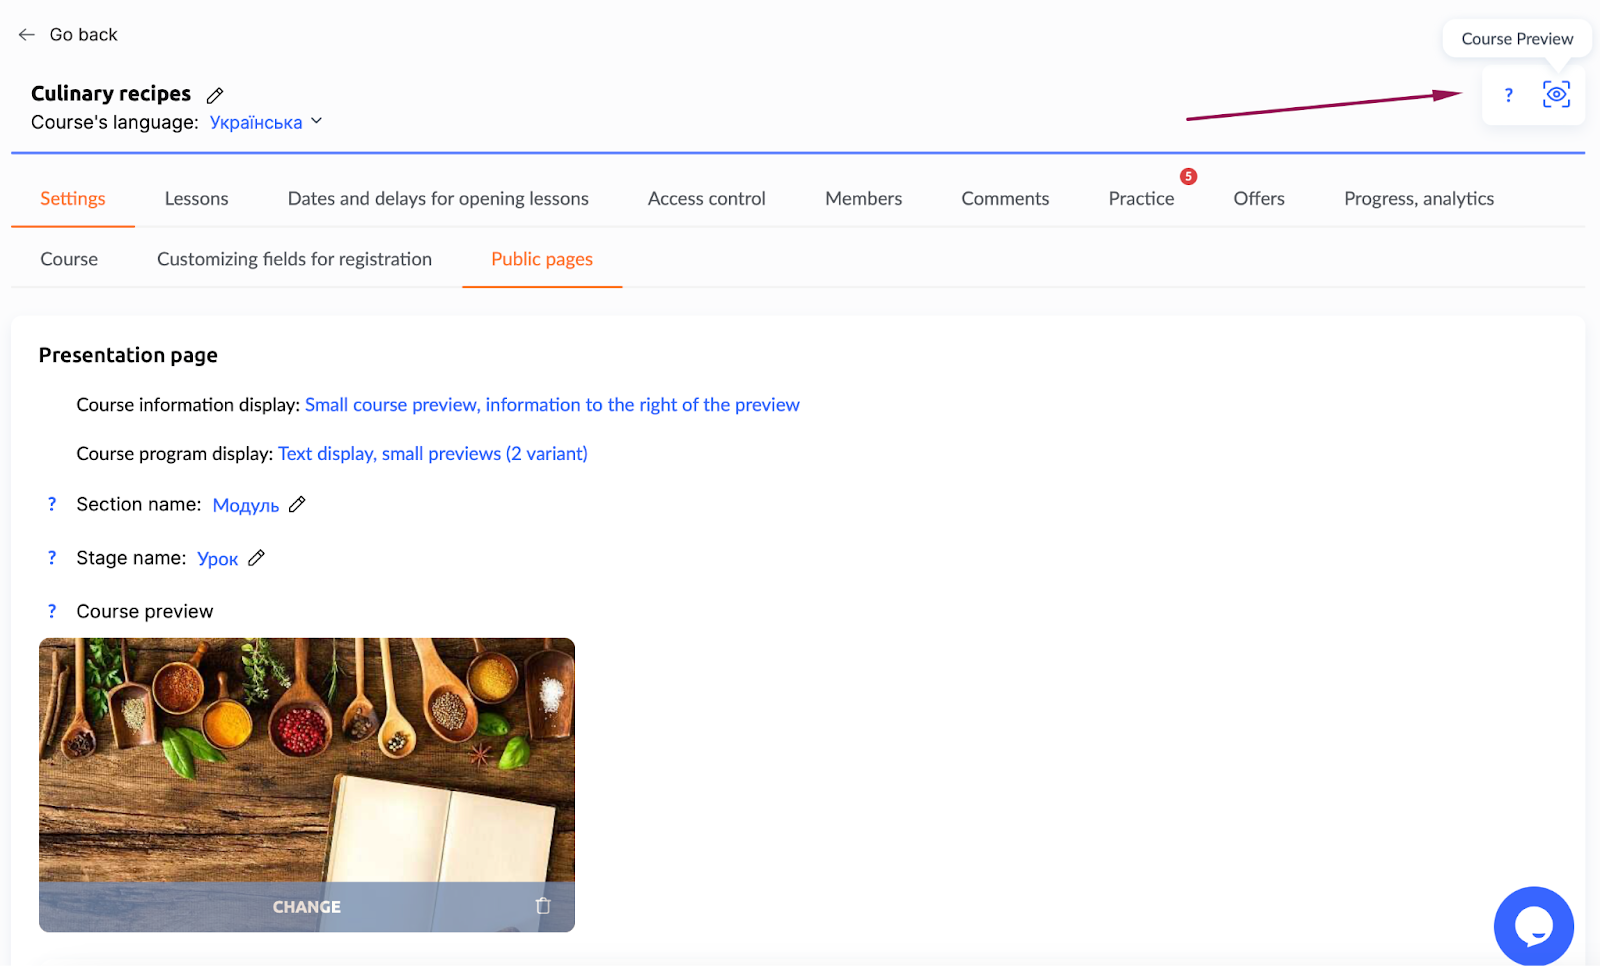
Add a preview of the course
Click Add and upload an image from your storage or computer. The image will be displayed on the public course page and in the Kwiga Unlock directory (if enabled in the settings above). This field is optional but highly recommended to enhance visual appeal.
The aspect ratio of the image must be 16:9, such as 1920x1080 or 1280x720 pixels. You can read more information in the article.
Next, use the Text, image, script button to add a text description of the course. Include details about the program, training format, expected outcomes, or other key information. You can use text, images, or buttons to make the page visually appealing and user-friendly.
You can also configure how the course information and preview are displayed — for example, showing the structure of modules or lessons so participants immediately understand what to expect.
To check how the course page looks, click Course Preview in the upper corner.
While the course is in Draft status, the public page will only be visible to you — other users will not be able to access it. Once you Publish the course, the page will become available to everyone via a public link.
Display of the course program, options and methods of adjustment
Settings for the Lesson/Module Page - Block Above the Lesson
In the course settings, you can add a block above the lessons, which will appear on all lesson pages. This block can include images, text messages, buttons, or links, such as a Zoom meeting link, a calendar, or a Telegram chat. You can also embed videos using iframes.
This block is ideal for publishing news, announcements, or contact information, making it easily accessible on every page of the course. You can configure this block in the Public Pages tab of the course settings (read the article for more information).
Setting up the course program
On the Public Pages tab, if you scroll down, you can adjust how the course program is displayed. The following options are available:
Include modules in transitions between lessons: When activated, modules with information are included in the navigation between lessons. Empty modules with no lessons or where all lessons are in "Draft" status are excluded.
Show empty modules: By default, modules without lessons or with lessons in "Draft" status are hidden from the course syllabus, but you can choose to make them visible.
Show lessons outside the offer: Lessons not included in the tariff (offer) may still appear in the course program. You can disable this option to hide such lessons from view.
Make inactive lessons and modules that are unavailable due to delays: Lessons and modules closed due to delay settings will appear in the course program but will not be clickable or active.
These settings allow for greater flexibility in presenting the course structure and tailoring the experience to your audience.
Publishing course
On the Settings - Course tab, you can manage key parameters that control the availability and visibility of your course.
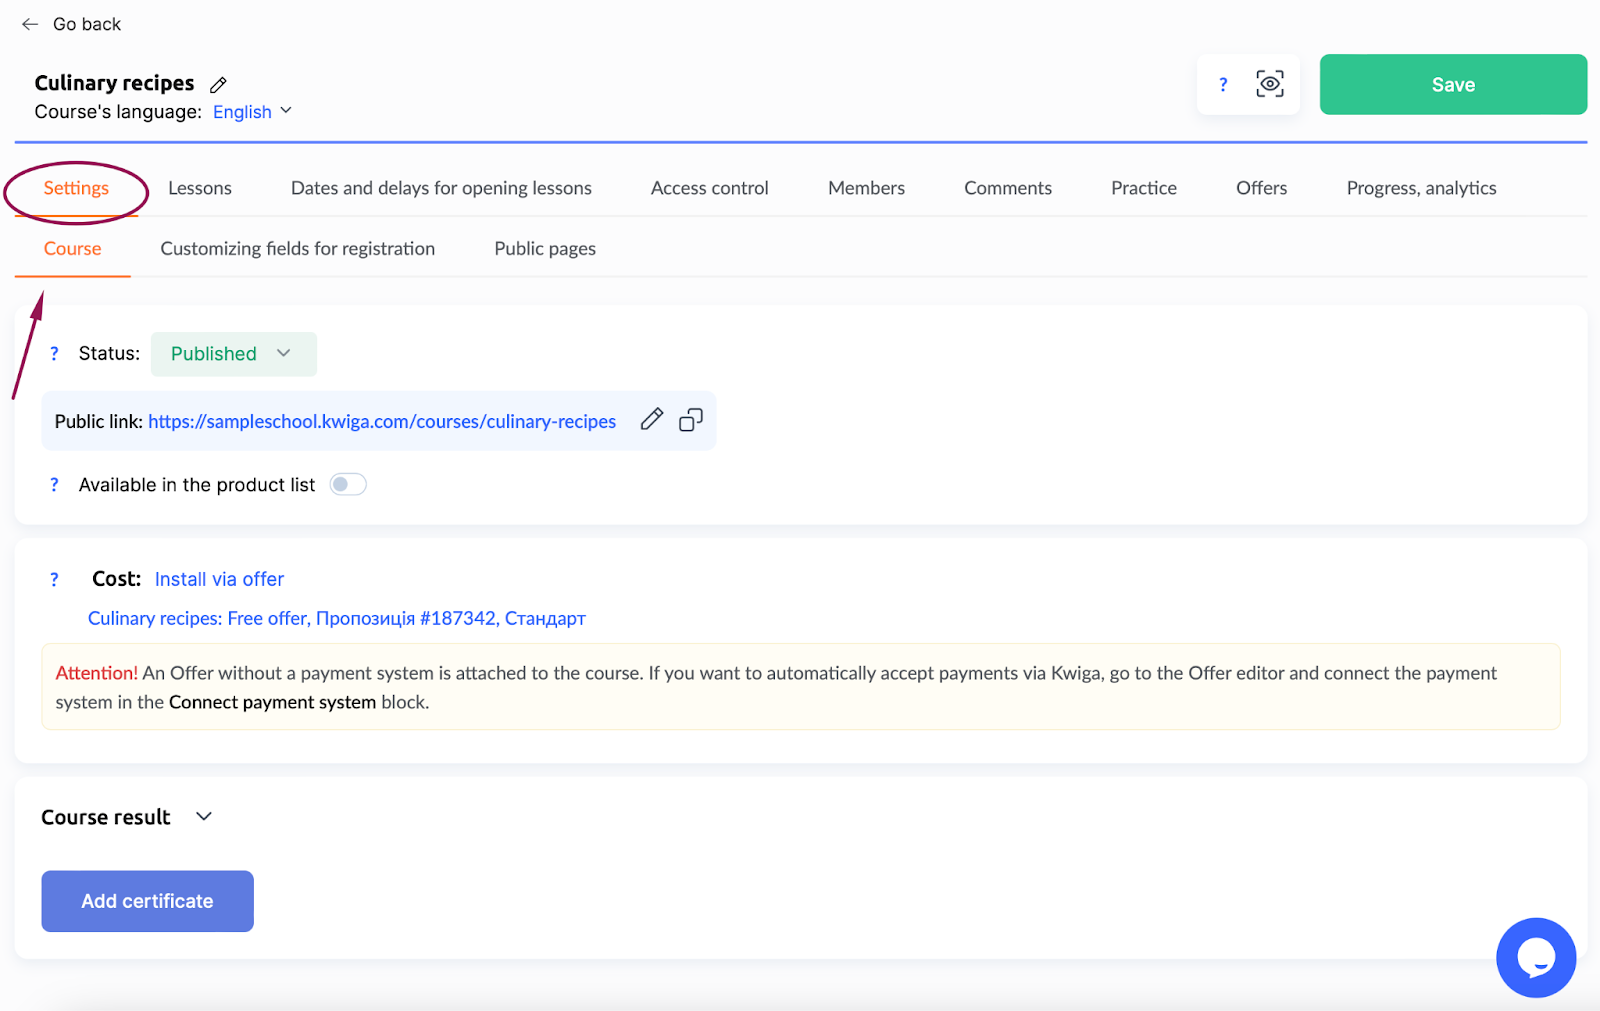
The Status option allows you to set the course’s visibility. If the course is in Draft status, it will only be accessible to the author via a public link, provided they are logged in. Draft courses are not visible to other users. Once the course is Published, it becomes available to all participants based on your configured settings.
The Available in the Product List setting controls whether the course appears among the products on the public page of your account. If this option is disabled, the course will not appear in the public list but will still be accessible via a direct link.
You can modify the course’s public link in this section.
Note: We recommend making any changes to the link before students gain access to the course to avoid issues with finding or accessing it.
Issuing Certificate
On the Settings - Course tab you can also configure automatic certificate issuance. Certificates are generated according to the parameters you set and are issued upon course completion. Additionally, you have the option to upload your custom certificate template.
These settings ensure that your course is accessible to the intended audience and simplify the process of awarding certificates to participants upon completion. See more information in the article.
Set the Course Price
On the Kwiga platform, you can choose to make your course free or paid, depending on your goals. To manage access, use offers — these let you set up flexible access conditions tailored to your needs.
For free courses, you can create a free offer that allows students to enroll without payment.
For paid courses, offers let you set up multiple options, such as different pricing plans, additional services, or separate learning tracks for different student groups.
You can find more details about setting up offers in a separate article.
Add the first participant
To start managing participants in your course, you can manually add a student on the Members tab. Just click the + button and fill in the participant’s details. The email address will serve as their login.
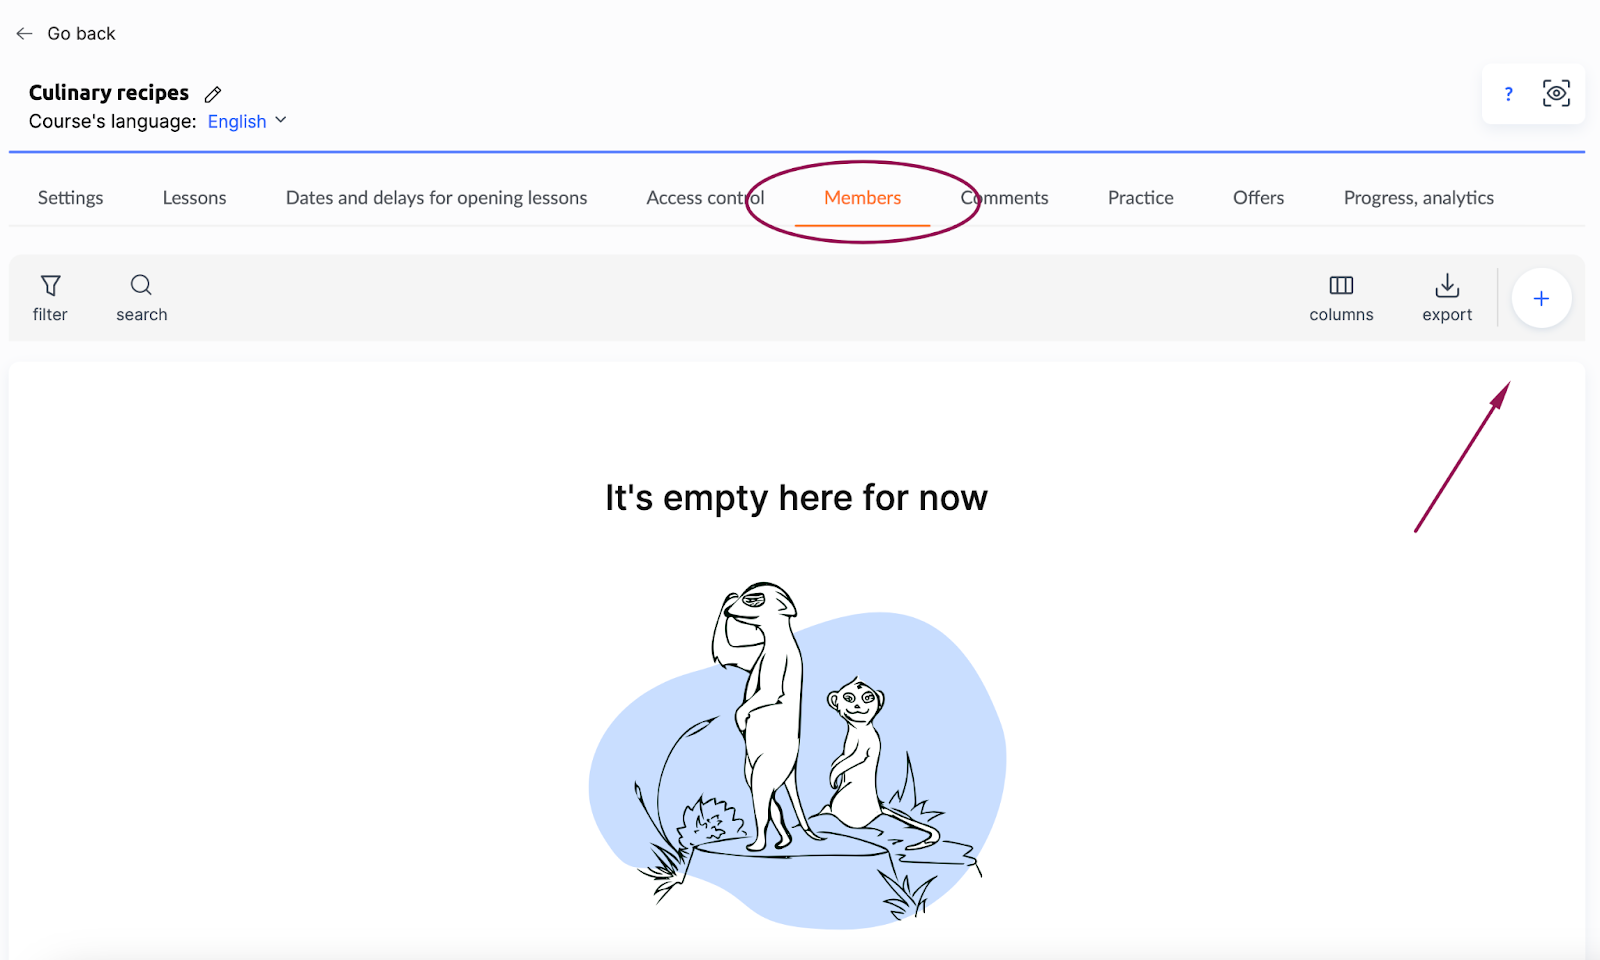
This is convenient, for example, for giving test access to a course, especially if you want to test its functionality or invite someone to evaluate the materials.
A detailed description of the process of adding members is available in a separate article.
Didn't find the answer? Contact the support service via online chat or Telegram