Articles:
- How to give access to the course
- How to access a student's account
- How to see the progress of participants
- How to Create a Certificate and Add It to a Course
- Automation: Awarding points upon completing lessons
- Conducting surveys (reactions, ratings, NPS)
- How to view all test attempts
- How to set up a test retake
- How to update a student's rate and keep their progress
- How to change access settings for a single student
- How to change the expiration date of the course
- The student entered wrong email
- How to extend access to the course
- Automation: Setting up reminders if a student does not log into the platform
- How to unblock a user
- How to "freeze" access to a course
- How to find an email with a code needed to access Kwiga account
- Viewing the course as a student
- Pre-registration or waiting list.
- Importing and transferring the student database
- Comments: a convenient tool for user interaction
- Certificate Issuance After Passing a Test
- How an Expert Can Access Their Student Profile
- Student Registration and Authorization
- Certificates Report
- Manual issuance and reissuance of a certificate
Learn how to add a participant to a Kwiga course. This article describes several ways to open access for an individual student: opening access within the course, adding via CRM, or using offers.
In this article:
On Kwiga, you can easily add an individual participant to a course by opening access to the materials. This can be done in several ways: opening access within the course, adding a student through CRM, or opening access via an offer.
In this article, you'll learn more about each method.
Opening access within a course
How to add a participant to a course:
-
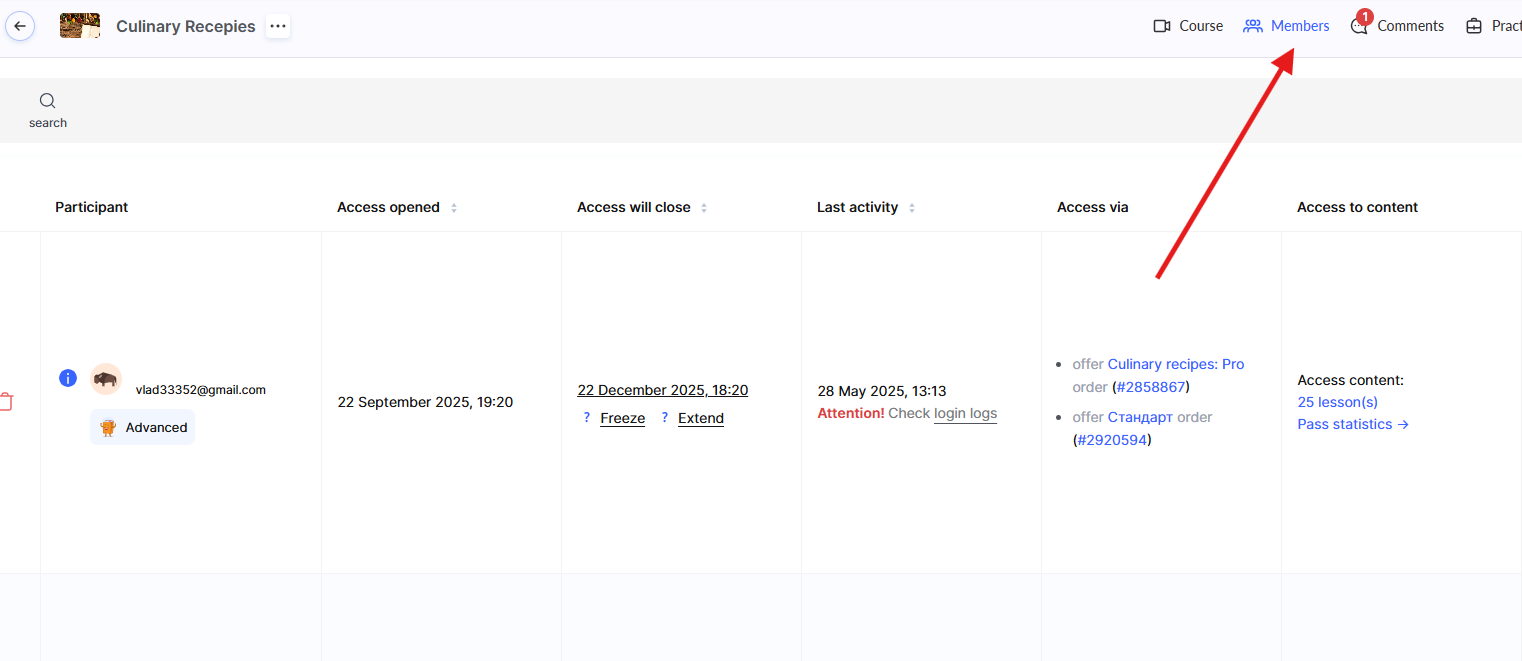
In the Courses section, open the desired course and go to the Members tab.
-
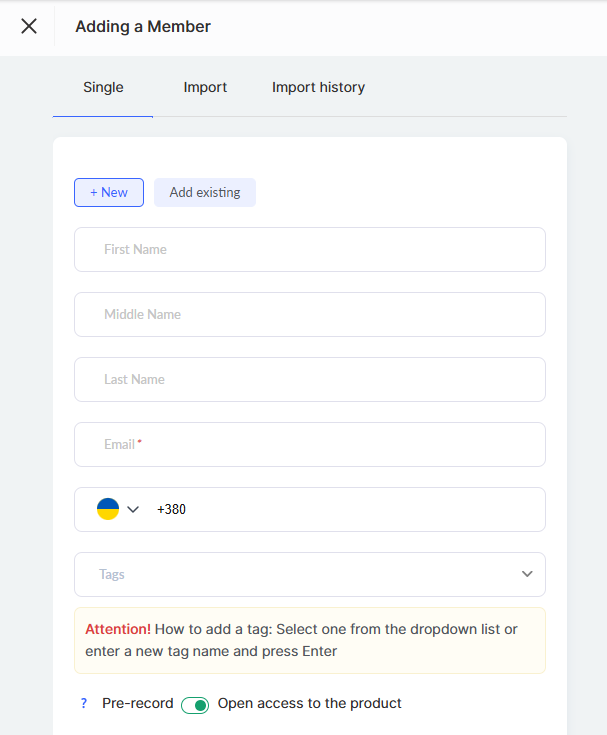
Click the + button and select the Single tab in the Adding a member modal window.

-
Choose one of the options: +New (to add a new contact) or Add existing (if the student is already in your contact database).
-
Fill out the form: Email is required. Other fields, such as name or phone number, are important but optional.
-
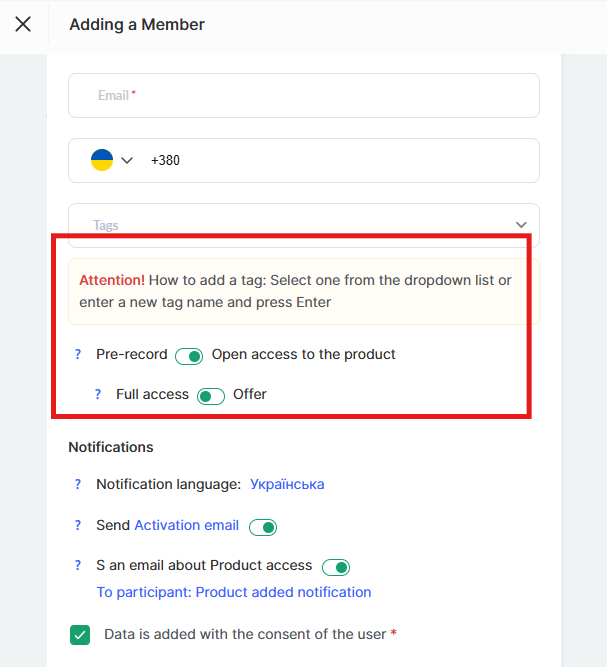
Enable the Open access to the product.
If you want to provide full access to all materials without restrictions, select Full Access. If you need to customize access (for example, limit time or choose specific lessons), select Offer (more details in the next chapter).
Important details:
Under the access opening settings, you can configure messages and choose which emails to send to the client or not send at all. You can disable standard notifications or use your template. If this is a new client, a personal profile is automatically created on the platform.
If the access email hasn’t arrived, ask the client to check the Spam or Promotions folders (especially in Gmail). Remember that we do not control which folder the email ends up in — the mail service determines this. The chances of it ending up in spam depend on the course name, email content (words like “cryptocurrency” or “sales” can increase the probability of being marked as spam), and whether the member has received emails from the platform or this course before.
To make sure the member can see the course in their account, check that the course status is Published. If the course is in Draft status, they will get the access email, but the content won’t be visible.
Full access lets the member see all lessons and modules right away, with no delays or time limits and also creates an individual order for them. The access stays active until you manually revoke it. However, we don’t recommend giving full access this way. Instead, it’s better to create an offer with full access settings. This makes managing access easier and gives you more flexibility for future changes.
Adding a member via CRM
The CRM in Kwiga helps you easily manage your student database, create personal access, process orders, and add extra fields to a member’s profile.

How to add a student via CRM:
-
Go to section CRM → Contacts and press the button + and in the modal window Add a contact select tab Single.

-
Fill out the form: be sure to include your email. You can also enable the Open access to the product option, choose an offer, and click Save.

The new contact will appear at the top of the CRM list. You can find it using search (by name, email, phone, etc.) or apply filters.
If a contact has already been added to the platform, but access to the product has not yet been opened, you can open access in the contact card.
Adding a product to a contact card
-
Find a contact in your CRM list.
-
Select a contact, click on the name and open the contact card and go to the tab Products: Click +Product.

Choose the product and offer, and set access options. Indicate whether access is paid and whether the transaction should be included in reports, then click Save

Adding a custom order in a contact card:
If you need to configure access manually, go to the Orders tab and click +Order.

Select a product, choose specific lessons or modules, set access duration, and adjust order settings. You can also mark whether payment is required and generate a payment link if needed.
For detailed steps on creating and managing orders, check out this article.
CRM provides flexible access management options, making it easy to work with your contact list.
Adding a student by offers
An offer allows you to customize course access, set time limits, schedule lesson releases, and assign an assistant. You can grant access directly from the offers page if needed.
How to add a participant to offers:
-
First, create an offer: Go to Courses → Price plans, Offers.

Click + Create an Offer and set it up by defining access duration, lesson opening conditions, and other settings.
Learn more about setting up offers in this article.
-
Return to the Price plans, Offers tab and find the one you need

-
Click +Add against the Number of sales and in the Add buyer modal window, select one of the options: +New (to add a new contact) or Add Existing (if the member is already in your database).

-
Set up access, fill in the required fields, and click Save.
Once a member is added to an offer, they will receive an email with course access details (if this option is enabled in the offer settings).
Additionally: Bulk import of students
For large groups, you can use the import function to add multiple contacts at once from a file. Learn more about importing and transferring student databases in this article.
Didn't find the answer? Contact the support service via online chat or Telegram