
Articles:
- How to give access to the course
- How to access a student's account
- How to view member progress
- How to Create a Certificate and Add It to a Course
- Automation: Awarding points upon completing lessons
- Conducting surveys (reactions, ratings, NPS)
- How to view all test attempts
- How to set up a test retake
- How to update a student's rate and keep their progress
- How to change access settings for a single student
- How to change the expiration date of the course
- The student entered wrong email
- How to extend access to a course
- Automation: Setting up reminders if a student does not log into the platform
- How to unblock a user
- Freezing and unfreezing access to a product
- How to find an email with a code needed to access Kwiga account
- Viewing the course as a student
- Pre-registration or waiting list.
- Importing and transferring the student database
- Comments: a convenient tool for user interaction
- Certificate Issuance After Passing a Test
- How an Expert Can Access Their Student Profile
- Student Registration and Authorization
- Certificates Report
- Manual issuance and reissuance of a certificate
- Managing products in a contact card: adding, closing, changing the date, and removing access
- Chats
Learn how to use chats in Kwiga to connect with students, assistants, and your team, provide one-on-one support, and communicate during webinars.
In this article:
Chats in Kwiga — a convenient way to communicate with students, assistants, and your team directly on the platform. They help you organize group conversations, provide individual support, and communicate during webinars.
In Kwiga there are three types of chats:
-
Group chats — for conversations among multiple members in one chat;
-
Direct chats — for one-on-one conversations with a specific user or team member;
-
Webinar chats — for members and the team to communicate during webinars. These chats are added automatically when a webinar starts.
To stay organized, you can group chats together. A chat group — a separate section in the chat list that helps you organize many chats and quickly find the ones you need.
In chats, you can send text messages, files, photos, audio, videos, and materials from Storage. You can also use reactions and other handy tools, including pinned messages: students can pin messages for themselves only, while administrators can pin them for themselves or for everyone in the chat.
If you need to send a message later, you can schedule it in advance — choose a suggested time or set a specific date and time.
You can create chats for specific products, plans, or courses. Membership then depends on what each user has access to. For example, you can create a chat for the "Premium" plan — and members who purchased that plan will be able to join the conversation.
You can also set up a chat for a segment, a contact list, or all school users, or add specific members yourself. If needed, you can add team members separately and set how long users have access to the chat.
To view and configure chats, open Courses — Tools in the school menu or use the chat icon in the platform's top menu.
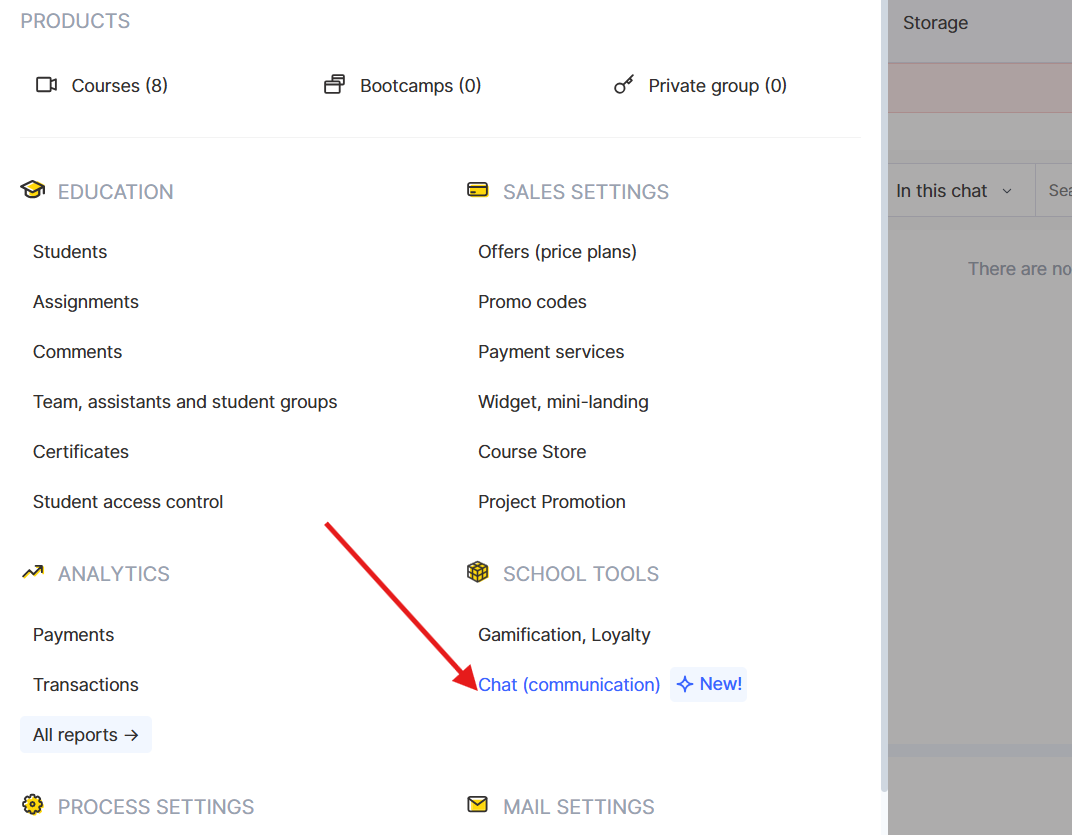
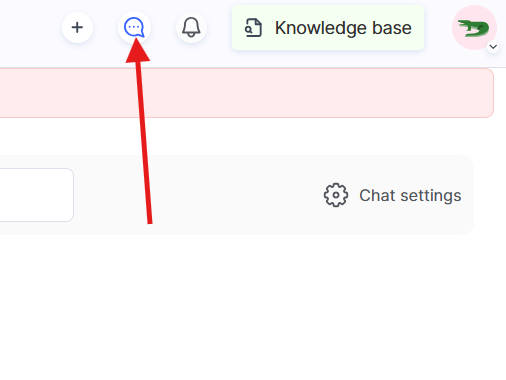
Chat types
Group chats
A shared chat for multiple members. You can add any number of students and team members. A group chat can be linked to a product, plan, course, or group, depending on how you want to use it. A group chat can be used not only for group conversations but also for individual student support.
In private mode, each student communicates with the team one-on-one within the group chat and cannot see other members' messages or requests. These individual conversations remain part of the group chat; they do not create separate direct chats between the student and assistant.
For example, you can create a support chat for members on the "Premium"plan: all students get access to the same chat, but each sees only their own conversation with the team. This lets you handle individual questions and provide support without creating a separate chat for every student.
Direct messages
One-on-one chats with a specific user. When starting a conversation, you can find a user by name or email and send them a direct message.
Webinar chats
Chats linked to webinars where members and the team can communicate during a webinar.
Creating and setting up a chat
1. Open "Chats" in the top menu.
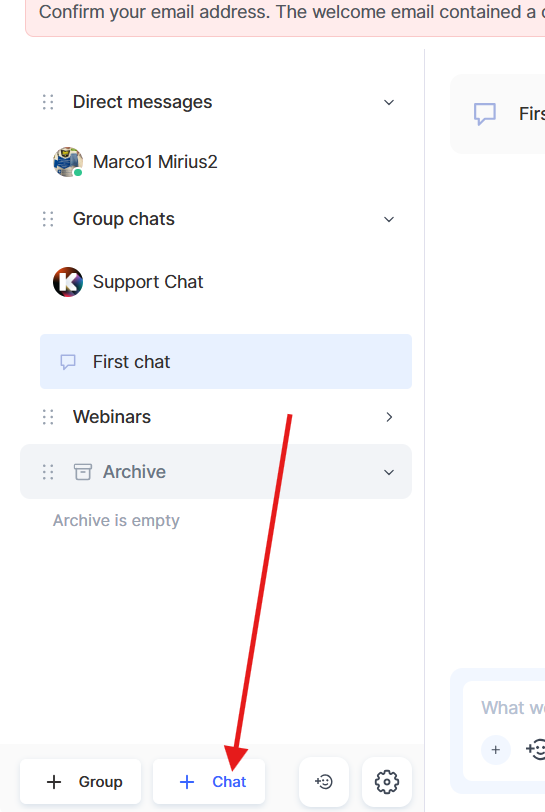
2. At the bottom of the screen, click +Chat and select a type: direct message or group chat.
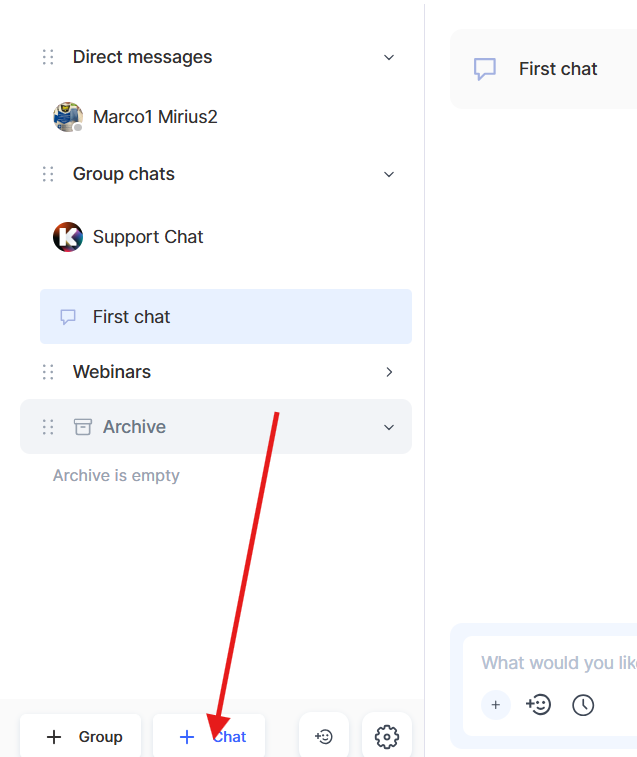
Or select a chat type and click +Chat (the button is available if there are no chats in that category), or click the "three dots" next to the category name and select Add chat.
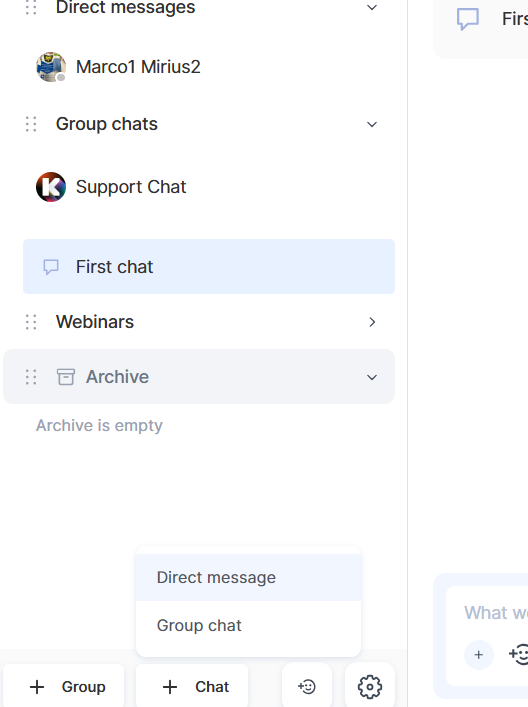
3. Upload a chat image if needed. Supported formats are PNG, JPG and JPEG; maximum file size - 1 MB; minimum resolution - 100 × 100 px.
4. Enter a chat name.
5. Click "Create chat".
General chat settings
In "General settings" , you can configure settings that apply to all school chats. The settings are divided into three tabs: "Widget", "Team", and "Notifications".
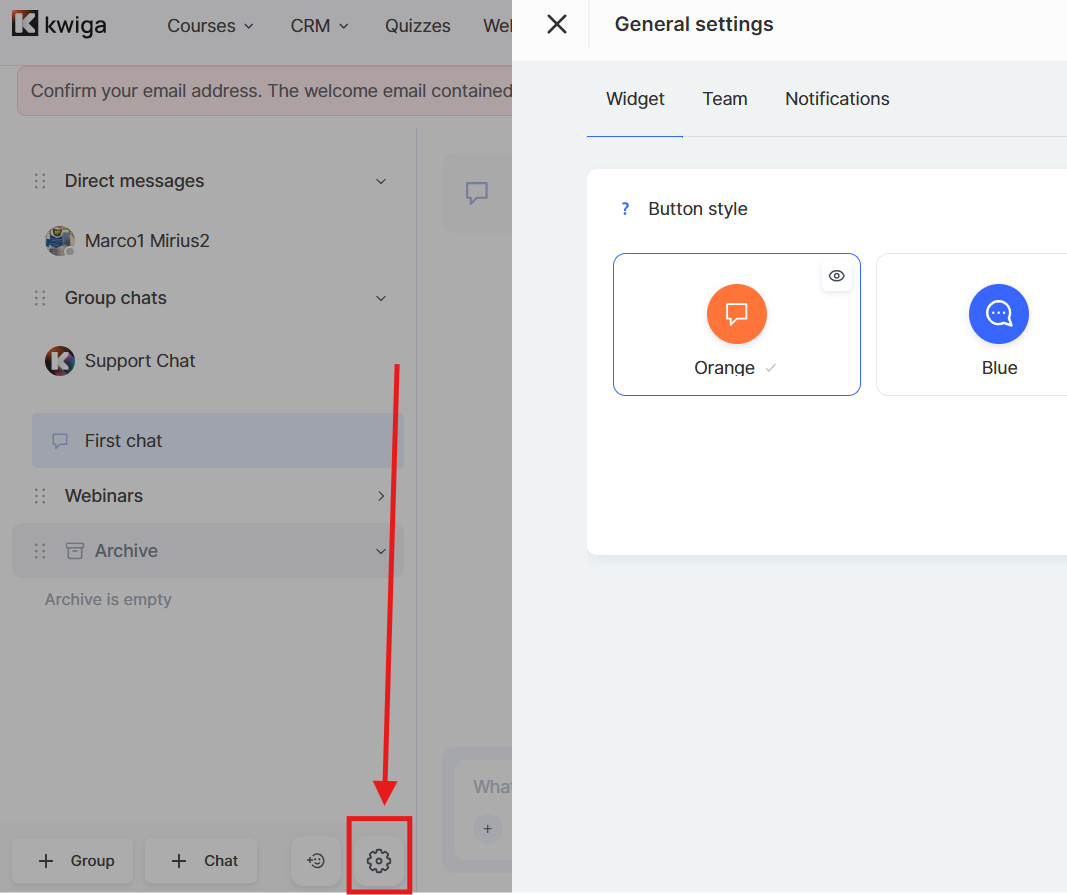
Widget
On the "Widget" tab, you can customize the chat button displayed on the student's page.
Choose from several ready-made designs or create your own button. The preview shows how it will look on the student's page.
Team
On the "Team" tab, you can choose which chats team members can access.
You can also:
-
add a team member;
-
view the chats a team member can access;
-
remove their access.
Notifications
The "Notifications" tab contains general notification settings for chats.
-
Message sound — turns the sound for new messages on or off in all chats.
-
Pop-up notifications — displays a pop-up with the text of a new message when you're in another chat or section.
-
Do not disturb — lets you set a time when new messages arrive without a sound or pop-up. Unread message counts continue to update. Times follow the time zone set in your profile.
You can also set notifications for each chat separately — for example, turn off sound and pop-up notifications for just one chat. You can do this in that chat's settings.
Individual chat settings
You can configure each chat separately. Change the chat image members see, set access and its duration, choose what happens when access expires, and enable additional features — private support mode, direct messages with an assistant, and assistant anonymity.
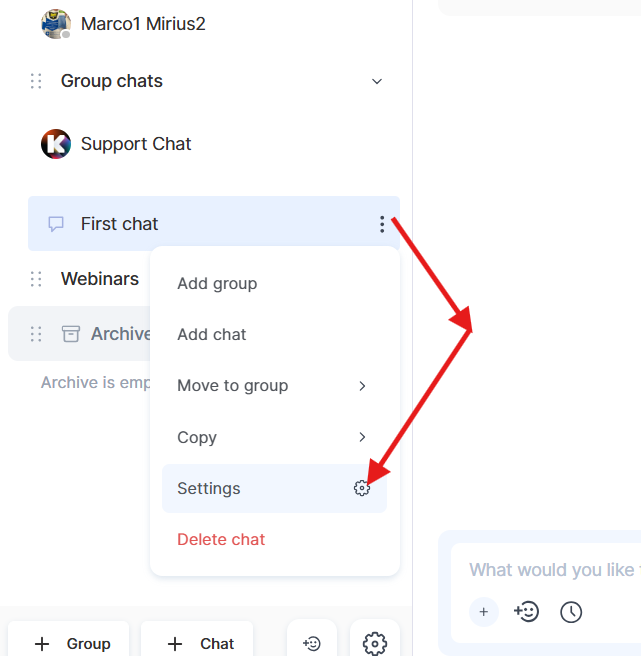
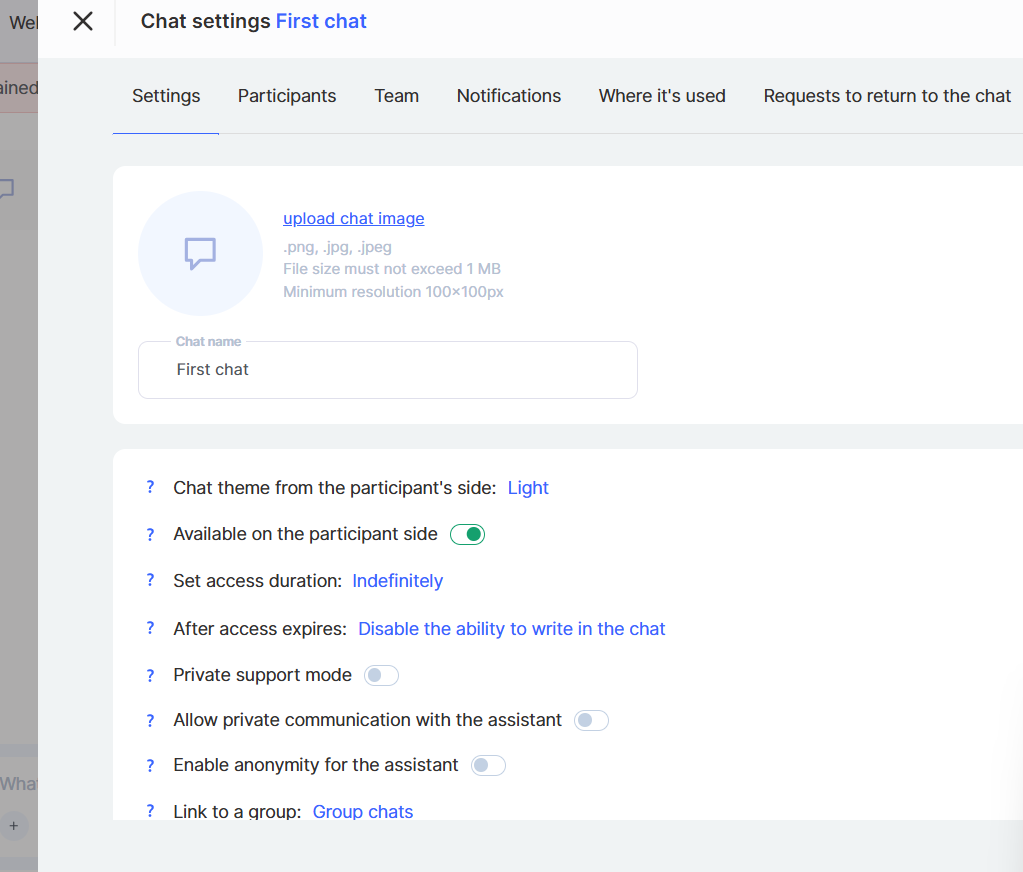
Image and name
You can change the chat image and name after creating it.
Chat theme
You can choose a light or dark theme for the chat window members see.
Member access
If a chat is linked to a product or plan, members can see it while they have access. If it isn't linked, the chat is available to users you've granted access to. If you turn off access, the chat and its history disappear for members.
Access duration
You can use the duration set in the plan, choose start and end dates in the calendar, or leave access unlimited.
After access expires
You can hide the chat and its history, or keep them available but prevent members from sending messages.
Private support mode
In private support mode, members see only their own messages and replies from the team. Assistants can see all requests in the shared chat.
You can turn this mode on or off only before anyone starts chatting.
In support mode, a group chat makes it easy to help each student individually. Members share one chat, but each sees only their own conversation with the team, not other students' messages.
All these conversations stay in one group chat — you don't need to create a separate private chat for each student.
For example, you can use this setup to support students on a specific plan when each member needs individual help but a shared conversation isn't suitable.
Direct messages with an assistant
You can allow members to send direct messages to assistants. Choose which assistants are available in the "Team" tab.
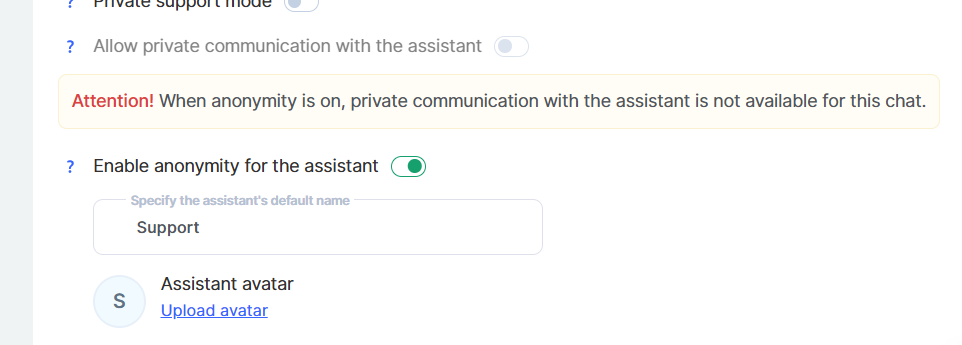
Assistant anonymity
When anonymity is enabled, members see messages from all assigned assistants under one name. By default, that name is "Support". You can use this with Private support mode or on its own if you want students to see all team messages as coming from one support team, regardless of which assistant replies.
Chat members
In the "Members" tab, you can manage the users in the chat.
You can:
-
view the list of members;
-
search for a member;
-
filter the list;
-
add a new member using the "Add member";
-
view the source from which the user was added to the chat;
-
prevent a member from sending messages in the chat;
-
hide all of a member's messages — both past and future.
The total number of chat members appears at the top of the tab. You can also manage messages and restrict a member's permissions directly from the chat feed. To do this, click "…" next to the member's message and select an action.
Team
The "Team" tab shows the employees assigned to the chat.
Here you can:
-
find an employee using search;
-
see which chats each employee can access;
-
add an employee to the chat team using the «+».
The list of team members available to add includes employees with the appropriate access permissions. For an employee to appear on the list, they need the "Chat — Access own chats" permission. To send messages, they also need the "Chat — Send messages in accessible chats".
Notifications
You can manage chat notifications separately in the chat settings:
-
Message sounds — turns sound notifications for new messages in this chat on or off.
-
Pop-up notifications — turns pop-up notifications for new messages in this chat on or off.
Both settings apply only to the current chat, so you can tailor notifications to its purpose.
Where it's used
In the "Where it's used" tab, you can quickly check which products and plans this chat is linked to.
-
Products — shows the products linked to the chat.
-
Plans — shows the plans linked to the chat.
For example, if you've linked the chat to a product or plan, it will appear in this tab. If the chat isn't linked to anything, you'll see a message saying so.
This lets you check at any time where the chat is used and which users it's intended for.
Requests to rejoin the chat
If a member leaves a group chat, they can request to rejoin.
The "Requests to rejoin the chat" tab shows these requests. Here, the team can see who wants to return to the chat and approve or reject each request.
If no members have requested to rejoin yet, the tab will be empty.
Managing chats
In Kwiga you have convenient tools for managing conversations. You can edit and delete messages you've sent, and team members can moderate conversations in chats they can access. Members can leave group chats on their own, while the team can manage membership and handle requests to rejoin.
Editing and deleting your messages
If you want to correct or add to a message you've sent, you can edit or delete it at any time. There is no time limit for editing or deleting your own messages.
After you edit a message, an "edited" label appears next to it. This lets members know the original message has changed.
Both students and assistants can edit their own messages.
Assistants can also delete messages from other team members if they have the required permissions. This does not apply to students' messages.
Managing membership and deleting chats
If a member leaves a group chat, they stop receiving notifications and can no longer send messages. Their previous messages remain in the conversation. If they want to return, they can request to rejoin — the team can approve or reject the request.
You can also delete private chats. When a member deletes a chat, their own messages are removed from the conversation, while the other person's messages remain. If only one person deletes the chat, the other can continue the conversation — a new message makes the chat active again.
Administrators can manage deleted chats. Deleted chats are kept in the archive, where you can restore or permanently delete them. Chats that aren't restored are automatically deleted after 30 days.
You can also delete and reorganize chat groups. Deleting a group doesn't delete its chats — they move to the system group "Group chats".
Adding a chat to a course
You can link a chat directly to a course so members and the team can use it to communicate during the course.
To link a chat:
-
Open the course.
-
Go to the course settings.
-
Find the "Chats".
-
Select the chat you want to link to the course.
-
Save your changes.
Once a chat is linked to a course, students who have access to the course and have accepted the school invitation can access it.
If a student joins a course on their own — for example, by purchasing an offer or accepting a free offer — their school invitation is automatically considered accepted. The student is added to the chat immediately and starts receiving messages.
If a student was added to a course manually, they'll be asked to accept the school invitation when they first sign in to the project. Until they accept the invitation:
-
they won't be added to the chat;
-
you can't send them messages in the chat;
-
the chat won't appear in their profile.
After accepting the invitation, the student can access the chat according to the course and chat settings.
You can link one or more chats to a course. For example, you can create separate chats for:
-
general member discussions;
-
course questions;
-
talking with an assistant;
-
separate groups or course cohorts.
After you unlink a chat from a product, new members will no longer be added to it. Members who gained access to the chat through that product will also lose access and be removed from the member list. Their messages and conversation history will remain in the chat.
Private chats
Private chats let you talk one-on-one with a specific student or another user. They're useful for personal support, consultations, feedback, and questions that don't need a group discussion.
To start a private conversation:
-
From the top menu, go to: Courses - School Tools - Chat (communication) or click the chat icon in the platform's top menu.
-
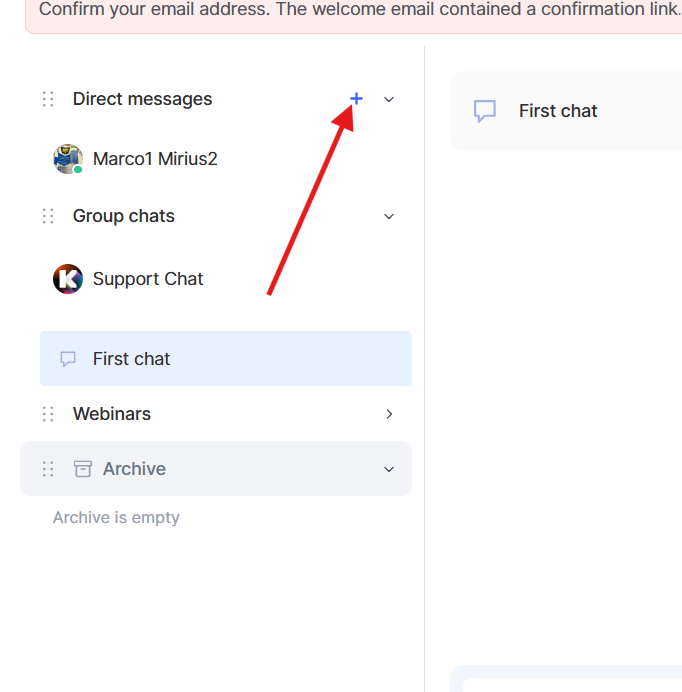
Hover over the group name Private messages, and a + will appear. Click it to create a chat. On the right, enter the member's email address or name.
You can also click + Chat at the bottom of the sidebar. Select Private messages as the type, then enter a name or email address.
-
Select the user and create the chat.
Private chats have the same core features as other chats: you can send text messages, files, photos, audio, videos, and materials from Storage, use reactions, and schedule messages for a specific date and time.
Access settings and other chat options also apply to private chats. You can change them after creating the chat.
Please note: if a student was added to the project or course manually, they first need to accept the invitation to the school. You can't start a private conversation with them until they accept it. Once they do, you can send them messages.
Didn't find the answer? Contact the support service via online chat or Telegram