Articles:
- Orders: creating and editing orders.
- How do I add an individual payment link to a student
- Transactions
- How to set up sending your own email after purchase
- Integration with the Sendpulse chatbot
- How to integrate a payment system on Kwiga
- How to set a specific language for an offer page
- Important Project Settings
- How to grant access to students if the sales were not made on Kwiga
- Payment without authorization
- How to create a new stream with your own schedule
- How to give access to one student
- How to change access for one student
- How to set up demo access to a course, open house day at the school
- Setting up subscriptions (recurring payments)
- Automation: Follow-up email sequences (unpaid orders and applications)
- Credits and installments, payment in parts
- Promotional offer
- Discount coupons and possible settings
- How to launch course registration with prepayment
- How to create cross-sell offers in Kwiga
- How to start selling on Kwiga: creating a price plan
- Creating multiple pricing plans
- Selling consultations and one-on-one sessions
- How to Change a Student's Plan (Additional Payment on Kwiga)
- How to sell (give access to) parts of the course
- How to implement access renewal sales
- Selling through a registration form on a third-party site
- Selling through a mini-landing page created on Kwiga
- How to add a video to a page (mini-landing, course page)
- How to create a link with an applied coupon
- Offers and Payments on Kwiga: How It Works
- Repeat Sales: Setting Conditions and Sending a Coupon Based on Purchase Count
- Setting up notifications in a Telegram channel
- Sending Emails with Promo Codes (Unpaid Orders)
- Course Store: Settings and Capabilities
- Setting Up the Public Offer Page
- Organization of CPD on Kwiga: step-by-step guide
- How to set up a thank-you page after payment
- Set up access to lessons, sections, and modules
We’ll explain how to set up email delivery with a promo code for clients who have already made several purchases at your school.
In this article:
Sending a promotional email with a discount code to a client who is already familiar with your products is a great way to reward loyal students and encourage repeat purchases. In this article, we’ll show you how to filter the right audience, create a personalized email message, and set up a promo code. Use this opportunity to strengthen customer relationships and boost repeat sales.
Scenarios to Increase Repeat Sales
On the platform, you can set up various automated scenarios to reward loyal clients and drive repeat sales. Below are some examples of such scenarios:
Coupon After Completing a Mini-Product
Set up the sending of a discount coupon after a student has not only paid for but also started a mini-course. We recommend tracking the completion of at least one lesson — this indicates that the student sees the value in your content and is ready to move forward.
Coupon for Two or More Purchases
Automatically send a discount coupon to clients who have purchased two or more products. The coupon can be time-limited, tied to a promotion or holiday — creating a sense of urgency and encouraging purchases.
Discount on the Next Product After Course Completion
If a student completes the main course, offer them a discount on the next level or a related product.
Coupon for Inactive Users
Bring back clients who haven’t purchased in a while with a personalized promo code with a limited validity period.
These scenarios are easy to configure and can run automatically. Use them to maintain interest, increase engagement, and stimulate further sales.
Here are steps to implement any of the above scenarios:
-
Create a customer list
-
Create a coupon
-
Create an email
-
Create automation
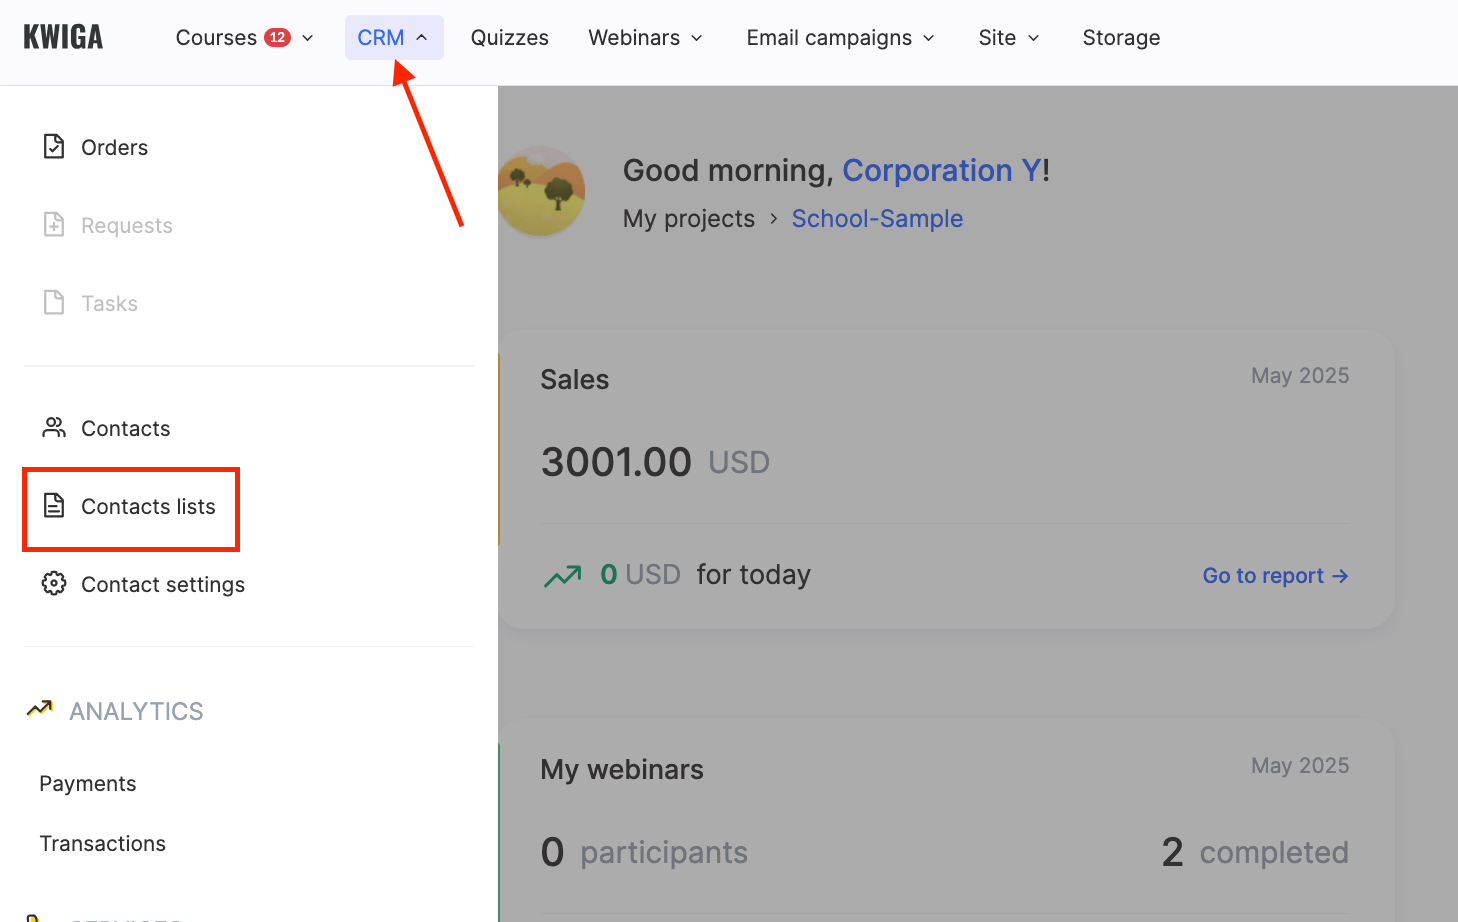
Creating a List
You need to create a special list to restrict coupon usage and make it available only to certain customers. This helps prevent the coupon from being shared with third parties.
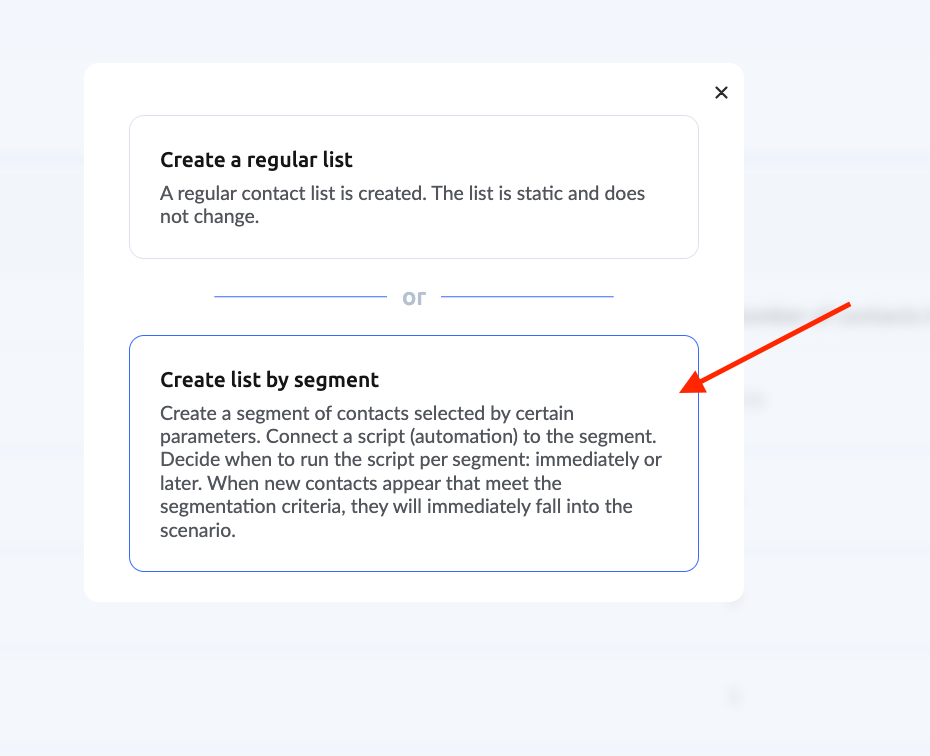
To do this, go to the "CRM" section in the top panel and select "Contact Lists." Then create a new list by segment. This list will be automatically populated if the customer meets the set conditions.
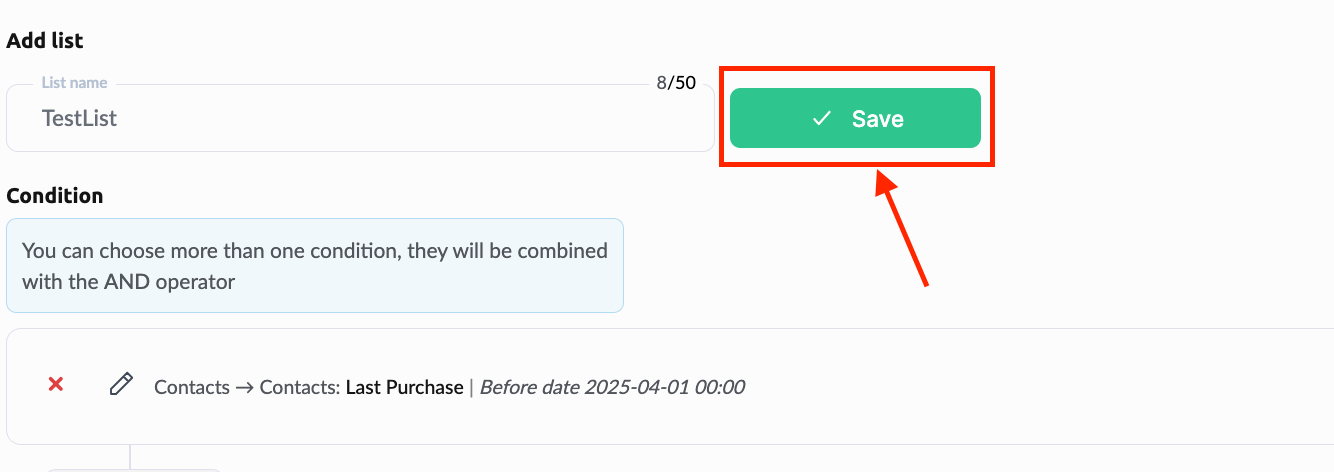
After entering the list's name, do not click the Save button immediately.
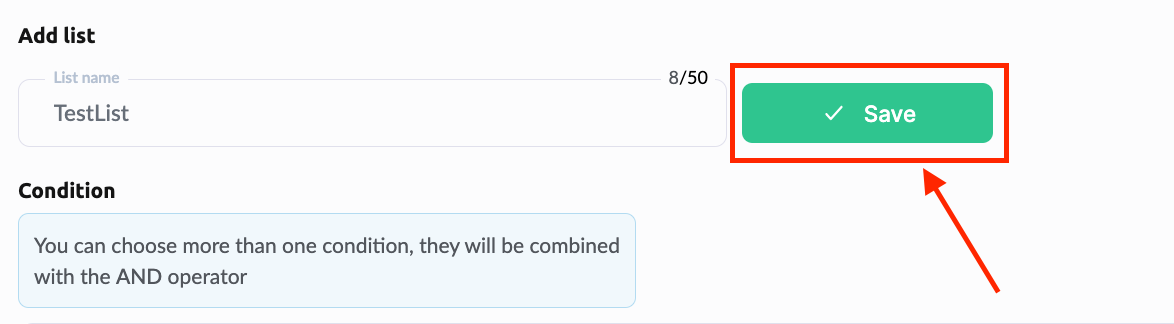
Only click Save after all conditions are set. A segmented list can only be saved once. Saving the list without conditions means the list will be saved empty. Here are some examples of filter conditions for different discount scenarios:
the client has purchased any of your products, or made 2 or more purchases:

the client purchased a specific course at a specific price tier:

the client purchased a course at any price tier (add several conditions combined with the OR operator)

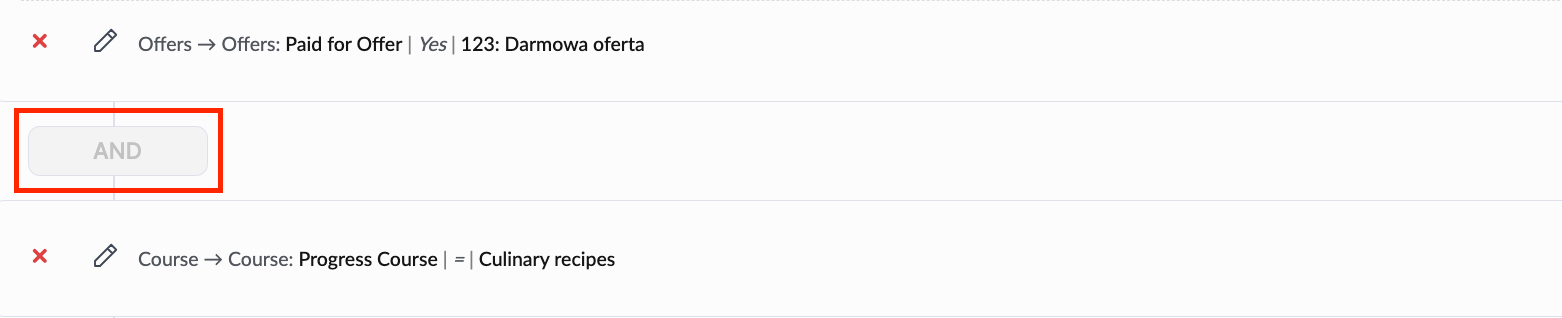
the client purchased and completed part of the course (use two conditions: course access and progress, specifying the necessary percentage, combined with the AND operator):
the client fully completed the course (we recommend specifying a slightly less than 100% completion rate, as some students may skip parts, affecting the final percentage. Choose a figure based on your general statistics, number of lessons, the importance of full completion, and your campaign goals):

the client made a purchase (payment before a specific date) but has not been active recently (you choose the period):
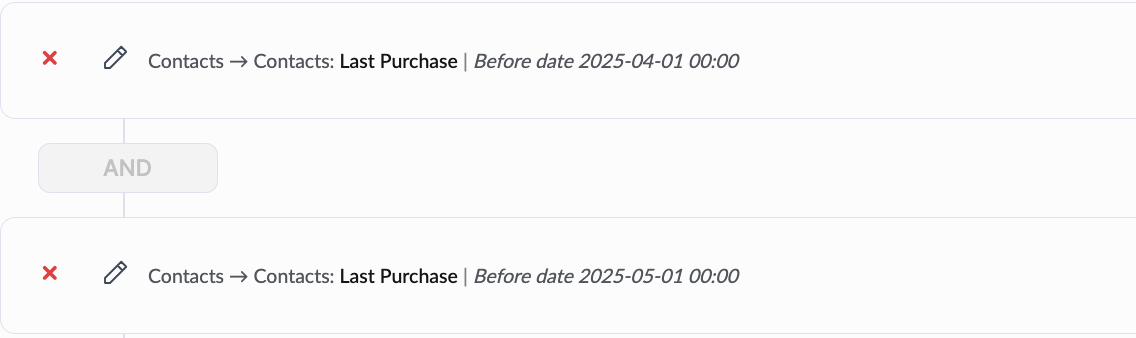
You can combine various conditions based on your goals. After you’ve added all the desired conditions, click the Save button near the list title at the top of the page.
Creating a Promo Code
Now, you must create a coupon to provide the desired discount.
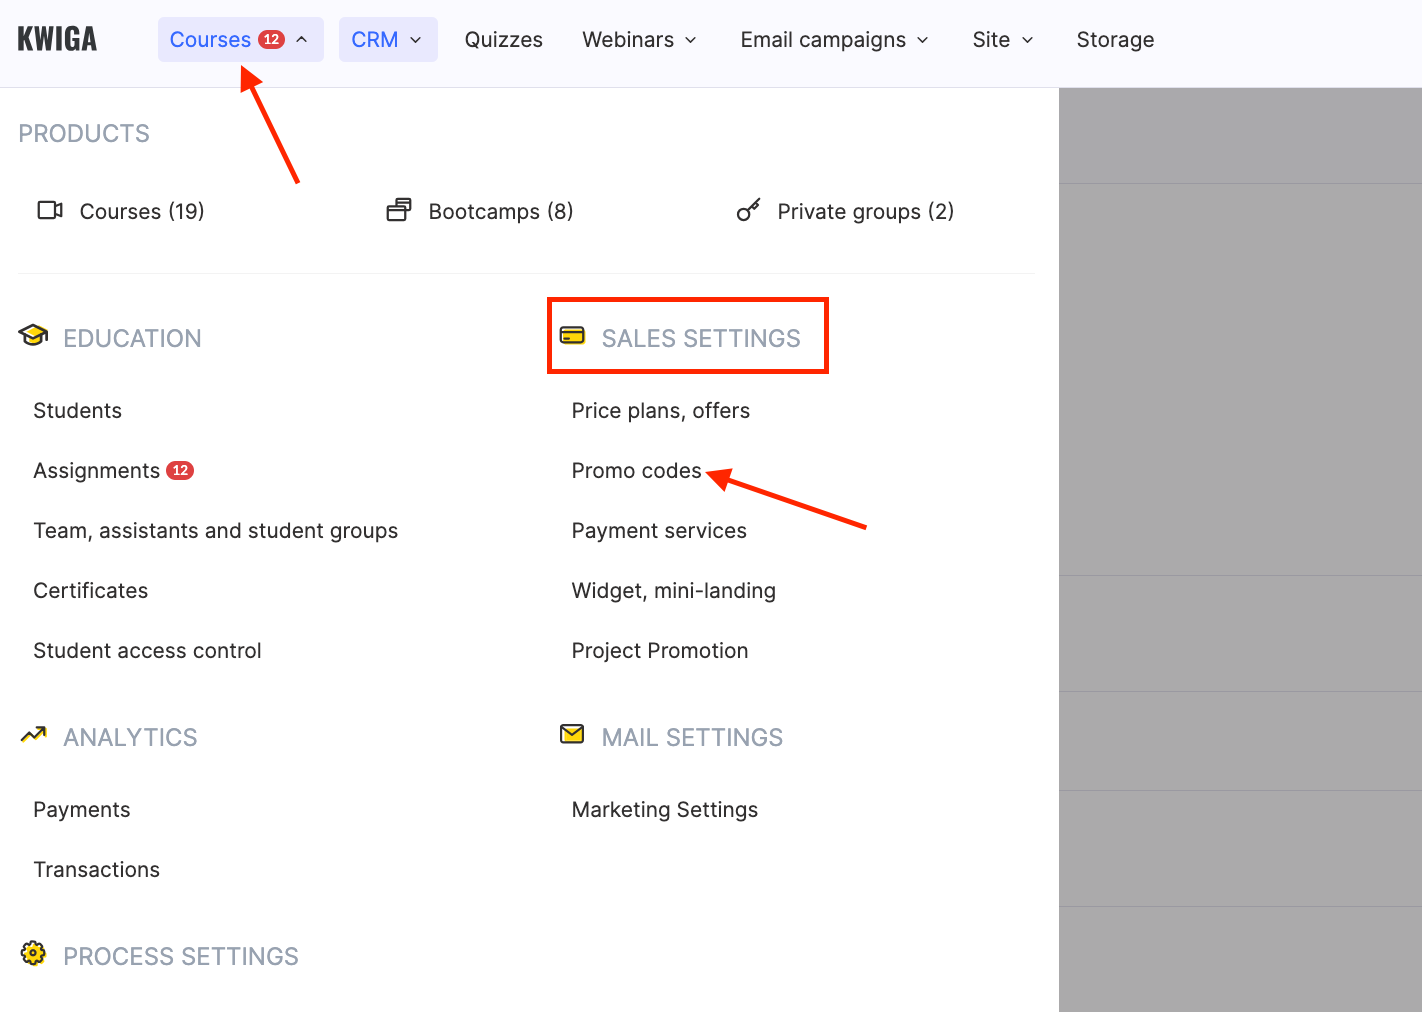
To create it, go to the “Courses” section, and under “SALES SETTINGS,” select the “Promo codes” option.
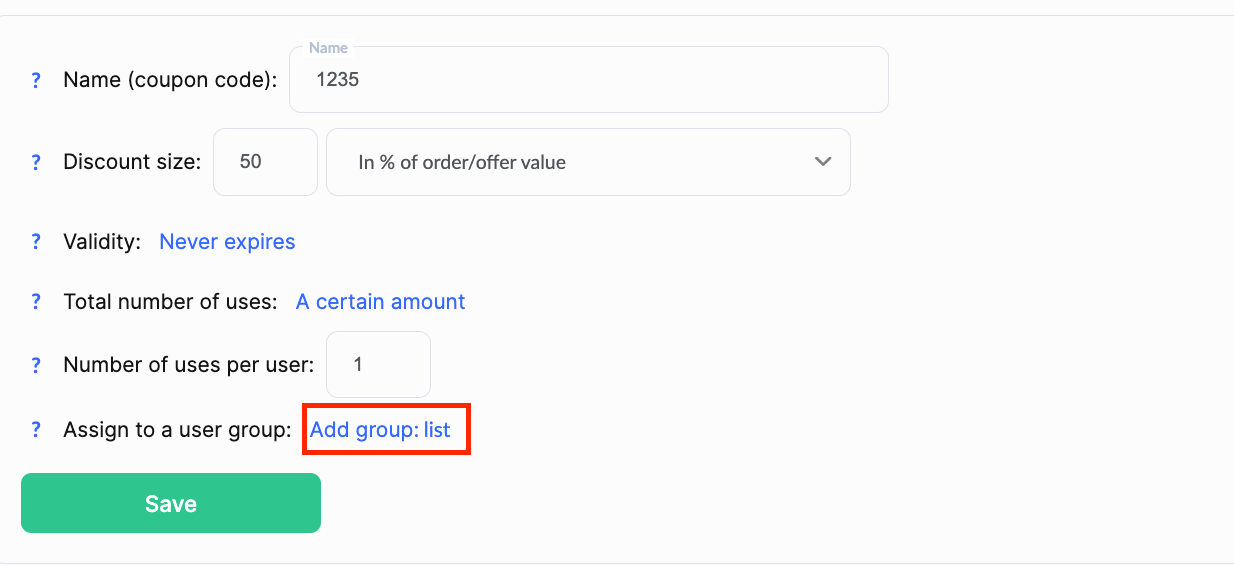
Fill in the fields for the coupon name and discount amount. In the validity period field, specify the end date until which the discount should be active.
Note: If you plan to offer customers a limited-time discount (e.g., 1 hour or 3 days), after which the discount should no longer apply to a specific customer—while the scenario continues for others—select "unlimited." The validity period for an individual customer will be controlled through automation.
After creating the coupon, it's essential to specify which user group it will be available to.
To do this, in the “Assign to a User Group” section, click and select “Add Group,” then choose the group you previously created for the participants eligible for the discount.
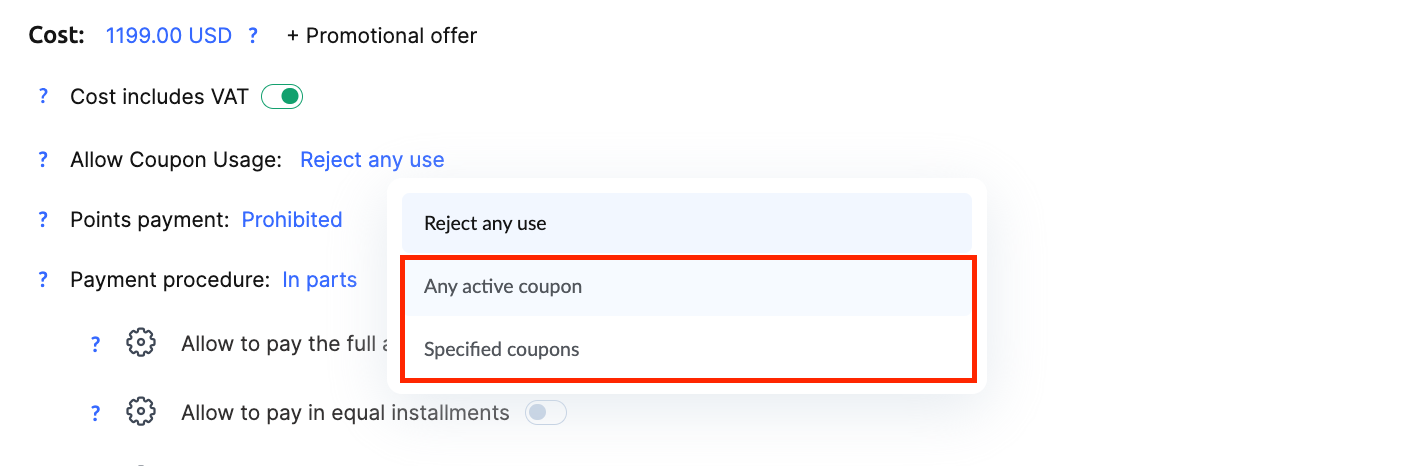
You must indicate that coupons can be applied in the settings of the offer for which you created the coupon.
To do this, go to the offer settings, select the third option in the “Allow Coupon Usage” field, and specify the coupon you created.
Creating an Email
You also need to create an email and include your coupon in it.
This email will be sent to the participant if they have not completed the payment for the offer.
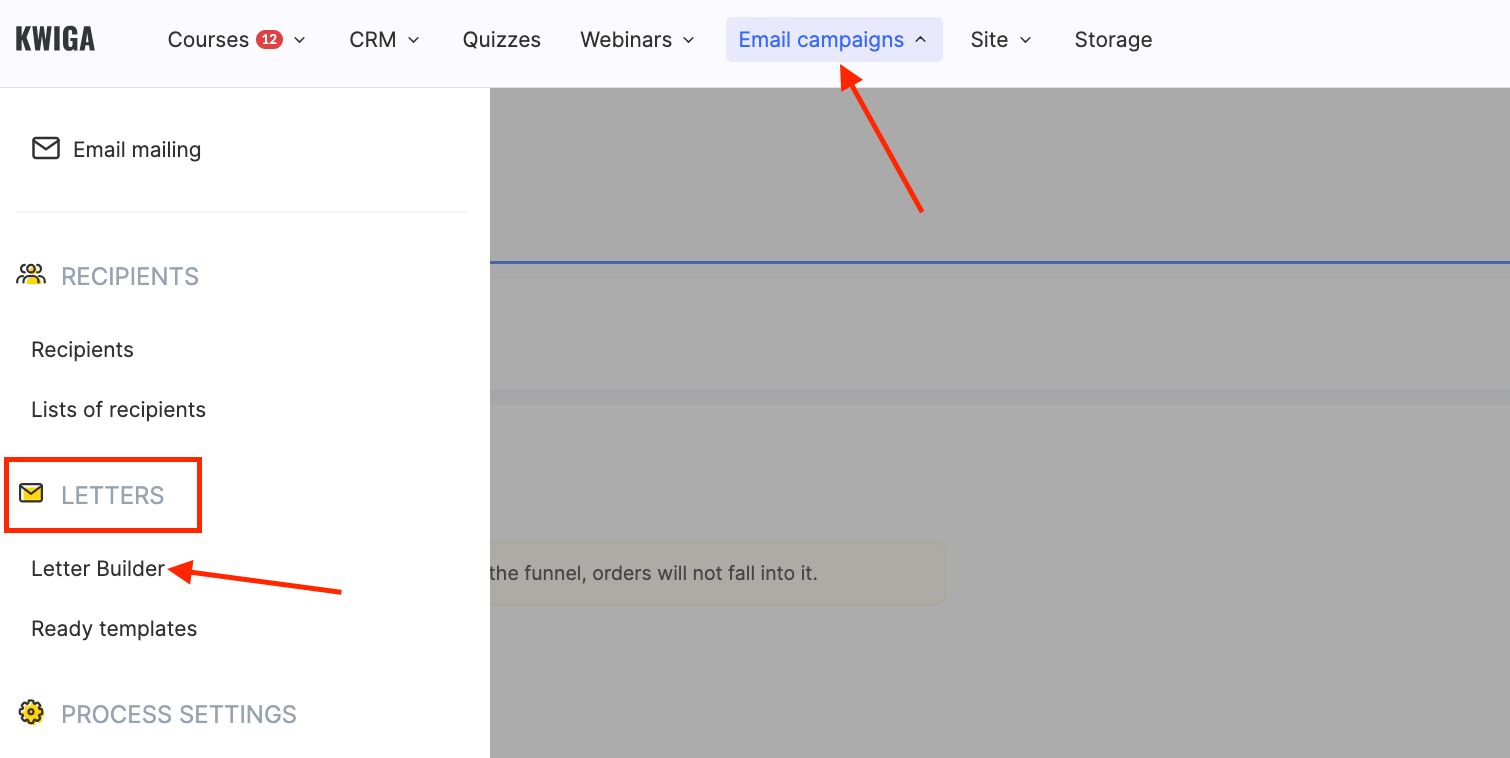
To do this, go to the “Email campaigns” section and under “Letters,” select “Letter Builder.”
The content of the email with the coupon is up to you, but we recommend including the following:
-
Coupon name – so the customer immediately understands which offer it refers to.
-
Discount amount – this is a key factor that can encourage completing the purchase.
-
Validity period – mention that the coupon is active, e.g., for X hours, to create urgency.
-
Price before and after the discount – this helps the customer see the actual benefit.
A well-crafted email with a compelling offer and clear terms increases the likelihood that the customer will complete the purchase.
More detailed information about creating an email is described in this article.
Creating Automation
Before proceeding with this section, we recommend reading the article on general automation information.
The automation described in this article sends an email with a discount coupon. The coupon is valid for a specific user for a limited time (30 minutes, 24 hours, a week, etc.). After this period, the coupon will no longer work for that specific customer.
The discount coupon configured for sending within the automation will only be sent to those customers who are added to the list after the automation is created.
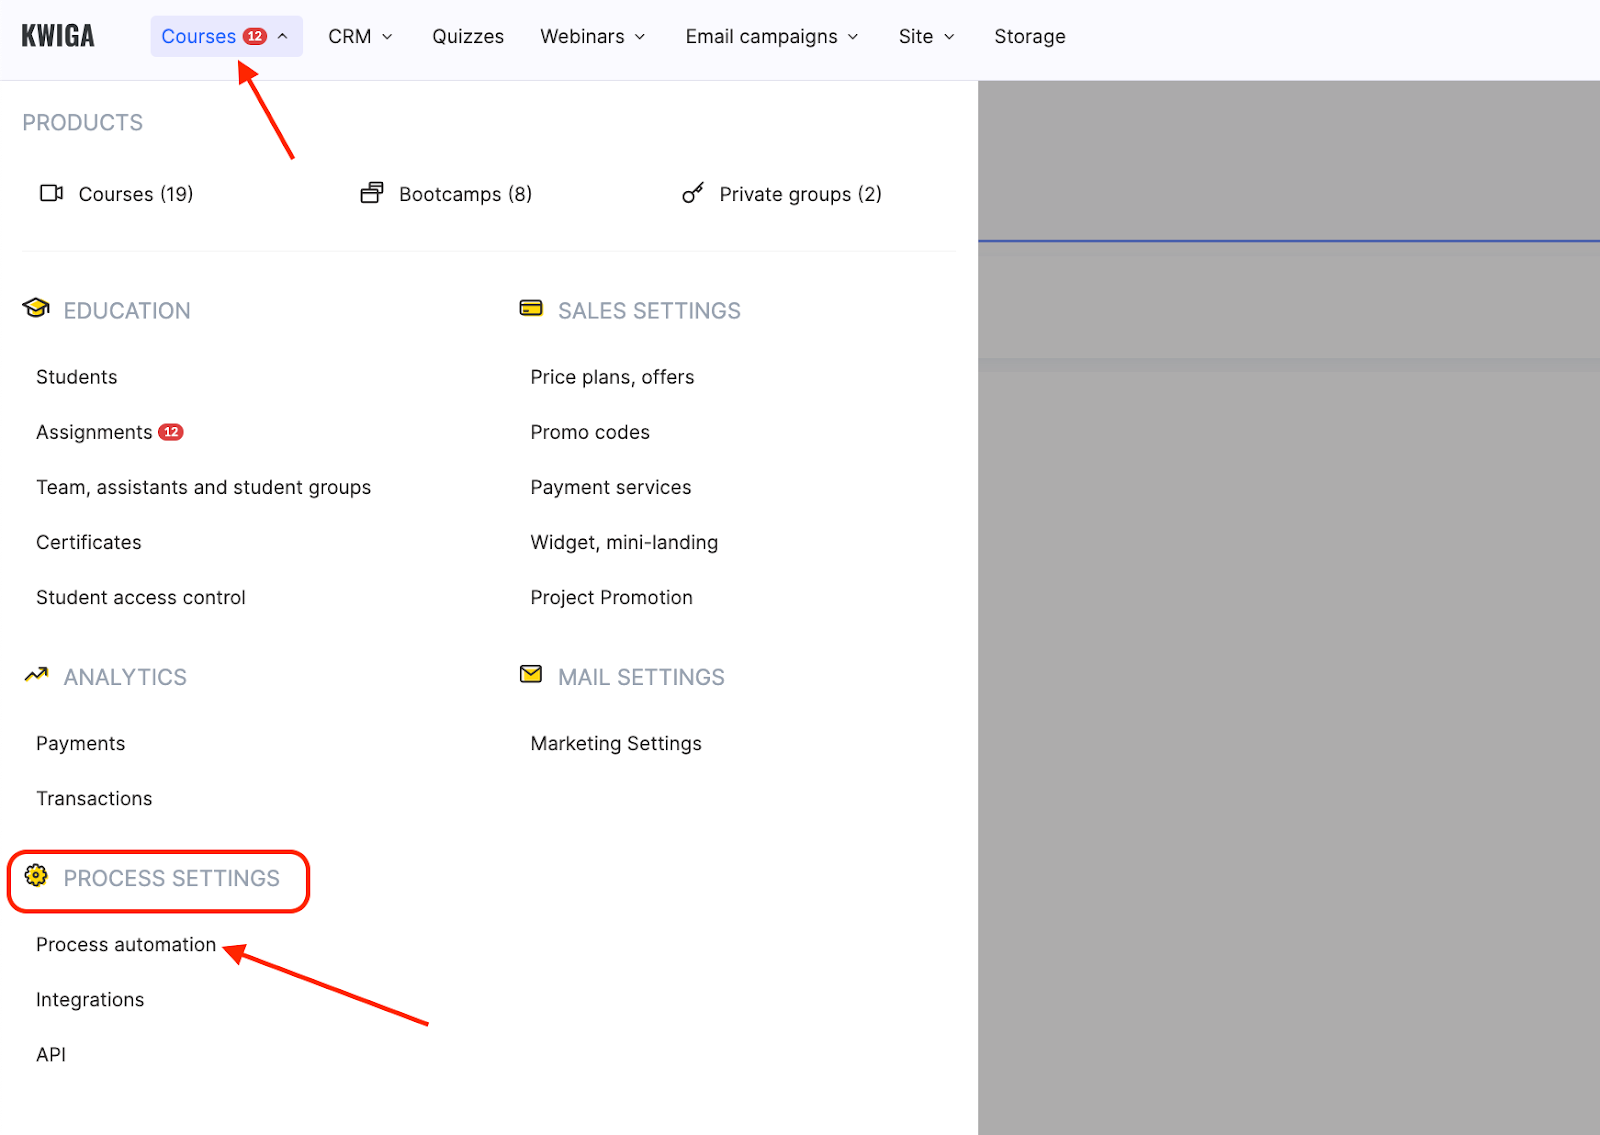
To create automation, go to the “Courses” section, select “Process Automation” under the “PROCESS SETTING” column, and click “+Scenario.”
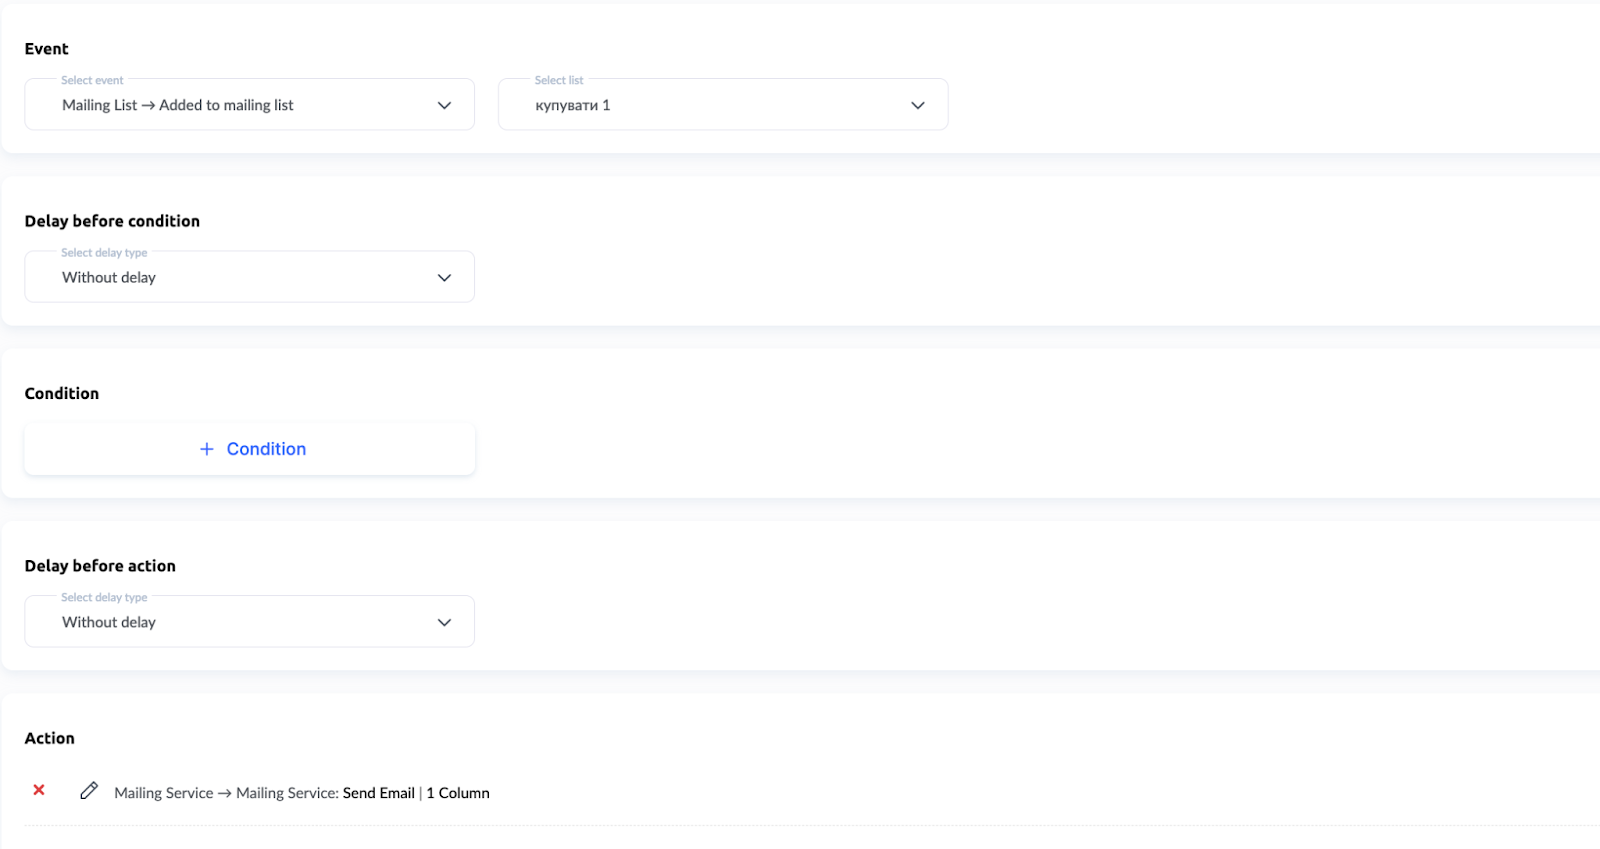
Setting Up the First Trigger
First, in the “Event” field, select "Mailing List -> Added to mailing list." The screenshot shows an example list name—use the list you created earlier.

Leave the “Delay before condition” and “Condition” fields unchanged.
If you want the customer to receive the promo code immediately after purchase, leave the “Delay before action” field unchanged (i.e., no delay). However, if you want the discount email sent a day after the purchase (or another time interval), specify that period in the “Delay before action” field.
Next, in the “Action” field, select:
Mailing Service → Mailing Service: Send Email.
The final configuration of the trigger should look like this:
Setting Up the Second Trigger
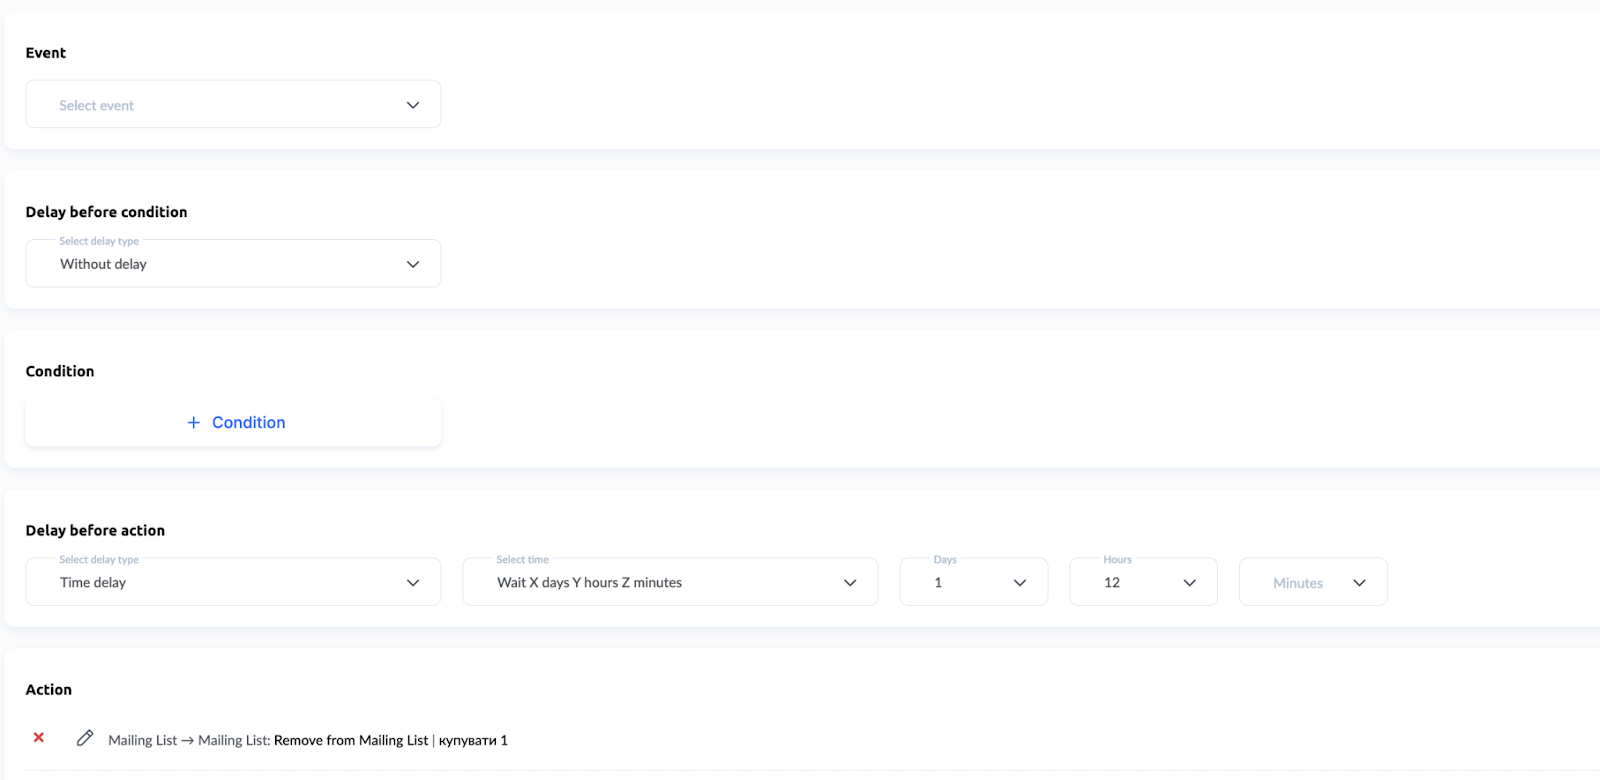
The next step is configuring the second trigger, which removes the customer from the list. This ensures the coupon becomes inactive after a specific time. If you do not want the coupon to expire, you can skip this step—one trigger is enough.
To set up the second trigger, click the “+trigger” button next to the scenario created in the first step. This adds another trigger to the sequence/scenario.
Do not select anything in the “Event,” “Delay before condition,” or “Condition” fields.
Scroll to the “Delay before action” field and select the necessary delay period when the client can use the coupon.
For a 24-hour coupon validity, choose:
Time Delay → Wait X days Y hours Z minutes = 24 hours.
The example shows the final setup for a coupon valid for one and a half days.
In the “Action” section, choose Remove from mailing list and specify the appropriate contact list.
Didn't find the answer? Contact the support service via online chat or Telegram