Articles:
- Orders: creating and editing orders.
- How do I add an individual payment link to a student
- Transactions
- How to set up sending your own email after purchase
- Integration with the Sendpulse chatbot
- How to integrate a payment system on Kwiga
- How to set a specific language for an offer page
- Important Project Settings
- How to grant access to students if the sales were not made on Kwiga
- Payment without authorization
- How to create a new stream with your own schedule
- How to give access to one student
- How to change access for one student
- How to set up demo access to a course, open house day at the school
- Setting up subscriptions (recurring payments)
- Automation: Follow-up email sequences (unpaid orders and applications)
- Credits and installments, payment in parts
- Promotional offer
- Discount coupons and possible settings
- How to launch course registration with prepayment
- How to create cross-sell offers in Kwiga
- How to start selling on Kwiga: creating a price plan
- Creating multiple pricing plans
- Selling consultations and one-on-one sessions
- How to Change a Student's Plan (Additional Payment on Kwiga)
- How to sell (give access to) parts of the course
- How to implement access renewal sales
- Selling through a registration form on a third-party site
- Selling through a mini-landing page created on Kwiga
- How to add a video to a page (mini-landing, course page)
- How to create a link with an applied coupon
- Offers and Payments on Kwiga: How It Works
- Repeat Sales: Setting Conditions and Sending a Coupon Based on Purchase Count
- Setting up notifications in a Telegram channel
- Sending Emails with Promo Codes (Unpaid Orders)
- Course Store: Settings and Capabilities
- Setting Up the Public Offer Page
- Organization of CPD on Kwiga: step-by-step guide
- How to set up a thank-you page after payment
- Set up access to lessons, sections, and modules
This describes the functionality of coupons, available settings for coupons, and offers that allow the use of coupons.
In this article:
Coupons are a convenient way to offer customers personalized discounts and flexibly manage product prices. On the Kwiga platform, you can create coupons with various conditions and restrictions and configure their usage in specific offers.
To view already created coupons or add new ones, go to Courses → Promo Codes.

On Kwiga, coupons can function in two formats:
-
Percentage Discount – from 1% to 100% of the product's value.
-
Fixed Amount in Currency, e.g., 100 UAH or 33 USD.
How to Create a Coupon
To create a coupon, click +Coupon.

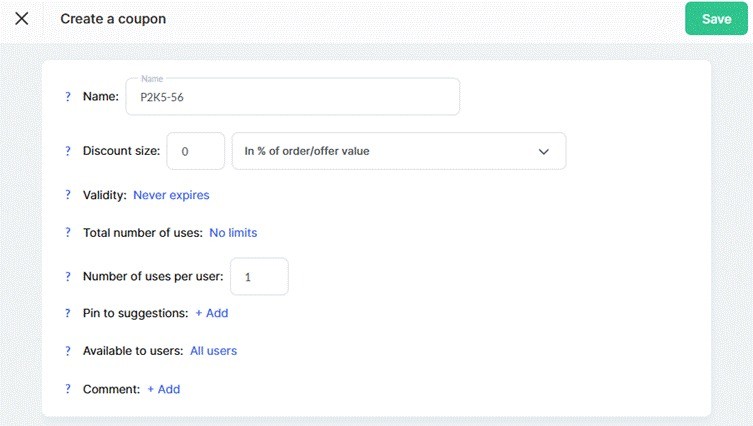
This will open a settings page where you need to enter details to Create a coupon.

Coupon Name – This is the code customers enter to receive a discount. You can modify the name and enter a convenient word or phrase, replacing the suggested generated code.
Discount Size – Enter either the percentage discount or a fixed discount amount in the first field, and select the appropriate option from the dropdown menu.
Validity – Set the coupon's active period, meaning the timeframe from the present moment until the date when the discount can be applied to an order.
Total Number of Uses – Define how often customers can use this coupon.
Number of Uses Per User – Specify how often each customer can use the discount.
Assign to a User Group – This setting allows you to create a coupon valid only for specific customers on a designated list. You can manually create this list or use automation. For example, you may want to offer a discount only to students who have already purchased at least one product or completed a final assignment.
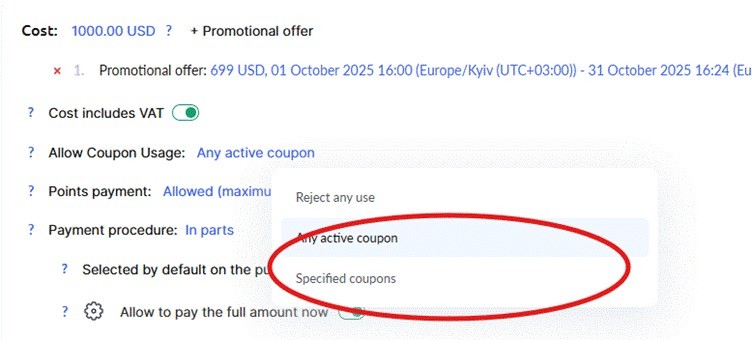
Important: A coupon can also be linked to offers both during their creation and while editing them. Additionally, in the offer settings, you can specify which coupons apply to it. More details about configuring offers can be found in a separate article.
Available to users — Determines who will be able to use the coupon:
For all users — The coupon is available to any customer who knows it.
For a specific user — The coupon will only work for one selected user (a personal coupon).
For a group of users — The coupon is available only to customers included in a specific list. The list can be created manually or through automation. For example, you can give a discount only to students who have already purchased one product or have submitted their final assignment.
Comment — an internal note for you and your team. It helps you remember the purpose of the coupon and details of the campaign. Customers do not see this comment.
How to Create a Link with Automatic Coupon Application
All offers on the Kwiga platform have unique links that customers can use to navigate and make purchases. If an offer allows coupon usage, a field for entering the code will appear on the page, but it will be empty by default.
If you want the coupon to be applied automatically when users click a link, add it to the URL address. To do this, append ?coupon=coupon_name to the offer link.
For example, if the standard offer link looks like this:
https://sampleschool.kwiga.com/o/TnHG7QjEFukO
and the coupon code is SPRING, the link with the pre-applied coupon will be:
https://sampleschool.kwiga.com/o/TnHG7QjEFukO?coupon=SPRING

Users will see the checkout page with the coupon already activated when they click this link.
Important: The coupon code must be valid, and its usage must be allowed in the offer settings.
This feature simplifies the discount application process and increases conversion rates since customers do not need to enter the coupon manually—everything happens automatically.
Creating coupons in automations
Through automations, you can automatically create personal coupons when a specific event occurs. This allows you to build flexible motivational programs without manual work.
From the Courses menu, go to Process Automation. More details about automations can be found in a separate article
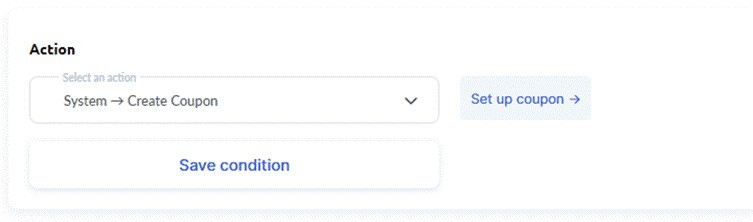
When setting up automation, you can add the Create Coupon action with the following parameters:
Coupon name – generate automatically or specify a custom format
Discount amount – percentage or fixed sum
Validity period – specify the coupon’s active duration
Contact association – the coupon is automatically created for the contact who triggered the event in the automation
Usage limit – restrict how many times the coupon can be used
Comment – add an internal note about the purpose of the coupon
Examples of use: You can set up automatic coupon creation for various scenarios — for example, give a bonus discount to students who have completed a course with 100% progress, or create personal coupons with a special offer for contacts who haven’t visited the platform for more than 30 days, to encourage them to return to learning, and so on.
Coupon List: Information About Coupons and Their Usage
The Coupons section lists all created coupons with key details about them. You can quickly check available discounts, usage conditions, and coupon status here.

For each coupon in the list, the following details are shown:
-
Coupon Code – A unique string of characters that customers enter when ordering.
-
Usage Statistics – Below the coupon code, you can see how many times it has been used (e.g., "Used: 1," meaning the coupon has been redeemed once at the viewing time).
-
Discount Amount – A percentage (e.g., 10%) or a fixed currency amount (e.g., 500 UAH).
- Assigned contact – shows whether the coupon is designated for a specific user. If the coupon is personal, the contact’s name is displayed.
-
Contact List – Indicates whether the coupon has restrictions based on user groups. If there are no restrictions, the coupon is available to all customers.
-
Total Uses Allowed – Specifies the number of times all customers can use the coupon. If there are no restrictions, it is labeled as "Unlimited."
-
Uses Per User – Specifies how often a customer can use the coupon.
-
Comment – an internal note about the coupon, visible only to administrators. Comments allow you to add internal notes to each coupon to help remember the purpose of its creation, record details of a marketing campaign, communicate among team members, or preserve context when working with a large number of coupons. Comments are visible only to administrators and are not displayed to customers.
-
Created By – The name of the user who created the coupon in the system.
-
Creation Date – The date the coupon was added to the platform.
-
Expiration Date – If the coupon has an expiration period, this field displays the end date. If there is no expiration, it is also indicated.
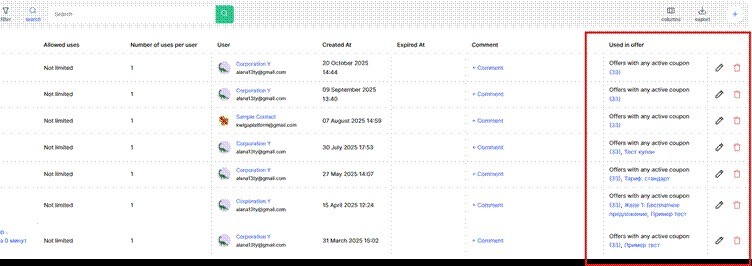
- Used in offer – shows where the coupon is applied and in which offers it’s used.
In the list of coupons, you can edit or delete coupons using the corresponding buttons. This allows you to quickly make changes or remove unnecessary codes.
When editing a coupon, all settings can be changed, except in cases where the coupon has already been used — in that case, some parameters may be locked to preserve the integrity of transaction data.
Didn't find the answer? Contact the support service via online chat or Telegram