Articles:
- How to delete a course
- Copyright protection of your content on Kwiga
- Public or trial lesson
- How to change the status of a lesson to draft and hide it from students
- Usage of checkpoints
- How to Add Practice to a Lesson
- How to create a task with mandatory review by an assistant
- How to create a task for different offers
- How to create a test with scores and automatic approval
- How to create and conduct a quiz among students on the course
- Contents of the lesson, all types of activities in the lesson
- Downloading video files
- How to add time codes to the video
- How to add button to the lesson
- Inserting iframe code
- Adding fractions, mathematical functions, formulas
- How to add text with spoiler to the lesson
- How to create a course on the Kwiga platform
- How to create a marathon
- How to add a cover to a course
- Course Program Display Options
- How to add a public face to a course
- How to add a team to a course
- Course preview with different access levels
- Block above lesson or module pages (top banner)
- Setting delays, schedule for opening and closing lessons (dripping content)
- Report on student progress on the course
- Analytics of assignments completion on the course
- Course sales report
- How to create a copy of the course
- How to copy lesson content
- Assistant’s Access to Practical Assignments
- Student Can't See the Course (Marathon, Closed Group)
- How to set up a test so that students see comments after completion
- Letter delivery: why letters don't arrive and how to fix it
- How to Customize the Appearance of a Course
- Manage activity visibility
Why a student might not see a course and how an expert can help resolve the issue and grant access.
In this article:
Sometimes, students report that they can't see a course, marathon, or closed group in their platform dashboard or that access appears restricted. This may appear as an empty homepage or the absence of the expected course in their available list. The reasons can vary—from account issues to the course's publication. This article explains the steps the expert should take to resolve the problem and how to guide the student quickly.
If a student says they can’t see a course, calmly go through each of the following possible issues: check whether the course is published, whether access was granted, whether the student’s email is correct, whether the access period has expired, and whether they are logging into the platform correctly. Often, these situations arise due to technical quirks or human error — for example, using the wrong email or opening a link in an in-app browser that doesn’t retain session data.
1. The Course is Not Published
Sometimes, a course is created but remains in Draft status. In this case, the student will not see the course in their dashboard even if access is granted.
To check the course status, go to Courses → Courses, open the relevant course, and go to the Settings tab.
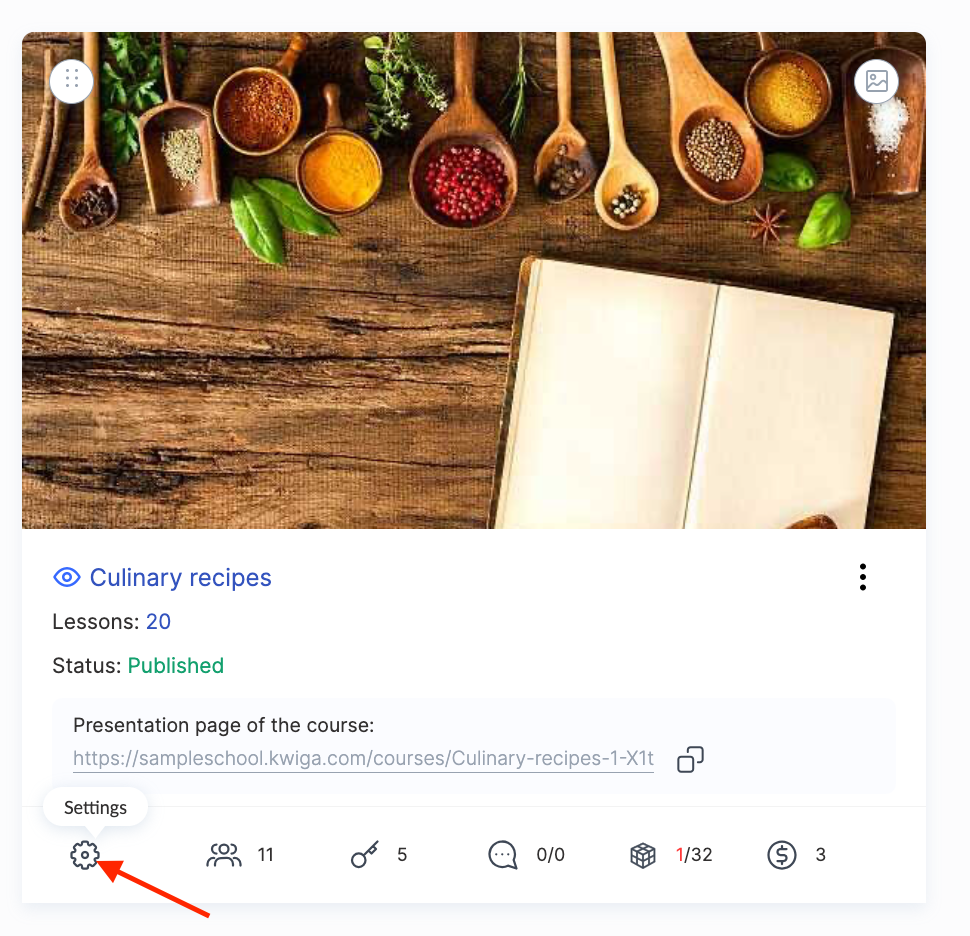
Check the Status field. If it says Draft, change it to Published and save the changes.
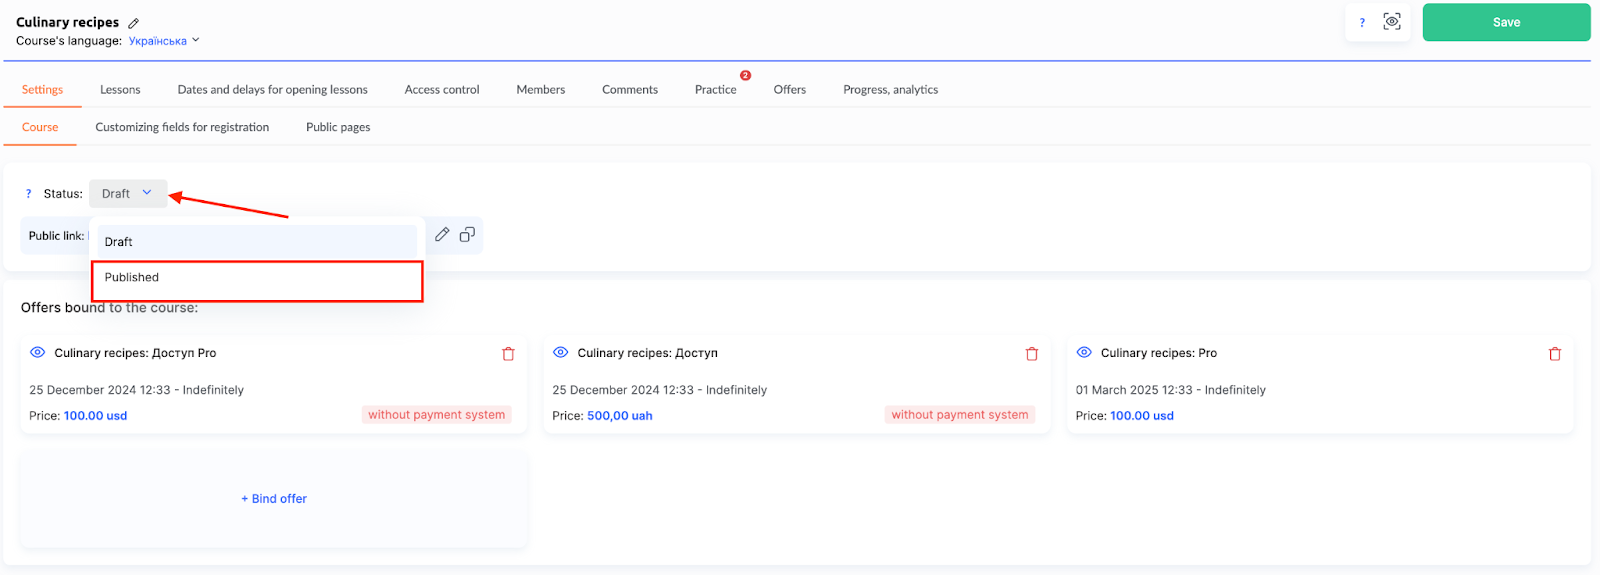
After publishing, the course will automatically become available to all participants granted access. They just need to refresh the page or log in again. This is a common oversight—the course was created but not published.
More on course creation and settings can be found in the relevant article.
2. Access Hasn’t Been Granted
Sometimes, a participant fills out a form or even receives an activation email (which is not the same as an access confirmation), but actual access to the product hasn’t been opened. The course won’t appear in their profile, even though their contact has been created.
To check whether access has been granted, go to CRM → Contacts, find the participant, and open the Products tab.
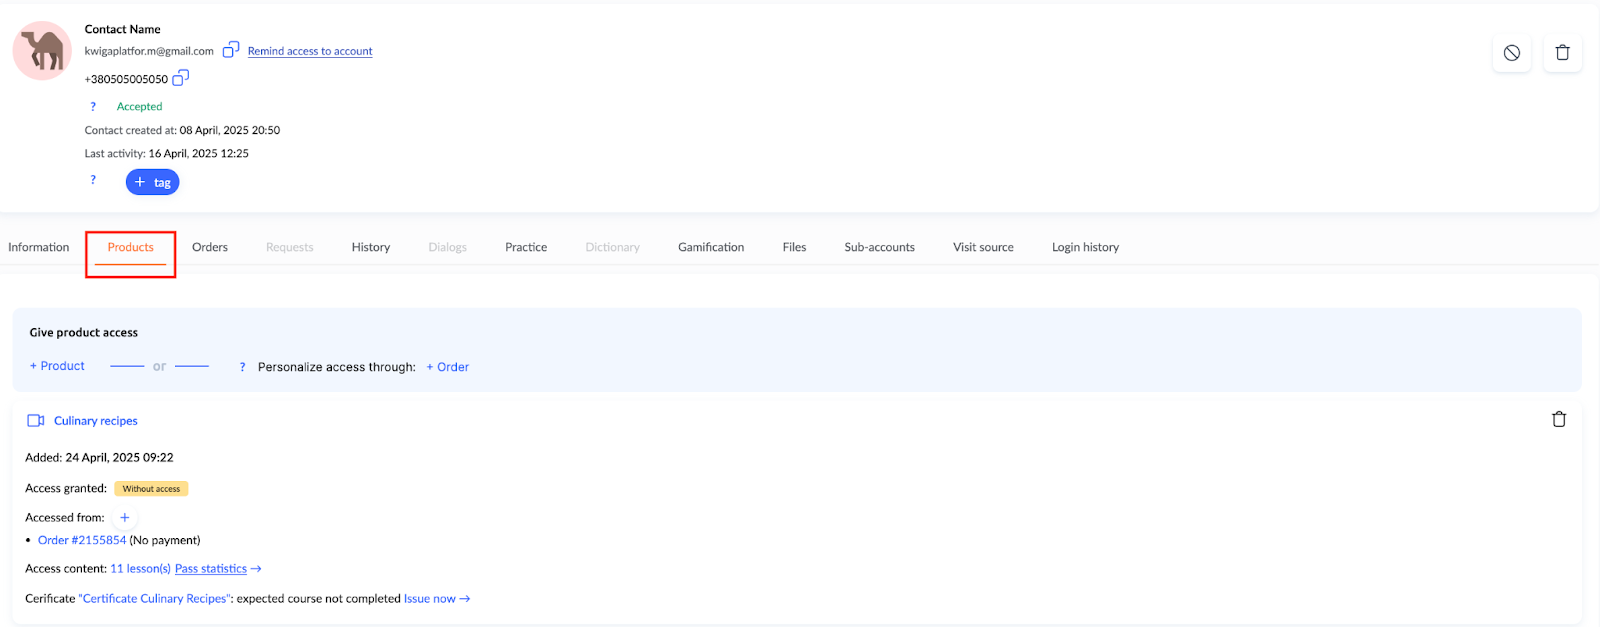
If the product is not listed, access will not be granted. If the product is listed but marked No Access (e.g., payment not completed), the participant won’t be able to view the course content.
In such cases, access can be granted manually — directly from the contact card. Instructions on how to do this are provided in the article: How to Give Access to the Course
Once access is granted, the course will immediately become available in the student’s profile.
3. The Student Logged In with the Wrong Email
Sometimes, a course may not be visible because the participant logged in with a different email than the one they were granted access to. This can happen if they accidentally create a second account, especially if they have multiple email addresses. The email address is the login on the platform.
To check which email they are currently logged in with, the participant must click on the profile avatar in the top right corner and look at the email address. We recommend asking for a screenshot of this part of their account so we can compare the email with the one listed in the CRM.
If the emails differ, the participant should log out of the current account by clicking on the avatar and selecting Exit.
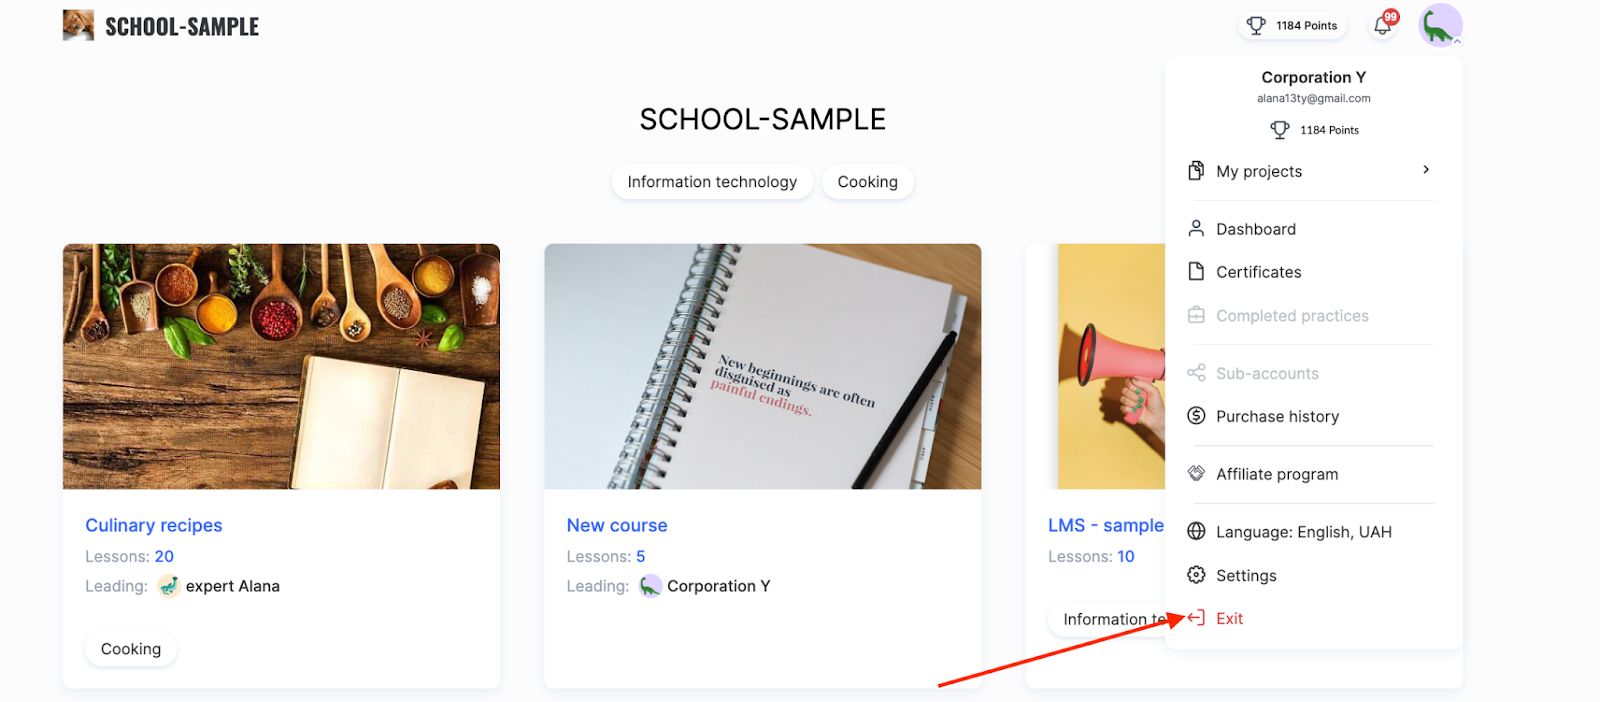
Then, they should log in again using the correct email (the one granted access to the product).
If the participant accidentally entered the wrong email during registration, guidance on that can be found in a separate article.
4. Authorization Error via Browser from the Email Link
Sometimes, the learner accesses the course by clicking a link in an email app (e.g., Gmail) or social media (e.g., Telegram, Instagram). In this case, the page opens not in a regular browser but in an embedded browser — a special viewer inside the app. It looks like a regular browser but works differently — it doesn’t save login data. As a result, every page that opens is treated as a new login attempt.
If the learner clicks the link from the email, enters the code, and returns to the email app, the system sends a new code. As a result, none of the codes work. This isn’t an error — it’s a specific behavior of the in-app browser, which restarts the process every time.
In such cases, it's best to open the platform in a regular browser — Chrome, Firefox, Safari, or any other installed on the device. Simply copy the link from the email and paste it into the browser’s address bar. Alternatively, if the page has already opened in the embedded viewer, choose the option Open in browser — this is usually found in the menu (three dots or an arrow icon). This dramatically simplifies the login process and allows authorization to be completed without extra steps.
If the learner can’t log in or doesn’t remember their password, the easiest way is to use the Send access reminder function in the contact’s profile card. This sends the learner an email with a temporary personalized link to log into their account.
The article "How to access a student's account" provides more details on how students can log into their accounts.
5. Access Has Expired or the Course Is Inactive
If a student previously had access but can't view the materials, the access expiration date is worth checking. In many courses and marathons, access is granted for a limited period — for example, 30 days after payment. Once this period ends, the course does not disappear from the profile, but the materials become unavailable for viewing.
Because of this, students often get confused: the course seems to be there, but nothing opens. This is normal — the platform keeps the course in the student’s profile under the Completed menu but restricts access to content according to the set conditions.
Open the participant’s card in the CRM → Products tab to check access availability. If the product is listed but the content access period has expired — that’s the reason the course isn’t opening.
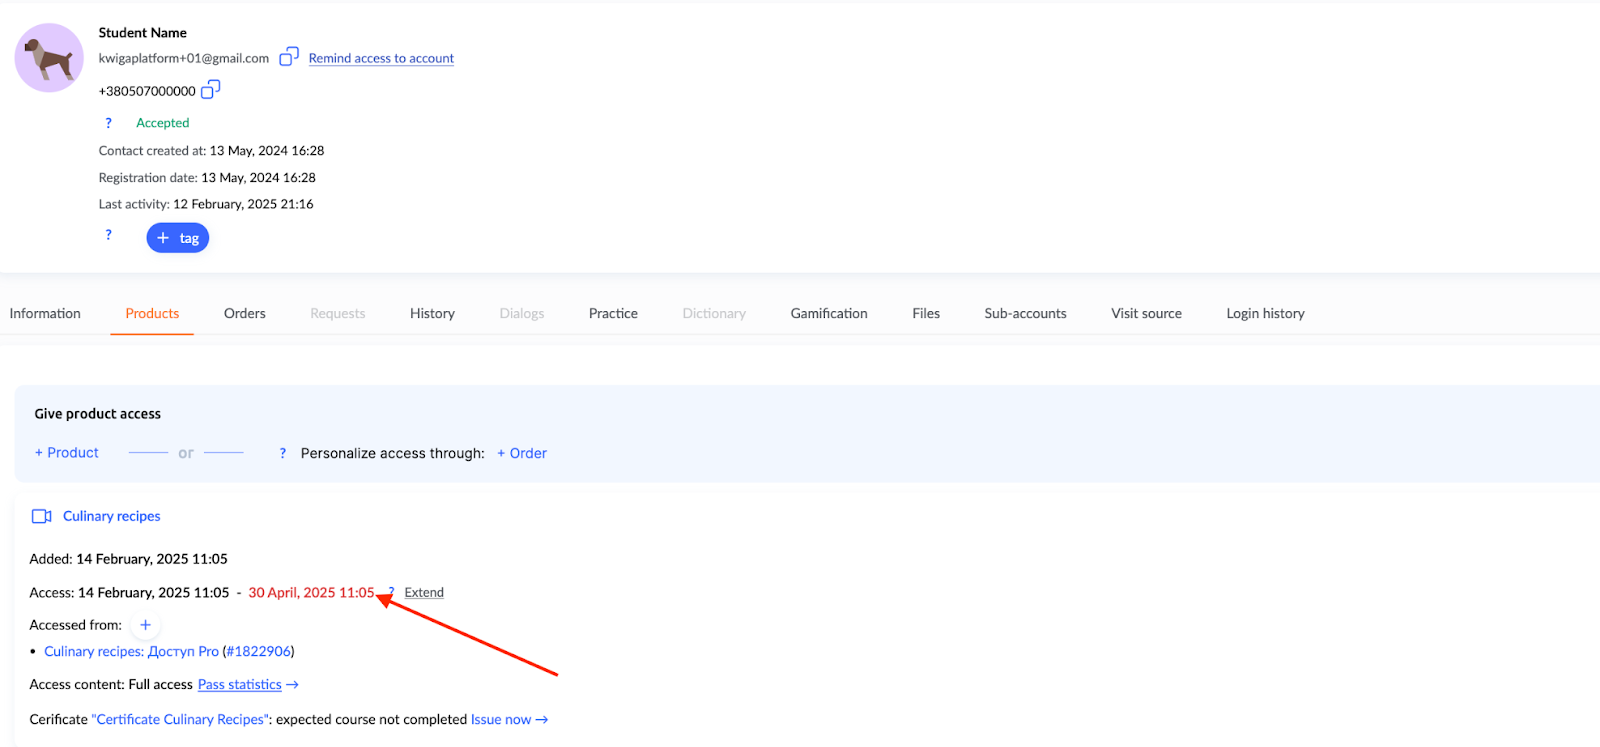
Access can be manually restored if necessary by adjusting the dates or reopening the product. Only after making such changes will the materials become available to the student again.
6. The Student Doesn’t Know Where to Log In
Sometimes, the student doesn’t understand where the course is located or how to log into the platform. They may not see the email with instructions, delete it by accident, or not know what to do after payment. In such cases, clarifying whether the student has tried accessing the platform is helpful. If not — you can provide a short guide:
Check if the activation/access email was received. Sometimes, it ends up in the Promotions or Spam folders.
Note: If there’s any doubt, it’s best to resend the course or school link to the student directly or using the Access Reminder function from the contact card in the CRM.
Next, the student needs to go to the school page (e.g., https://sampleschool.kwiga.com) or to kwiga.com, click Enter at the top, and enter their email address.
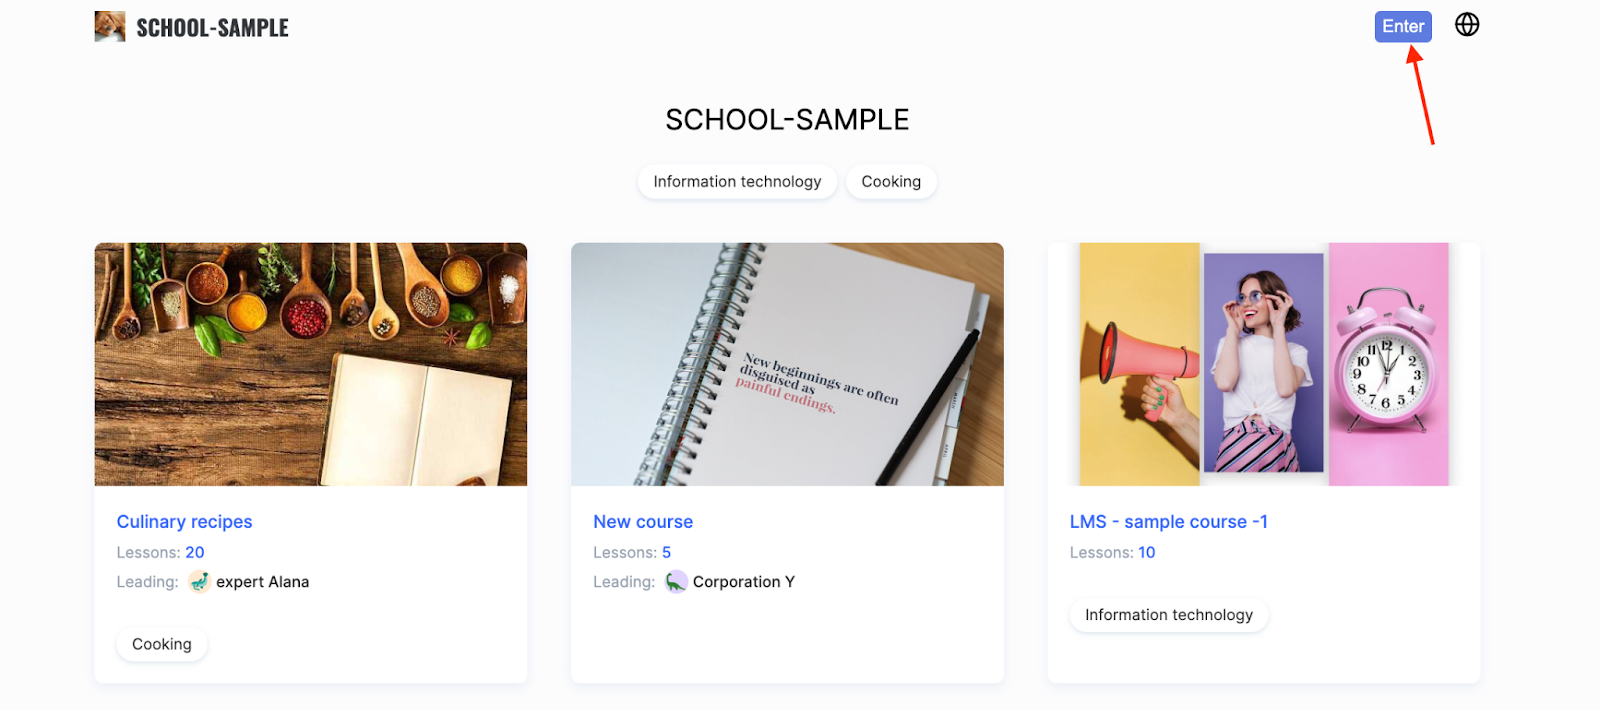
If this is the user’s first time logging in, the platform will email them a confirmation code, which they must enter to access their account.
We recommend always clarifying the details: ask the student to send screenshots, check their email, or resend the access email or a personal login link. If in doubt, refer to the platform’s general instructions or contact support.
Also, remember that thoroughly checking all steps helps avoid such situations in the future and improves student satisfaction with the service.
Usually, the issue is resolved quickly once all details are clarified, and reopening access or checking the email takes only a few minutes.
Didn't find the answer? Contact the support service via online chat or Telegram