
Articles:
- Orders: creating and editing orders.
- How do I add an individual payment link to a student
- Transactions
- How to set up sending your own email after purchase
- Integration with the Sendpulse chatbot
- How to integrate a payment system on Kwiga
- How to set a specific language for an offer page
- Important Project Settings
- How to grant access to students if the sales were not made on Kwiga
- Payment without authorization
- How to create a new stream with your own schedule
- How to give access to one student
- How to change access for one student
- How to set up demo access to a course, open house day at the school
- Automation: Follow-up email sequences (unpaid orders and applications)
- Setting up subscriptions (recurring payments)
- Promotional offer
- Credits and installments, payment in parts
- How to launch course registration with prepayment
- Discount coupons and possible settings
- How to create cross-sell offers in Kwiga
- How to start selling on Kwiga: creating a price plan
- Creating multiple pricing plans
- Selling consultations and one-on-one sessions
- How to Change a Student's Plan (Additional Payment on Kwiga)
- How to sell (give access to) parts of the course
- How to implement access renewal sales
- Selling through a registration form on a third-party site
- Selling through a mini-landing page created on Kwiga
- How to add a video to a page (mini-landing, course page)
- How to create a link with an applied coupon
- Offers and Payments on Kwiga: How It Works
- Repeat Sales: Setting Conditions and Sending a Coupon Based on Purchase Count
- Setting up notifications in a Telegram channel
- Sending Emails with Promo Codes (Unpaid Orders)
- Course Store: Settings and Capabilities
- Setting Up the Public Offer Page
- Organization of CPD on Kwiga: step-by-step guide
- How to set up a thank-you page after payment
- Set up access to lessons, sections, and modules
- How to change the contact in an order
- Accept payments through external WayForPay buttons
Learn how to accept payments through WayForPay payment buttons in Kwiga, with automatic order creation and access to offers.
In Kwiga, you can accept payments through payment buttons created directly in your WayForPay account. After a successful payment, the platform automatically registers the order and gives the buyer access to the corresponding offer.
To use external buttons, you first need to connect and set up WayForPay in Kwiga, as described in the separate article on connecting payment systems. You can then create external buttons and link them to offers.
How to connect an external payment button
Step 1. Create a button in Kwiga
- Go to Settings → Payment systems and open the connected WayForPay account. How to connect the WayForPay payment system is described in this article
-
Find the "External payment buttons".
-
Click "Add button".
-
Enter a name for the button and select the offer the buyer should access after payment.
-
Save the settings.
After you create the button, Kwiga will generate a unique Service URL. Copy it — you'll need it to set up the payment button in WayForPay.
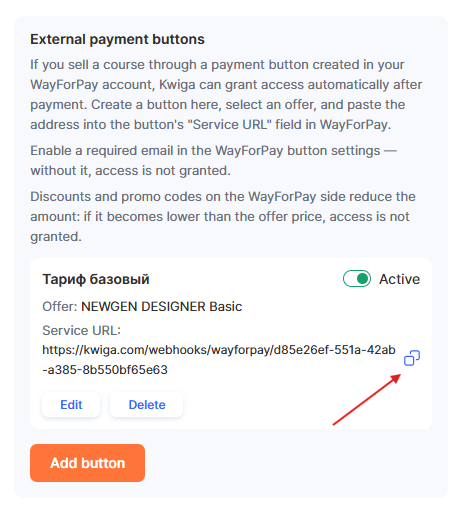
You can create as many external buttons as you need. Each button has its own offer and Service URL.
Step 2. Set up the button in WayForPay
-
Sign in to your WayForPay account.
-
Create a new payment button or open the settings for an existing one (see the Wayforpay).
-
In the Service URL field, enter the URL generated in Kwiga for the corresponding button (this field is highlighted in yellow in the screenshot below)
-
Save the settings.
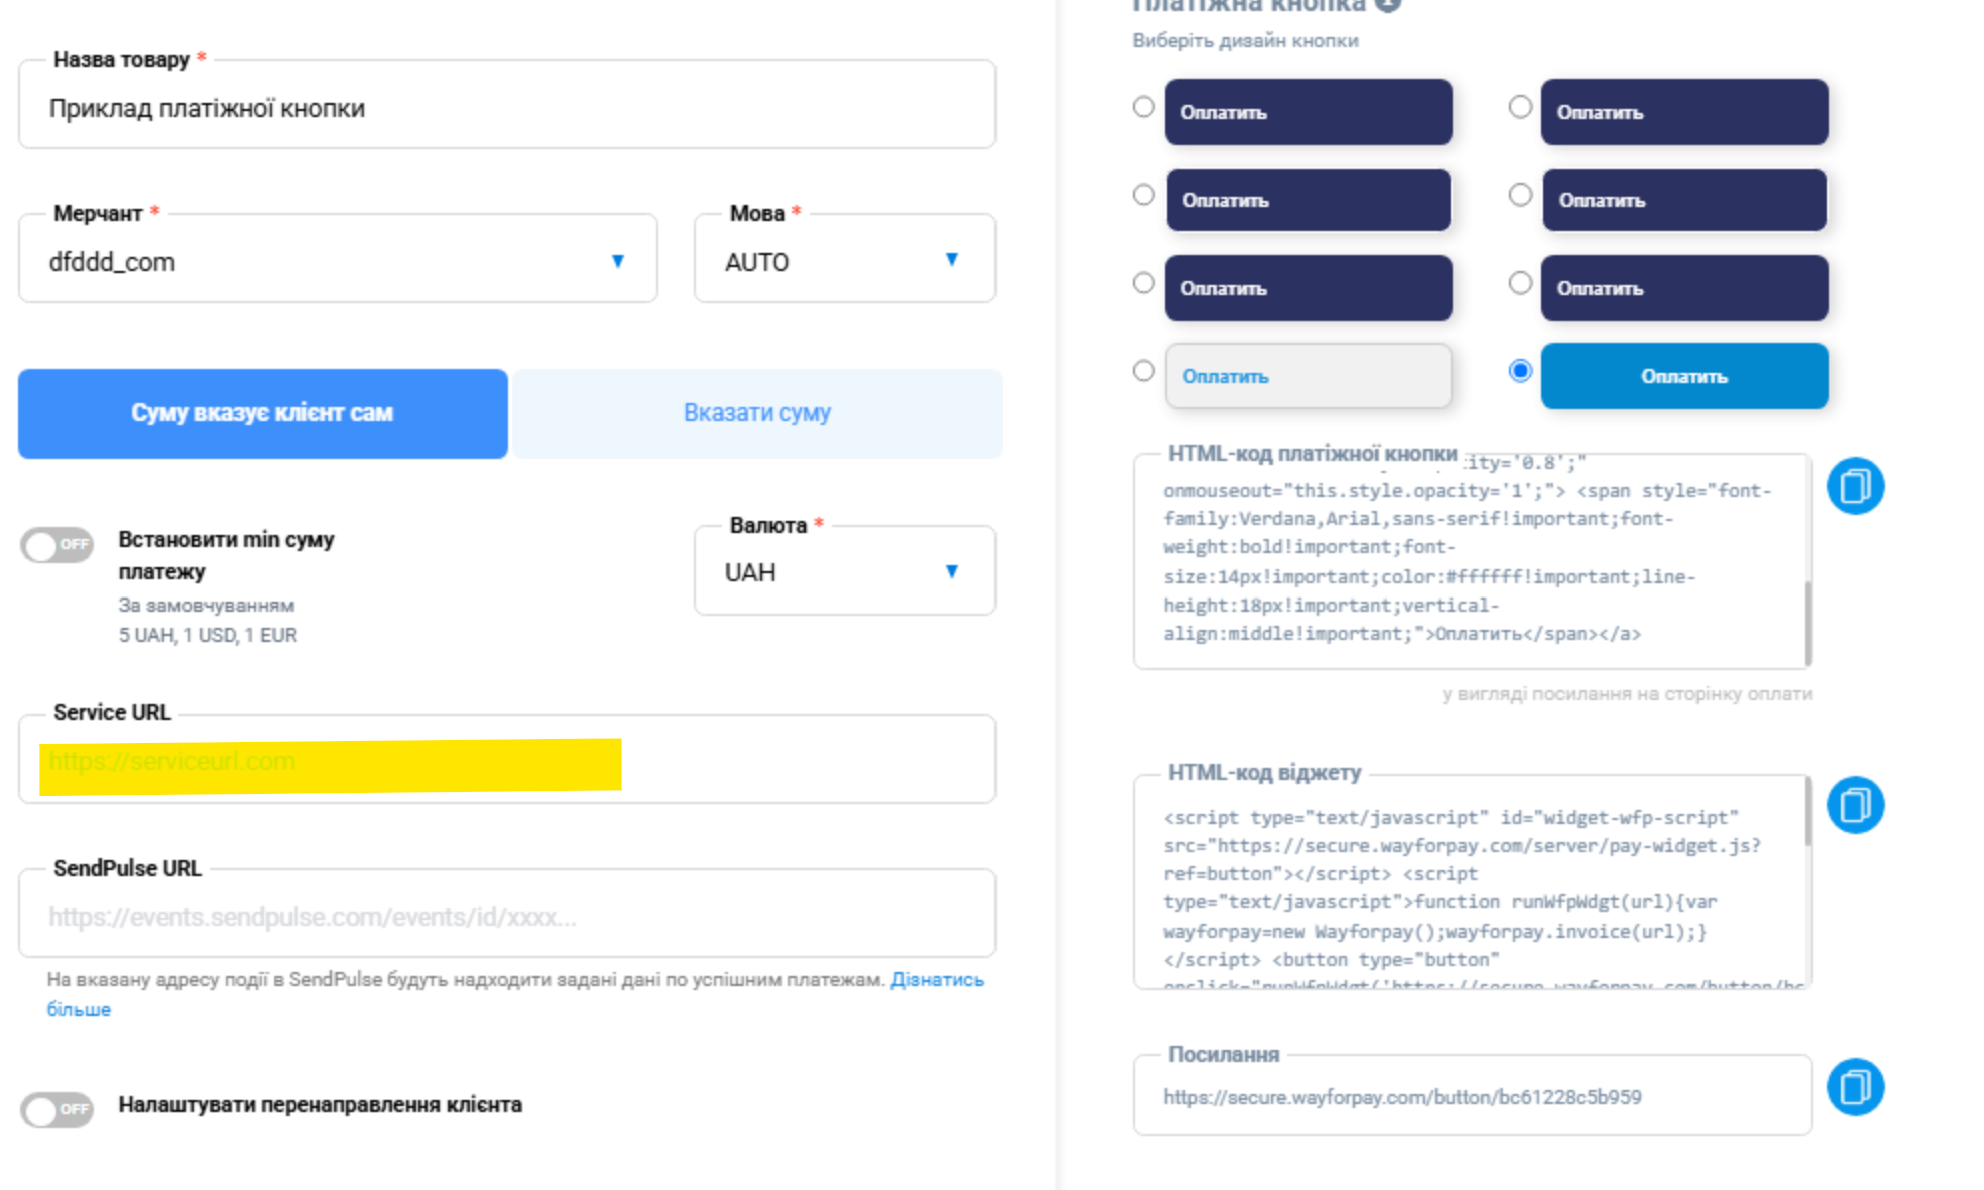
Important: Service URL must be set separately for each WayForPay payment button. You don't need to change the store's general Service URL .
Step 3. Check the settings
Make sure that:
- the WayForPay account is connected and active in Kwiga;
- the button created in Kwiga is active;
- the correct offer is selected for the button;
- the corresponding WayForPay payment button has its Service URL
Each external WayForPay button must be linked to a separate button created in Kwiga.
How access is granted
After a successful payment, WayForPay sends a notification to the Service URL specified in the payment button settings.
Kwiga identifies the button by the address that received the notification and processes the payment for the linked offer.
When processing the notification, the platform checks the payment signature, amount, and currency. If the details match the offer price, Kwiga records the paid order, grants the buyer access, and sends a welcome email.
Repeated notifications for the same payment do not grant access again.
Please note: WayForPay does not include product information in the notification. Kwiga therefore uses the Service URL that received the notification to determine which offer to grant the buyer access to. Each button must have its own address and be linked to a specific offer.
If payment went through but access was not granted
If WayForPay accepts a payment but the amount is less than the offer price or the payment currency does not match the offer currency, Kwiga does not grant access automatically.
In this case, the school owner receives a notification about the payment issue and can check the payment and resolve it with the buyer.
To avoid this, make sure the amount and currency set in WayForPay match the price of the selected offer in Kwiga.
Didn't find the answer? Contact the support service via online chat or Telegram